![[Datsun 1200 encyclopedia]](/wiki/upload/wiki.png)
| Revision as of 06:44, 14 November 2010 ddgonzal (Talk | contribs) <- Previous diff |
Revision as of 07:12, 14 November 2010 ddgonzal (Talk | contribs) Next diff -> |
||
| Line 8: | Line 8: | ||
| # Remove insider rear-view mrror | # Remove insider rear-view mrror | ||
| # Remove outside windshield [[Wipers|wiper arms]] | # Remove outside windshield [[Wipers|wiper arms]] | ||
| + | # (optional) Remove radio antenna | ||
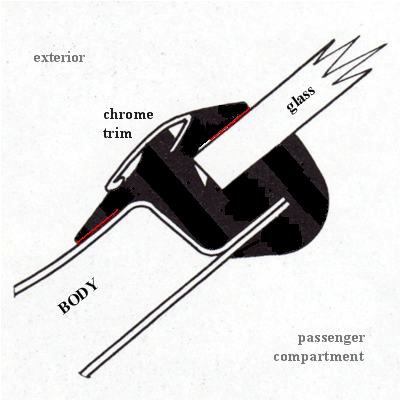
| # Remove the exterior windshield trim. On models without chrome trim, remove the rubber insert from the rubber seal | # Remove the exterior windshield trim. On models without chrome trim, remove the rubber insert from the rubber seal | ||
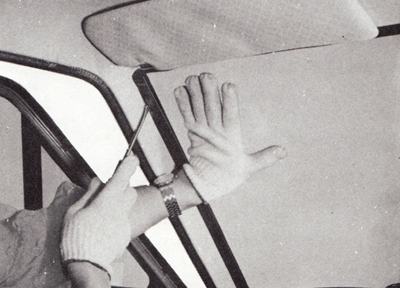
| - | # From inside the cabin, loosen the lip of the glass rubber seal from the body. With palm of hand, apply pressure to glass near the edge. At the same time, use a blunt putty knife or other suitable tool and carefully assist the rubber lip over the metal flange | + | # From inside the cabin, loosen the lip of the glass rubber seal from the body. |
| - | # After seal lip is free from the flange, with aid of help, carefully lift windshield from body opening and place it on a protected bench | + | # With palm of hand, apply light pressure to glass near the edge. At the same time, use a blunt putty knife or other suitable tool and carefully assist the rubber lip over the metal flange. Work from upper corners down to the bottom and across the top |
| + | # After top and side seal lip is free from the flange, with aid of assistant, carefully lift windshield from body opening sufficiently to permit removal of seal from bottom flange. Carefully pry bottom seal lip free | ||
| + | # Remove glass and place it on a protected bench | ||
| = Installation = | = Installation = | ||
| Line 20: | Line 23: | ||
| Check Glass to Flange Fit | Check Glass to Flange Fit | ||
| CAUTION: Do not let glass edge knock | CAUTION: Do not let glass edge knock | ||
| - | against the flange | + | against the flange. Edge chips may |
| + | lead to future breaks. | ||
| # Remove seal from glass or body if already fitted. We need to check the bare glass | # Remove seal from glass or body if already fitted. We need to check the bare glass | ||
| # With the aid of an assistant, carefully position glass in body opening. Be careful not to chip the glass edge | # With the aid of an assistant, carefully position glass in body opening. Be careful not to chip the glass edge | ||
| Line 36: | Line 40: | ||
| # Check the rubber seal for any irregularities, especially if the seal is new | # Check the rubber seal for any irregularities, especially if the seal is new | ||
| # Fit rubber seal to glass | # Fit rubber seal to glass | ||
| - | # Insert a strong, thin, cord in the groove of the rubber seal where the body flange will go. Tie each loose end in a knot. Tape the loose ends on the inside of the glass at bottom center of glass | + | # Insert a strong, thin, cord in the groove of the rubber seal where the body flange will go. Fit cord so ends are at bottom center of glass. Tie each loose end in a knot. Tape the loose ends on the inside of the glass at bottom center of glass |
| # With aid of assistant, carefully position and center windshield/rubber assembly in body opening | # With aid of assistant, carefully position and center windshield/rubber assembly in body opening | ||
| # With the glass and seal properly position in opening, slowly pull the ends of the cord, starting at lower center of windshield to seat the lip of the seal over the metal flange. The cord should be pulled first across bottom of windshield, then up each side and finally across the windshield top | # With the glass and seal properly position in opening, slowly pull the ends of the cord, starting at lower center of windshield to seat the lip of the seal over the metal flange. The cord should be pulled first across bottom of windshield, then up each side and finally across the windshield top | ||
| + | # Carefully tap around glass to assist in seating seal on flange. Never tap or hammer at glass to move or position it | ||
| # Using a pressure type applicator, seal the inner and outer lips of the rubber seal to the glass with an approved weatherstrip adhesive. Seal completely around. | # Using a pressure type applicator, seal the inner and outer lips of the rubber seal to the glass with an approved weatherstrip adhesive. Seal completely around. | ||
| # Reinstall the exterior chrome windshield trim | # Reinstall the exterior chrome windshield trim | ||
| # Reinstall all previously removed parts (mirror, wipers arms) and remove protective coverings | # Reinstall all previously removed parts (mirror, wipers arms) and remove protective coverings | ||
| + | |||
| + | [[Category:Body]] | ||
Revision as of 07:12, 14 November 2010
The Datsun 1200 windshield is easily replaced. It just requires patience. Do not force the glass, use light pressure. It takes time to work it. Use the old rubber seal if possible. If you have a new rubber seal, be careful to warm it up in a hot box or boiling water before installation. A soft seal is the key to a succussful installation.
Removal
- Place a protective cover over the hood, front fenders, instrument panel and front seats (in case the glass breaks)
- Remove insider rear-view mrror
- Remove outside windshield wiper arms
- (optional) Remove radio antenna
- Remove the exterior windshield trim. On models without chrome trim, remove the rubber insert from the rubber seal
- From inside the cabin, loosen the lip of the glass rubber seal from the body.
- With palm of hand, apply light pressure to glass near the edge. At the same time, use a blunt putty knife or other suitable tool and carefully assist the rubber lip over the metal flange. Work from upper corners down to the bottom and across the top
- After top and side seal lip is free from the flange, with aid of assistant, carefully lift windshield from body opening sufficiently to permit removal of seal from bottom flange. Carefully pry bottom seal lip free
- Remove glass and place it on a protected bench
Installation
Inspect the body opening
- Clean off any old sealer from the body opening and from the rubber seal
- Inspect entire body opening flange for any irregularities, straightness or rust
Check Glass to Flange Fit
CAUTION: Do not let glass edge knock
against the flange. Edge chips may
lead to future breaks.
- Remove seal from glass or body if already fitted. We need to check the bare glass
- With the aid of an assistant, carefully position glass in body opening. Be careful not to chip the glass edge
- With windshield glass supported and centered in body opening, check relationship of glass to body opening around entire perimeter of glass
- The inside surface of the glass should completely contact the metal flange
- The curvature of the glass should be uniform to that of the body opening
- Mark any sections of body to be reformed. Remove glass, and reform opening as required
Install Glass
NOTE: Do not position glass by tapping
or hammering at any time
- Clean out old sealer (if any) on rubber seal, and clean seal thoroughly
- Check the rubber seal for any irregularities, especially if the seal is new
- Fit rubber seal to glass
- Insert a strong, thin, cord in the groove of the rubber seal where the body flange will go. Fit cord so ends are at bottom center of glass. Tie each loose end in a knot. Tape the loose ends on the inside of the glass at bottom center of glass
- With aid of assistant, carefully position and center windshield/rubber assembly in body opening
- With the glass and seal properly position in opening, slowly pull the ends of the cord, starting at lower center of windshield to seat the lip of the seal over the metal flange. The cord should be pulled first across bottom of windshield, then up each side and finally across the windshield top
- Carefully tap around glass to assist in seating seal on flange. Never tap or hammer at glass to move or position it
- Using a pressure type applicator, seal the inner and outer lips of the rubber seal to the glass with an approved weatherstrip adhesive. Seal completely around.
- Reinstall the exterior chrome windshield trim
- Reinstall all previously removed parts (mirror, wipers arms) and remove protective coverings