![[Datsun 1200 encyclopedia]](/wiki/upload/wiki.png)
Rebuilding a stock Hitachi is not too difficult if you are careful and patient, so why pay somebody to do it? OK ... if you are not patient, hire a good expert to do it for you. Carburetors are complicated, precision analog air/fuel devices. Because it is so easy to make the carburetor worse, the last thing you want to do is disassemble the carburetor.
Contents |
Overview
Rebuilding doesn't usually cost much. You may not even need new gaskets, even 20-year old ones are often resuable. Or you can get a $20 "rebuild kit", but I think that's not usually worth it. The most you'd need is the top (float chamber) gasket, and that only if it tears.
Because it is so easy to make the carburetor worse, the last thing you want to do is dissasemble the carburetor. So first See Carburetor Adjustment. Only proceed to this dissasembly if the carburetor is known bad. For example: rusted, sitting in mud bucket, or all other engine factors are known good but if it still runs poorly:
If the carburetor is missing parts or shows signs of being poorly assembled (stripped screws, etc) it may need a partial disassembly for inspection.
A repair manual will be useful here.
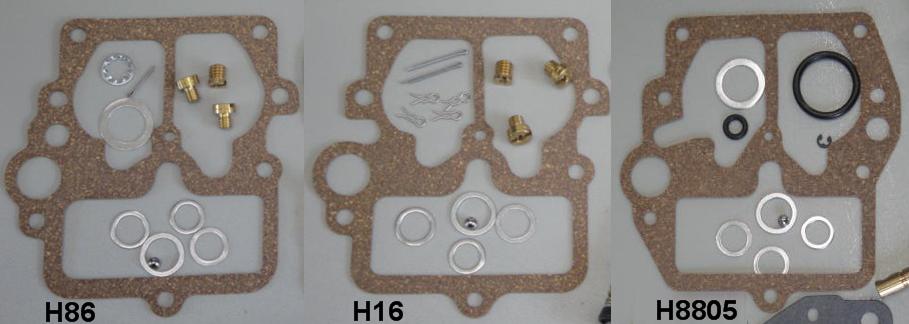
Gasket Set
See: Carburetor Parts#Gaskets
Quick Rebuild Method
ddgonzal: I've taken to just doing quick clean and inspect. You don't even necessarily need to take the carb off the manifold (which makes it much easier, there are no throttle linkage and wires to disconnect, and removing the carb is harder than fitting a new kit). The keys are to success are:
Be careful taking the top off, note where the parts go
Be careful of parts "flying off" or "falling out"
- Remove the top of the carburetor. See Carburetor Top Removal
- Rinse the insides off with carb cleaner. Suck up the dirty fuel using a suction bulb (I use a Turkey Roast baster)
- Spray carb cleaner through every passageway in the body to make sure they are clear
- main jets
- air bleeds
- Power valve passage
- Accelerator Pump passage
- Unscrew the idle mixture screw and spry cleaner through that passage. It should come out inside the bore near the throttle blade. Screw it back in the same number of turns (two turns is a good starting point if you're not sure)
- Don't take the throttle plate off the carb. There is almost never a need for that
- Adjust the float level. See Float Level Adjustment
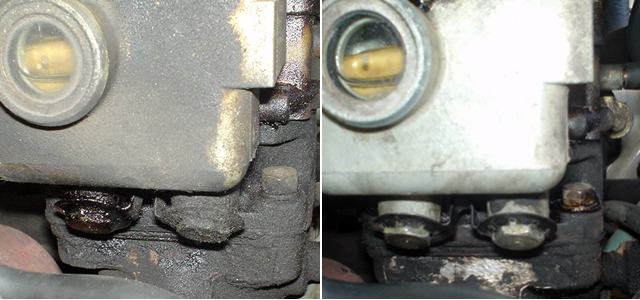
- Test the power valve by using a bit of hose to suck on the right passage.
- Power Valve test
- Push the plunger down with your finger.
- Suck on the passage. Let go of the plunger.
- The plunger should stay down while suction is applied.
- If this is busted, it can cause black smoke and lack of power at full throttle.
- Newer models: Remove fuel inlet screen in the top cover and clean
- Newer models: Test all carburetor vacuum parts and replace as necessary
- Auto choke pull-off
- Throttle Opener
- Inspect throttle shaft for wear. There should be zero detectable axial play.
Put the top back on (see Carburetor Top Removal). Just tighten the bolts enough to compress the lock washers. No more.
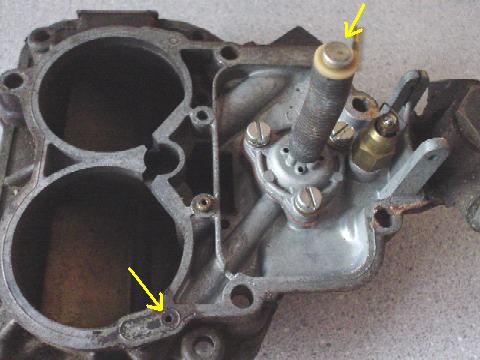
Hitachi Power Valve Plunger (the suction hole is just to the lfe of the valve, in the top casting

Weber 32/36 power valve
Full Rebuild
A full rebuild is called for if the carburetor is corroded/oxidized. It includes all the items in the Quick Rebuild, plus:
- Hot tanking all metal parts to remove corrosion
- New throttle body-to-main body gasket. These rarely go bad, but the screws can sometimes get loose.
- Repair throttle shaft play (fit bushings)
- New Carburetor-to-insulator-to-manifold gasket
- New fuel inlet valve. These rarely go bad on the Hitachi carburetor
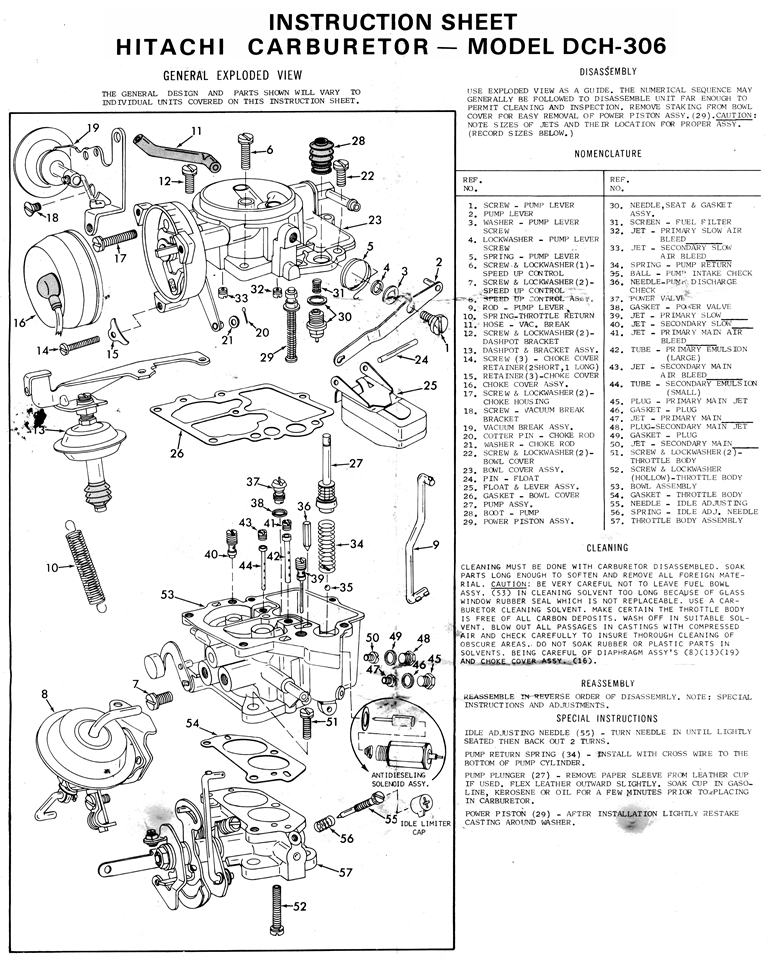
Disassembly
Use exploded view as a guide. The numerical sequence may generally be followed to disassemble unit far enough to permit cleaning and inspection.
- Remove staking from bowl cover for easy removal of power piston assy. (22).
- Secondary fuel valve plunger assy. (31) is pressed in carefully. Pry out.
CAUTION: Note sizes of jets and their location for proper assy. (record sizes as you remove them.)
Cleaning
Cleaning must be done with carburetor disassembled.
- Soak parts long enough to soften and remove all foreign material. # Use a carburetor cleaning solvent.
- Make certain the throttle body is free of all carbon deposits.
- Wash off in suitable solvent.
- Blow out all passages in castings with compressed air and check carefully to insure thorough cleaning of obscure areas.
CAUTION:
- be very careful not to leave fuel bowl assy. (56) in cleaning solvent to long because of the glass window rubber seal which is not replaceable.
- Do not soak assemblys with attached plastic parts for a long period of time.
- Do not soak any parts containing rubber or diaphragm and solenoid assemblys.
Reassembly
Reassemble in reverse order of disassembly. Note special instructions and follow numerical outline in making adjustments necessary for carburetor being serviced.
Special Instructions
- Idle adjusting needle (59) - turn needle in until lightly seated then back out 2 turns. (do not install idle limiter caps at this time.)
- Baffle washer (54)- when installing, baffle blocks primary side of passage.
- Secondary fuel valve plunger assy. (31) - when installing aline opening in sleeve with passage in fuel bowl.
- Pump return spring (27) - install with cross wire to the bottom of pump cylinder.
- Power piston (22) - after installing lightly restake casting around washer.
- Pump plunger (20) - before installing flex leather outward slightly. Soak cup in gasoline, kerosene or oil for a few minutes prior to placing in carburetor.
- Pump lever (3) - hook pump rod in inner hole of lever.
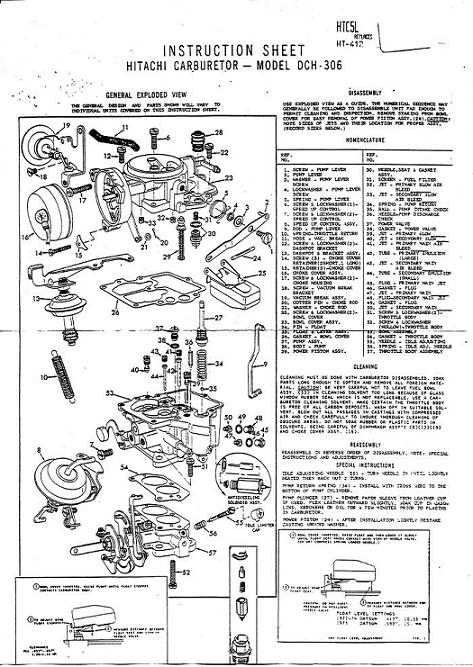
Instruction Sheet
Breakdown
DCG-306 (manual choke)
DGH-306 (automatic choke)
Parts Breakdown
Exploded view: Parts list & breakdown sheet
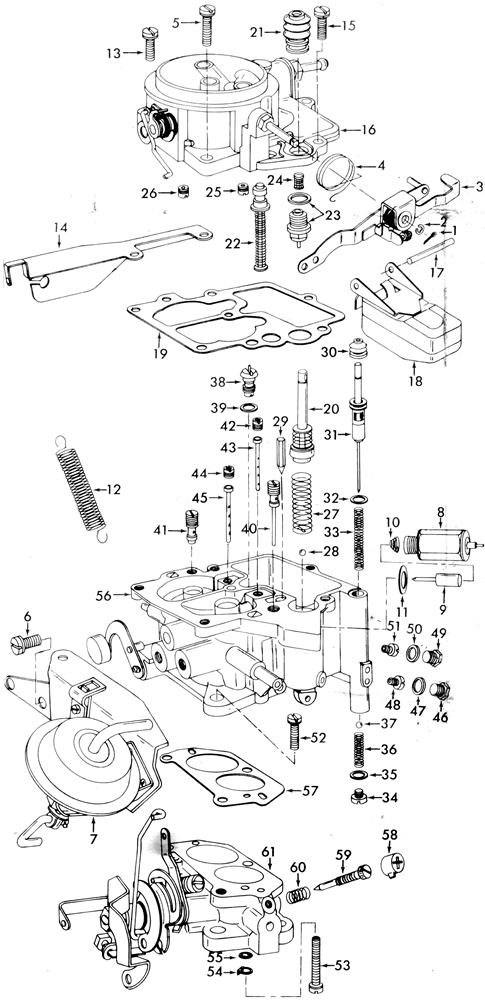
Numbers correspond to nomenclature below.
Diagram is of manual choke model circa 1973. Other models are slightly different.
1. COTTER PIN - PUMP LEVER ASSY. 2. E CLIP - PUMP LEVER ASSY. 3. LEVER ASSY. - PUMP 4. SPRING- PUMP LEVER 5. SCREW & LOCKWASHER (1) -SERVO DIAPHRAGM ASSY. 6. SCREW & LOCKWASHER (2) -SERVO DIAPHRAGM ASSY. 7. SERVO DIAPHRAGM ASSY. 8. SOLENOID ASSY.- ANTIDIESELING 9. PLUNGER - SOLENOID 10. SPRING - SOLENOID PLUNGER 11. GASKET -SOLENOID ASSY. 12. SPRING - THROTTLE RETURN 13. SCREW & LOCKWASHER (2) -BOWL COVER 14. BRACKET -THROTTLE CABLE 15. SCREW & LOCKWASHER (2) - BOWL COVER 16. BOWL COVER ASSY. 17. PIN - FLOAT 18. FLOAT & LEVER ASSY. 19. GASKET - BOWL COVER 20. PUMP ASSY. 21. BOOT - PUMP 22. POWER PISTON ASSY. 23. NEEDLE, SEAT & GASKET ASSY. 24. SCREEN - FUEL FILTER 25. JET - PRIMARY SLOW AIR BLEED._____ 26. JET- SECONDARY SLOW AIR BLEED_____ 27. SPRING - PUMP RETURN 28. BALL - PUMP INTAKE CHECK (SMALL) 29. NEEDLE - PUMP DISC. CHECK 30. BOOT - SECONDARY FUEL VALVE PLUNGER 31. PLUNGER ASSY. - SECONDARY FUEL VALVE 32. GASKET - PLUNGER ASSY. 33. SPRING - PLUNGER RETURN 34. PLUG - SECONDARY FUEL VALVE 35. GASKET - PLUG 36. SPRING - SECONDARY VALVE BALL 37. BALL - SECONDARY FUEL VALVE 38. POWER VALVE 39. GASKET - POWER VALVE 40. JET - PRIMARY SLOW 41. JET -SECONDARY SLOW 42. JET - PRIMARY MAIN AIR BLEED_ 43. TUBE - PRIMARY EMULSION (LARGE) 44. JET - SECONDARY MAIN AIR BLEED 45. TUBE - SECONDARY EMULSION (SMALL) 46. PLUG PRIMARY MAIN JET 47. GASKET - PLUG 48. JET - PRIMARY MAIN JET 49. PLUG - SECONDARY MAIN JET 50. GASKET - PLUG 51. JET - SECONDARY MAIN JET 52. SCREW & LOCKWASHER (2) - THROTTLE BODY 53. SCREW (HOLLOW) - THROTTLE BODY 54. BAFFLE WASHER - HOLLOW SCREW 55. LOCKWASHER - HOLLOW SCREW 56. BOWL ASSY. 57. GASKET - THROTTLE BODY 58. CAP - IDLE LIMITER (WHEN USED) 59. NEEDLE - IDLE ADJUSTING 60. SPRING - IDLE ADJ. NEEDLE 61. THROTTLE BODY ASSY.