Quote:
Lets start with how the water gets in
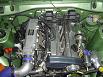
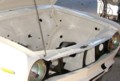
It comes in though the vents behind the bonnet then runs down to a hole that is there to let it out you will only see this hole when a section is removed from above the stiffening at the top of the inner guard block the factory hole and leave the section you cut out open.this then allows the water to run straight onto the road instead of down though the rust holes that have formed (in behind the stiffening section) that you can not see t.These rust hole allow the water to run down inside the panel where the side kick panels are it then leaks down to where the rust is in the above photo.
Hope this all makes sence works for me
Ok the first bit doesn't completely make sense. But I see what you are getting at. This is happening to me!
Comes in the back of the driver side kick panel...
How hard is it to remove the guard? I haven't actually done it on my car yet...
any hidden bolts to look out for?
I might give this a go, next time I get a day off...
 Members
 Demojob