|
|
|
|
Re: racetech's 1200 SR20VE Project |
|
Home away from home  
Joined:
2009/4/16 10:37
From Cape Town, South Africa
Group:
Registered Users
|
February 2013 Damn, Upgrades this soonSeeing that last month was a particular happy and also a very dark period for the project, at least things are looking better as I type this. Here is my list of issues/improvements to fix or at least diagnose and understand it better. In the next few updates, I will work thru the list: Motor: fix combustion chambers, reassemble Fuel Lines: new 10mm OD x 8.5mm ID steel lines into -6 flex line thru -6 bulkheads, a much bigger and better setup. Oil Cooler: relocated to the front of the radiator, add an hot air separator between it and the air filter, -8 lines swopped for -10 flex lines. Induction upgrades: Stock SR20VE Throttle to small, will install BMW E46 M3 throttles with new velocity stacks and plenum TPS: starting to show signs of aging, will be replaced with new E46 unit as they actually have a O-ring to keep the insides water tight, good idea on a rally car. MAP Sensor: will be moved to the engine bay closer to the ITB's New Suspension: all depends on time, but the front S13 parts will be swopped for MKII Escort Bilstein type Monotube setup, rear shocks will also be swapped for MKII rally units Wheel Speed Sensors: will be in place on the new front suspension Look at Digi Dash Config: will ask for some advice around the setup to get the unit to read from 0 km/h. Switches for Motorsport functions:Launch Control on D1-6 Flat Foot Shifting needs lock out switch, basically ON/OFF for the limit switch Seeing that I had some damage to the combustion chambers in the head from the screws Friday Party, I took the head to a company called HeadZone for cleaning, blending and finally a resurface of the head. Seeing that the company does not do their own porting, polishing and blending, this was done by one of their employees, thus it took way longer than I expected. But at the end of the day I'm quite happy about the work that was done. While all this waiting for the head was going on, I was busy with the following.  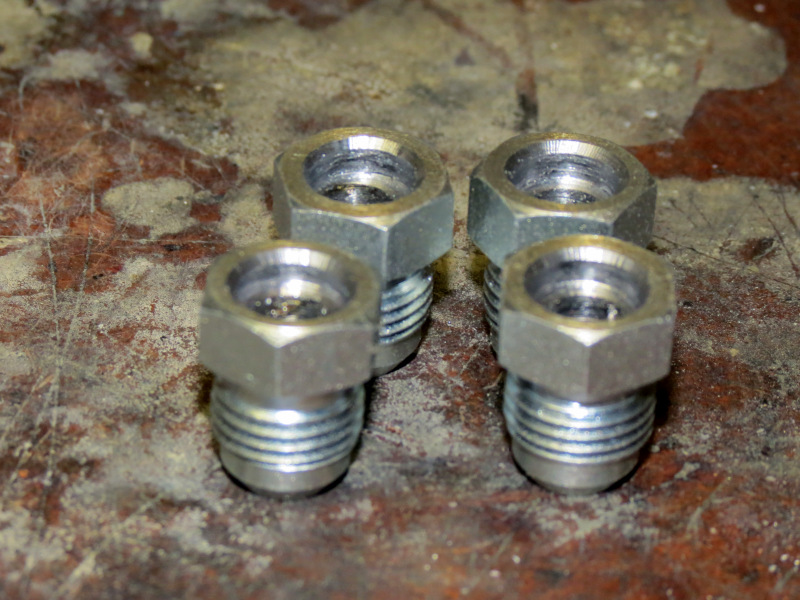 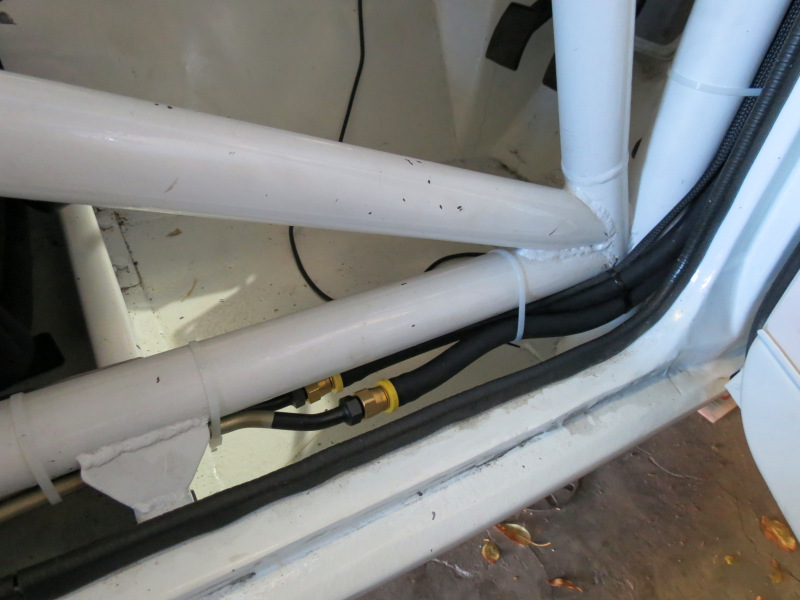 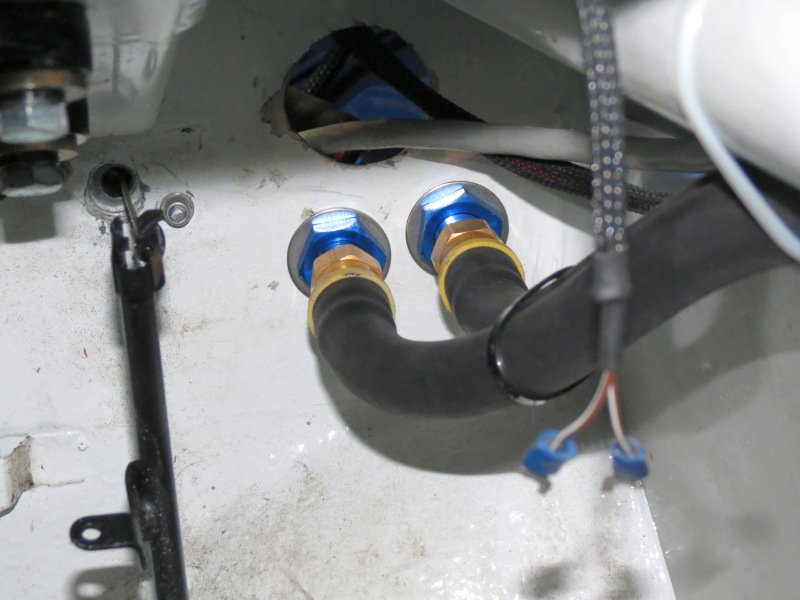 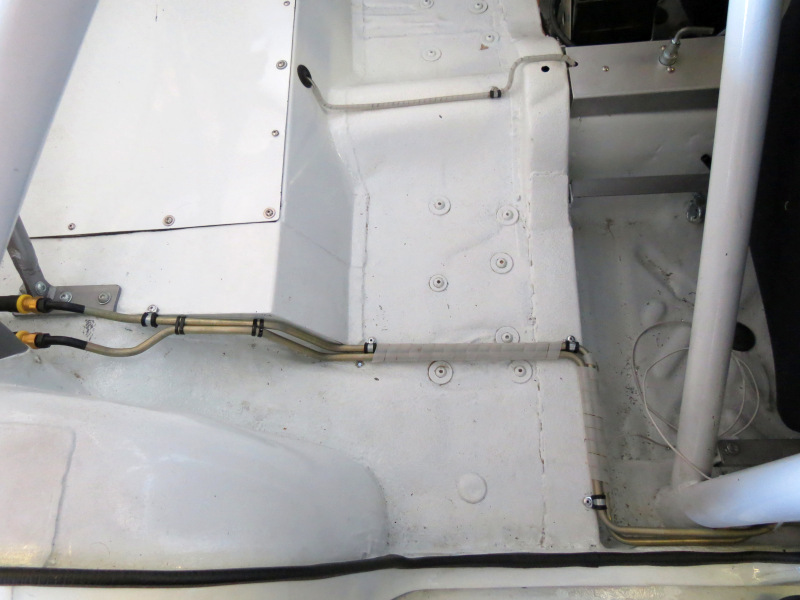  Fuel Lines Fuel LinesWork started with the fuel lines, the old ones was removed or I should rather say destroyed, all good and well for getting them out of the car, but once you sit with the new hard lines, pipe cutter and bender in hand, you quickly realise that it would have been much easier if you just kept the old ones in tact to use as samples. Well as you would have guessed, I sometimes get a little over eager to get some work done, this is exactly the situation I found myself. Seeing that I had nothing to work from, I actually got my chair and had a good long sit down next to the car to plan the new setup. Seeing that the old setup was quite difficult to get correct seeing that it run thru both the front and rear firewalls. This time around I decided to take the easy route, slightly more expensive and use bulk heads. The beauty about these is, you just drill the correct size hole, fit them thru the hole and fasten them, then you just fasten a flex line to them, as easy as that. I ordered some bulk heads and fittings for the oil cooler. Having made a decision to use bulk heads, I decided to use Parker brass push lock fittings and hose between the hard lines and bulk heads on the inside of the car, seeing that the hose is fire retardant, it will work 100%. Seeing that the old setup was way too small, 8mm OD feed and 6mm OD return, which yields an effective 6.2mm ID feed and 4.2mm ID return with the use of 0.9mm wall Zista tubing, this resulted in the regulator not being able to do its work effectively and quite considerable aeration in the lines. This time around I used 10mm OD Zizta tubing for the feed and return, which will not hinder the supply of fuel thru the flex lines of -6AN. Seeing that I had to start from scratch, I made a few changes in the route the lines follow to make it easier to fit and remove these. Two pairs of -6 Male plugs was drilled and silver soldered to the bend Zista tube and fastened to the vehicle. The only outstanding work to be done is the flex lines in the boot and in the engine bay, but I first have to finish the new induction before Ill order the fittings.    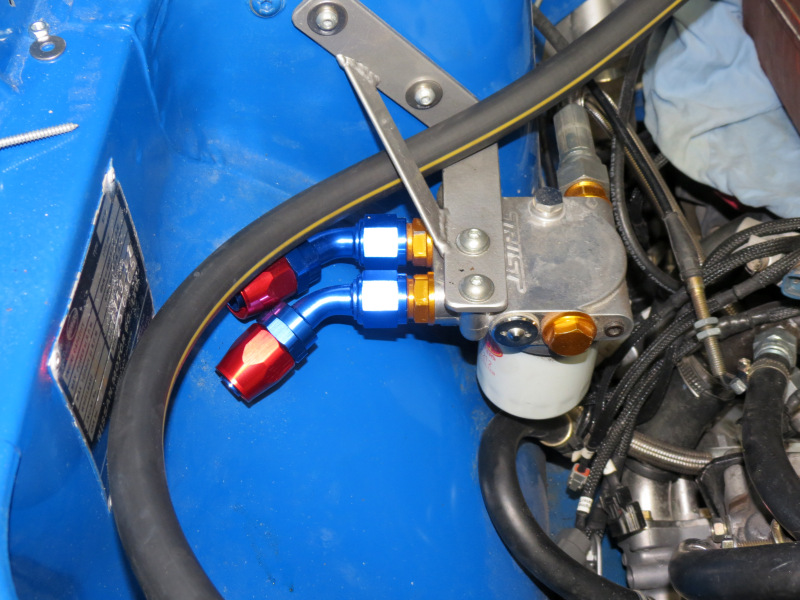 Oil Cooler Oil CoolerFirst order of business was to strip the front-end of the car to get easier access, especially since i was about to remount the oil cooler, a fixture that was mounted with the idea that it will never have to be removed. Once everything was stripped and cleaned, the only obvious place to remount the unit was next to the radiator fan, the only problem with that was the fittings that was then needed, seeing that the pipes had to turn between 150-180 degrees. I took my change and ordered some fittings for the oil cooler and thermostat housing, luckily at the end of the day the gamble paid off and it seems that everything will work out, just not 100% sure about the 45 degree fittings on the thermostat housing, as the space is limited. With the next order of fittings I'll also order the black nylon braided hose to finish the relocation.  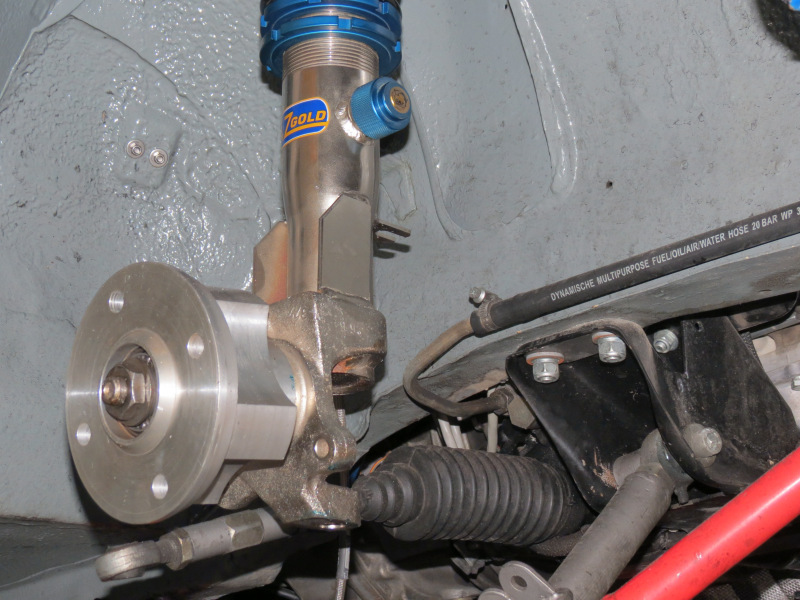 Front Suspension Front SuspensionWhile all the above was going on, I managed to strip the front right strut to start the measuring process for the new gravel rally struts. It was decided to convert the majority of the front suspension parts to legendary Ford Escort MKII units, this makes more sense than would have admitted a year ago, seeing that a friend is also building a MKII rally car, another a Escort Track car and my brother will use Escort parts on his new project, interchangeable parts could always become very important, especially on the rally cars. After numerous conversations we decided on the proven Bilstein Monotube setup, this replaced the original Escort strut with a new unit with a different strut tube to accommodate the Monotube inserts, which also provided the opportunity the strengthen the body to stub axle fixture. We got in contact with Gaz Shocks in the UK seeing that they do offer a package that is really exactly what we are after as their inserts are based on the Bilstein units but are available in an adjustable version also. I'll also be replacing my rear shocks with a gravel rally version of the Escort Grp4 rear coil overs. After about 3 months of research we took the plunge and placed an order for 10 coil overs for 3 different vehicles. I've never seen such a vast amount of emails flying around to gather all the necessary detail. Hopefully these units will be in the country to the end of March. 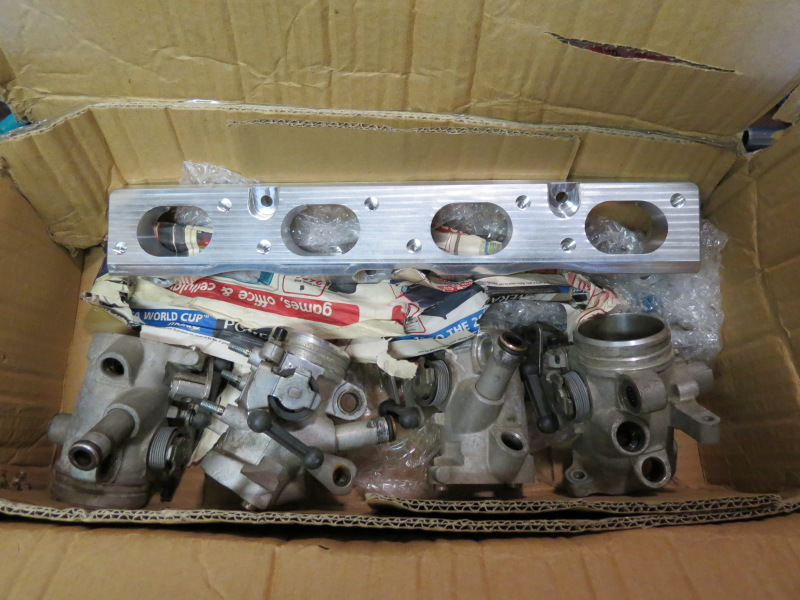 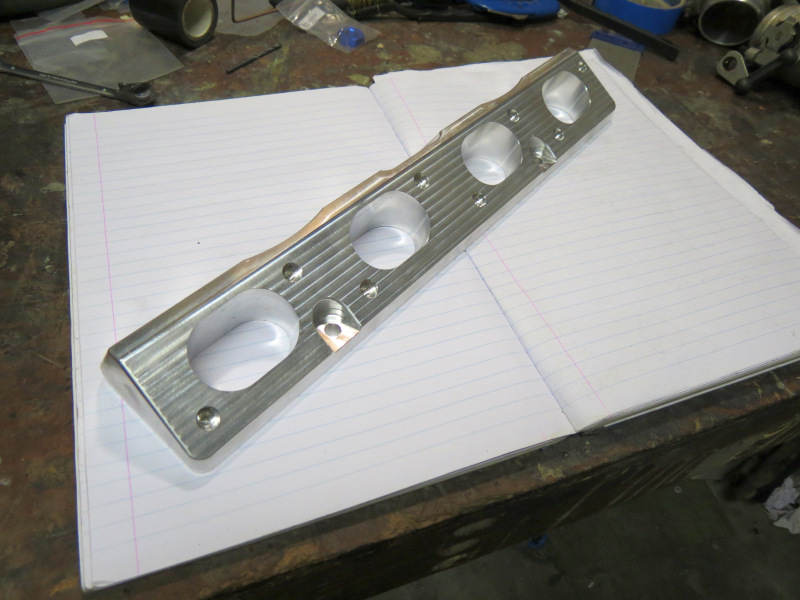 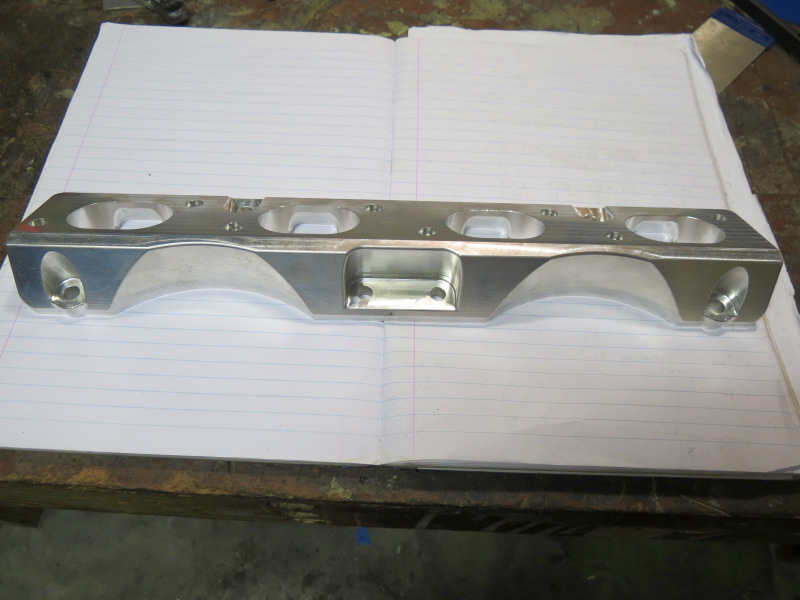 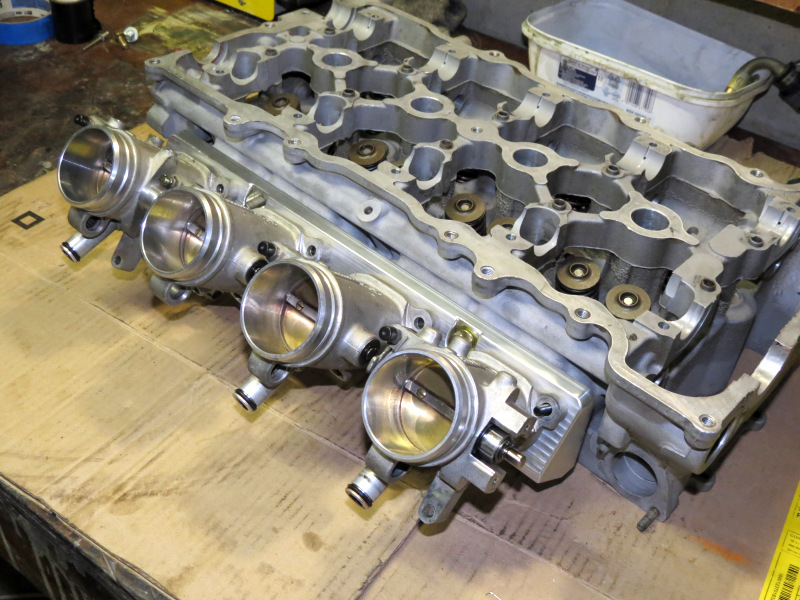 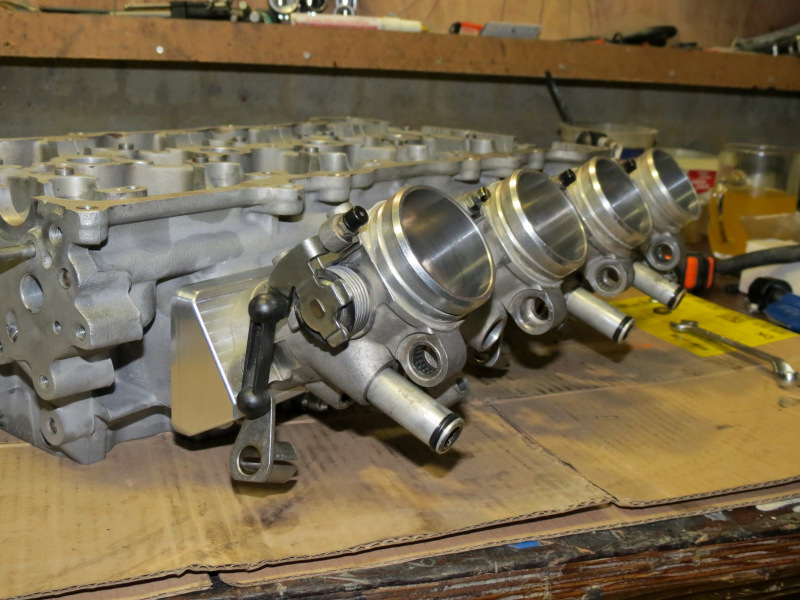 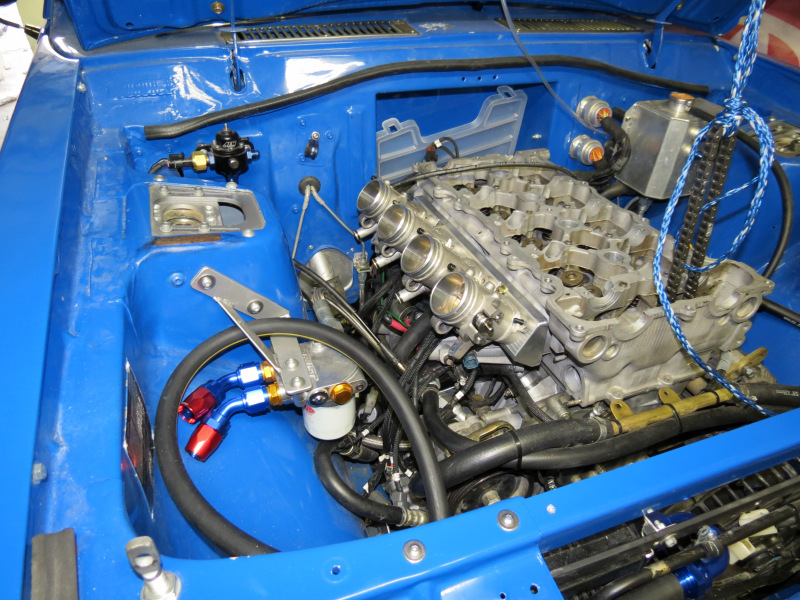 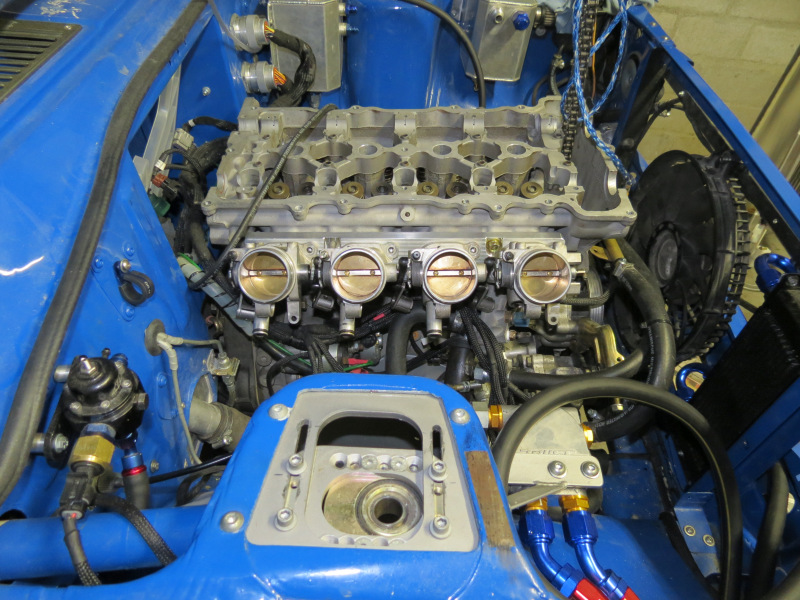 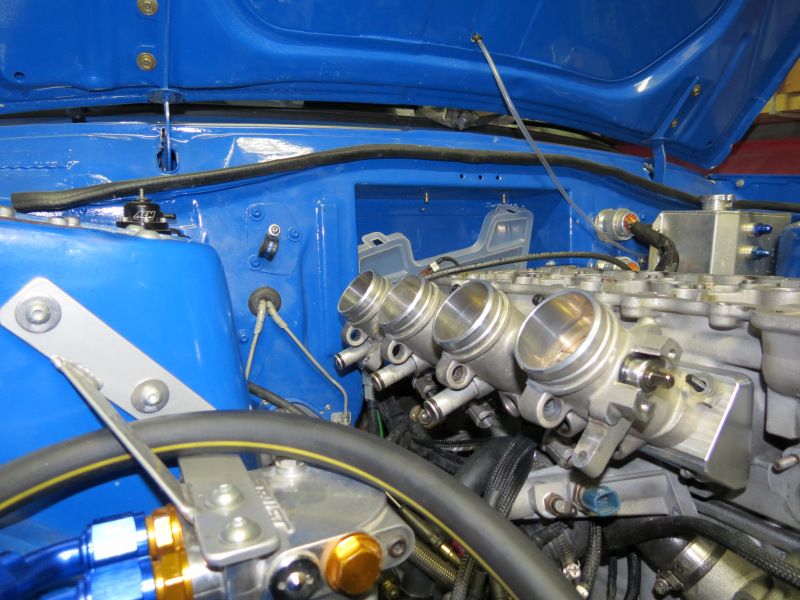 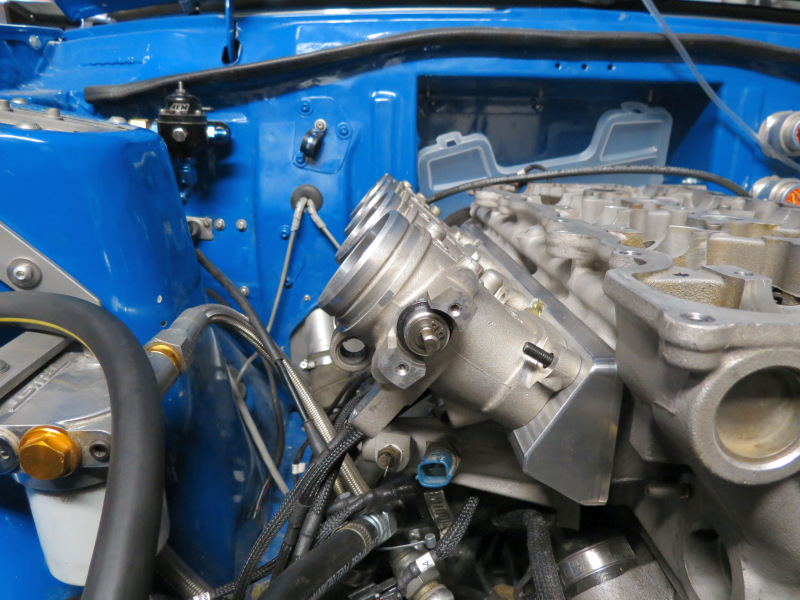 Independent Throttle Bodies Independent Throttle BodiesSeeing that Ian from RAW picked up that the intake manifold goes into vacuum on Wide Open Throttle in the higher rpm range, suggested that the standard throttle body is just not big enough to support the N1 cams, this on a motor that is otherwise stock on the intake side. Since I'm not a fan of my particular throttle since it developed a habit to cause me grieve, I decided to swop the entire intake for a new independent throttle setup, this time around I'll use BMW E46 M3 throttle bodies linked to a sourced adapter plate designed for the SR20VE motor. I took the plunge and ordered the adapter plate and 4 throttle bodies, on arrival I opened the box to be mesmerized with the beautifully CNC machined adapter plate, this thing will look better against my wall as an art piece than on the motor. Closer inspection of the throttles suggested that I will have to make my own throttle plate linkage, fuel rail, vacuum manifold, idle control manifold and a new air box. First order of business was to mount the throttles to adapter and test their fitment on a spare head, everything looked good and suggested a few things, I'll need to source a set of top feed injectors in place of the current side feed units, big enough to support the power levels for the future, seeing that the current ones already were used above 80% duty cycle @ 3bar and a new TPS. 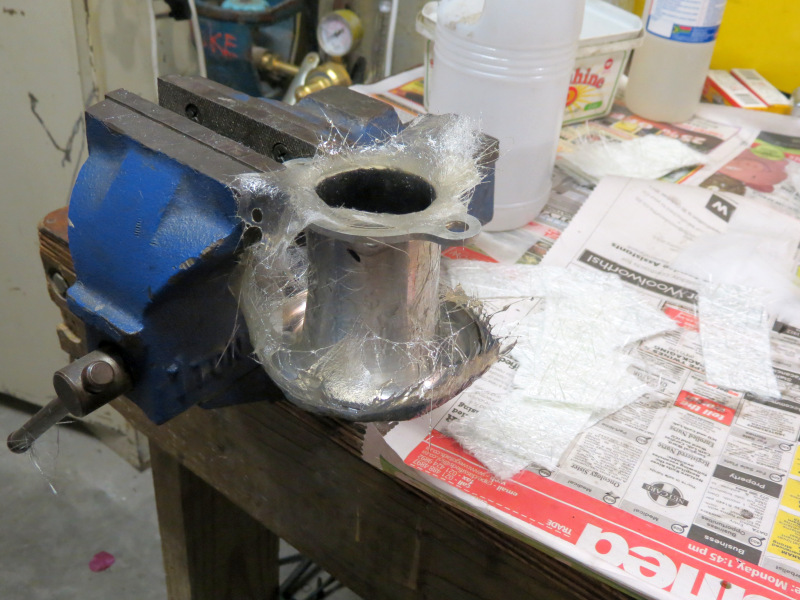 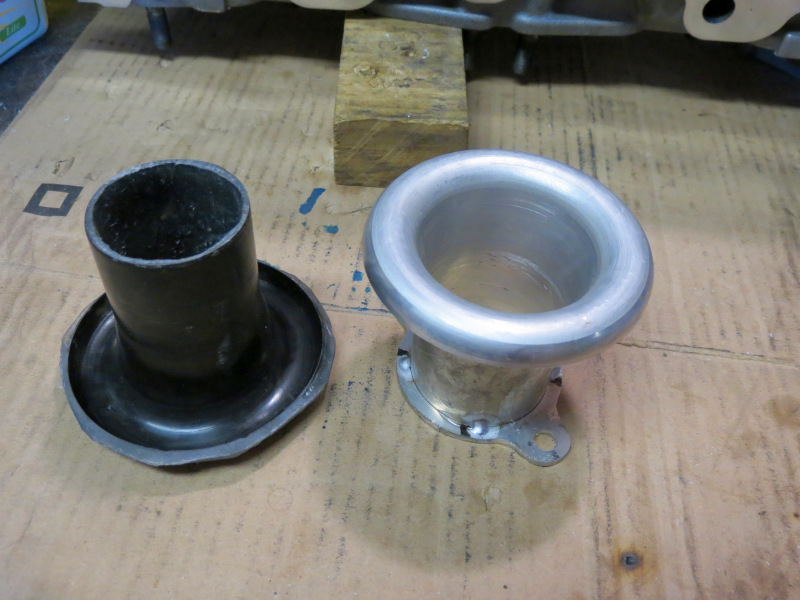 First order of business was to start making my own 50mm ID velocity stacks, as I'm unable to source some in the country and the imported units are very expensive. The best strategy my brother and I could come up with was to make a mould of one of his 48mm ID x 65mm High ITG units, once this was done I basically destroyed it in a lathe trying to open the ID to 50mm. In the mean time I bought a carbide insert boring bar for the lathe, this time around I'll make a much stronger unit to clamp more securely to the chuck and use the sharpest possible tools. As I was busy figuring out what would the best solution be to make my own throttle linkage, I noticed one of the roller needle bearing was missing and another one badly damaged, these was replaced by new HK1210 units. Here is a very good [url]http://6-city.blogspot.com/2013/01/overhauling-throttle-bodies-on-m635csi.html[/url] to help with a few ideas to make your own puller, unfortunately the E46 units have a shoulder that does not allow a bolt to pull thru the housing, I had to get creative by breaking a quarter out of the bearing housing after removing all the rollers, then grinded 3/4 of a M8 countersink Allen cap to get a snug fit inside the bearing casing in order to pull it out, with allot of heat applied. 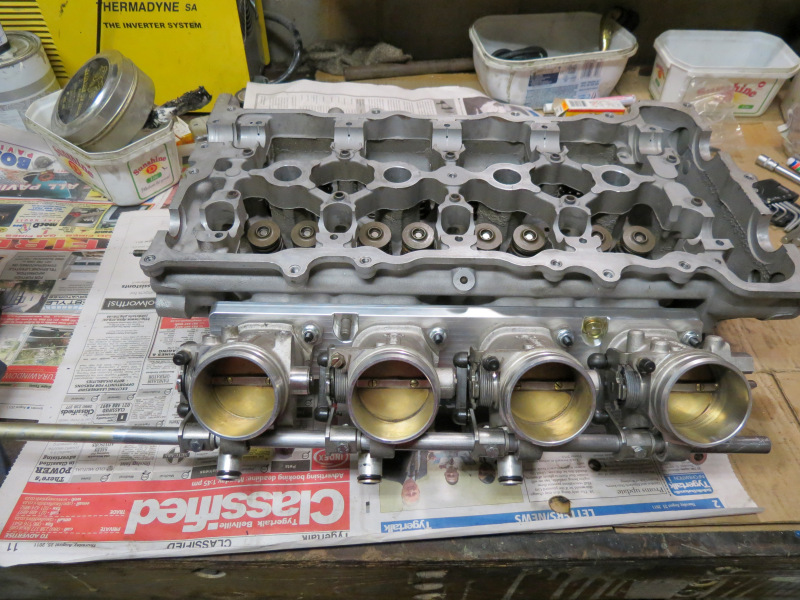 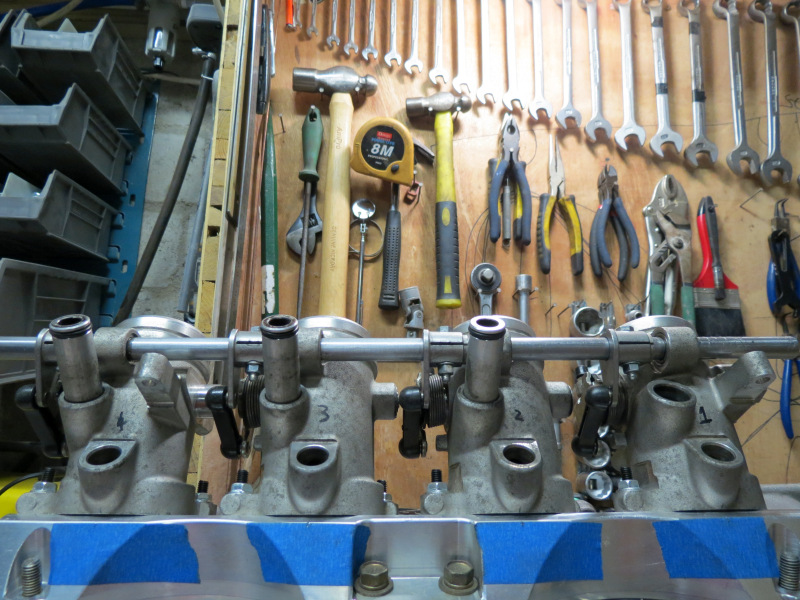 As for the shaft between the throttles a piece of 12mm OD Zista tubing was polished in the lathe to get rid of that 0.1mm to enable it to pass thru the new needles and cams that actuate the butterflies. I just need to turn a few Polypropylene bushes to restrict movement of the shaft. Once this was in place I was able to measure the amount of travel on the cable to allow the full use of the throttle pedal range, this then was used to determine the size of the cam needed to pull the shaft thru 90 degrees to open the throttles from close to open. This would give the best possible throttle pedal modulation with what I have available. I managed to finish the mounting for the throttle cable, even if this is not my best work to date, it is done, I'm pretty sure something is disturbing the Argon flow out of the TIG torch as you can feel it, but it is as if it is not directed to the tungsten tip. In the next few days I'll make an adjustable mount for the throttle cable cam. 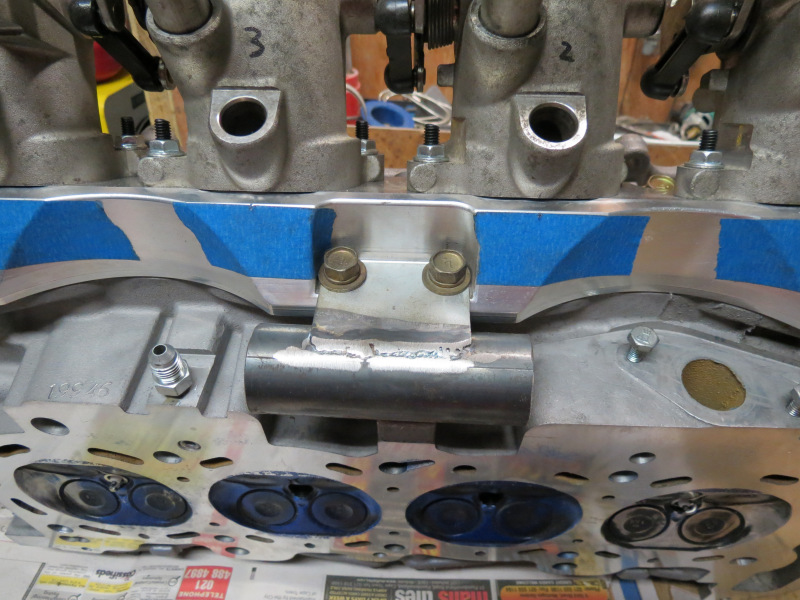 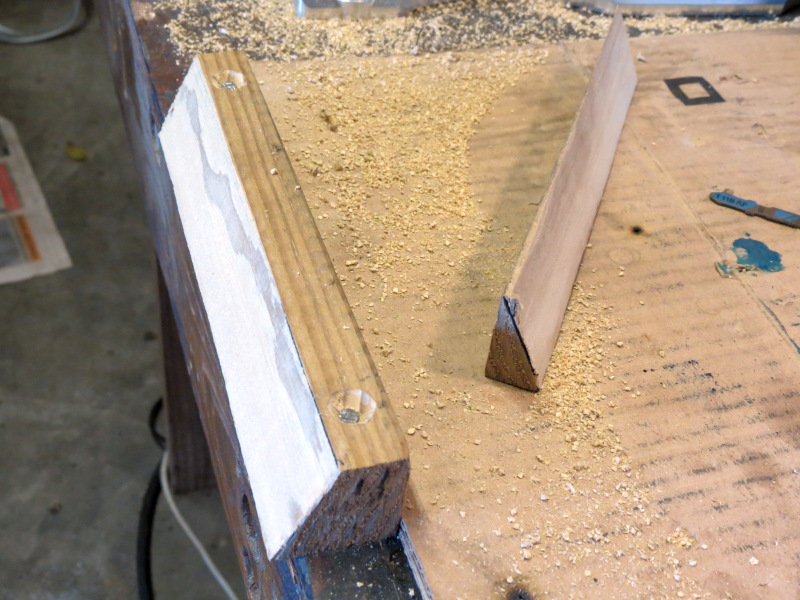  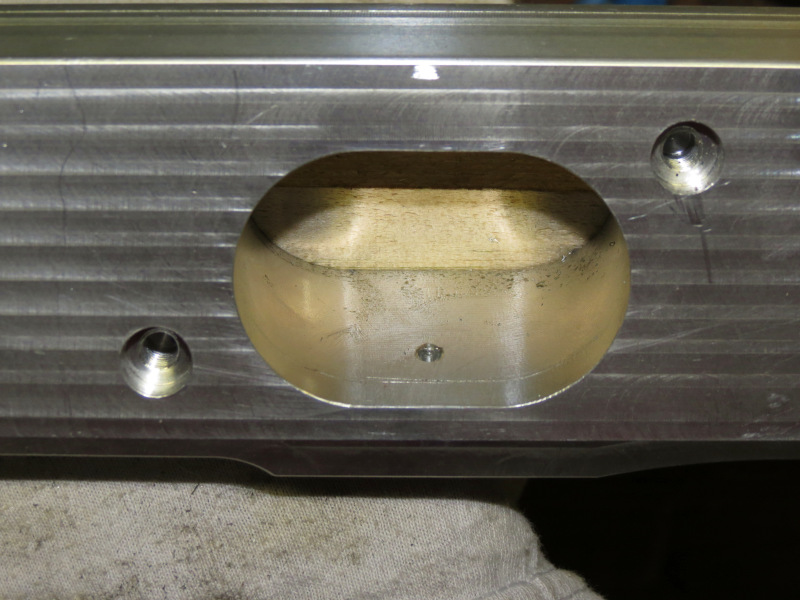 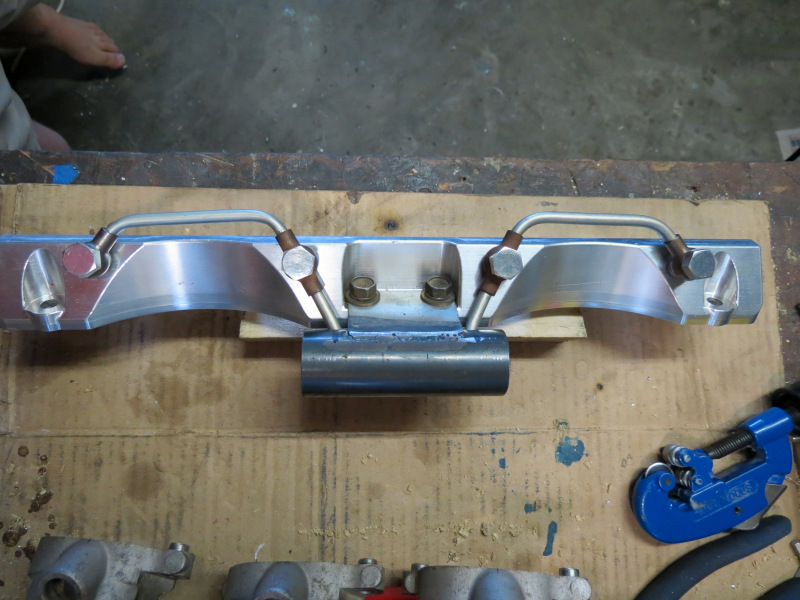 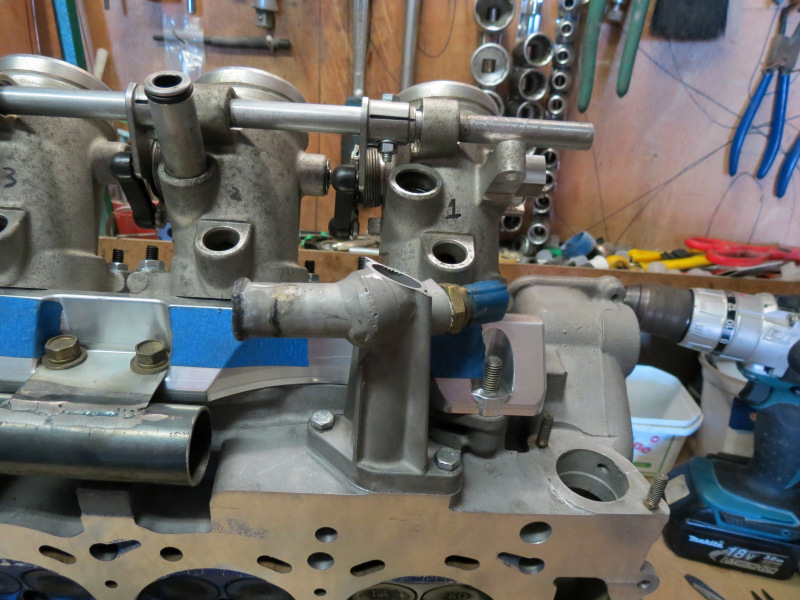  Seeing that I wanted to keep the vacuum take off separate from the Idle control manifold for the best possible readings, I came up with a plan that involves drilling and tapping into the beautiful adapter. Trust me on this one, I triple triple checked everything, seeing that I was not willing to mess up and replace the adapter. I( purchased a few weld on banjo's and set about drilling and tapping holes for the 10mm banjo bolts, I even had to get creative by cutting a piece of wood to the exact angle in order to clamp the adapter in order to drill the holes 90 degree to the face. Afterwards I made a nice big reservoir from 30mm pipe to remove as much possible pulses from the vacuum readings. I even had to mill the heads smaller on the banjo bolts to clear the water temp sensor. The unit will have two take offs, one for the MAP sensor and the other for the Fuel Pressure Regulator.    Next inline was the Idle Control Manifold, as I only got 3 of the original connectors between throttle body and reservoir tube, I became creative and made my own one on the lathe and a piece of 20mm OD Aluminium pipe rounded off the reservoir and link between the standoffs, I had a few brackets laser cut to mount and strengthen the unit, once more of the pieces is in place I'll add probably a -8AN male alu plug for the intake, I'm pretty sure -10AN is overkill for idling, it is not as if I want to use the intake to blip the throttle, hmmmm, maybe this idea could work, I'll have to spend some time on it. 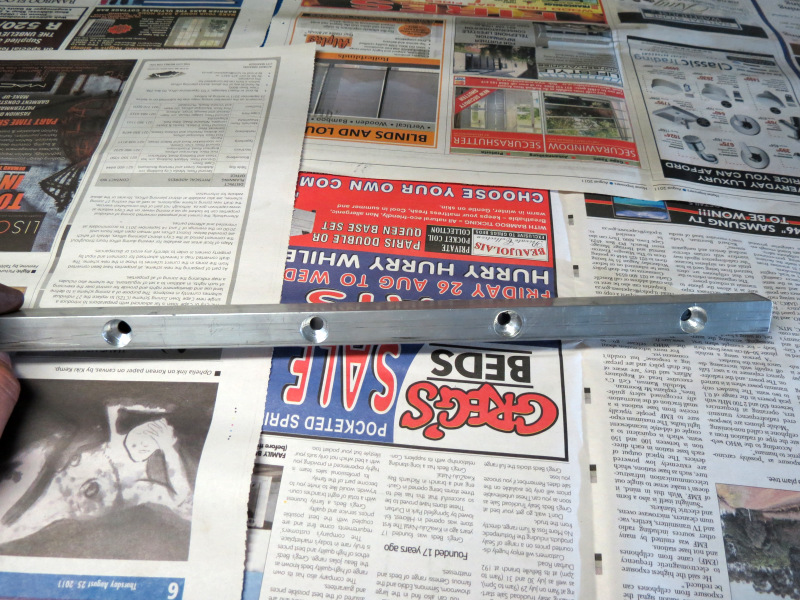 Fuel Rail Fuel RailI tried my absolute best to try and find a way to use the old SR rail, but it turned out to be an unfruitful exercise as I would have to make adapters to space the rail away from throttle bodies, thus ruining the spray pattern of the injectors, it was to just do it correct from the start, I spend countless hours researching injectors as an injector previously was just an electrical solenoid opening and closing to allow fuel to enter the combustion chambers, well not any more. I more or less decided on the design needed that will be easy to make a rail, available connectors, size and spray pattern. At the end of the day I settled for a set of brand new Bosch 0280156127 440cc 42lbs-hr EV6 Blue Giant units, seeing that they have a very thin body and with a dual wide cone spray pattern, made them ideal for the SR head with the divider in the intake port. Being armed with all these new knowledge regarding injectors, I bought a piece of aluminium fuel rail from Flat Four Racing for a very decent price. On this subject, what kind of business opens at 9am and closes at 3pm in these days, it is virtually impossible to get to them during the week. Anyways, the holes was drilled very carefully again, luckily with the mill in the garage the finish on the holes was perfect for using a normal drill bit as we don't own a 14mm end mill. Now I just have to wait for the injectors to arrive from the States in order to finish the mountings on the rail. All the brackets and reinforcements have already been laser cut and is just sitting and waiting. 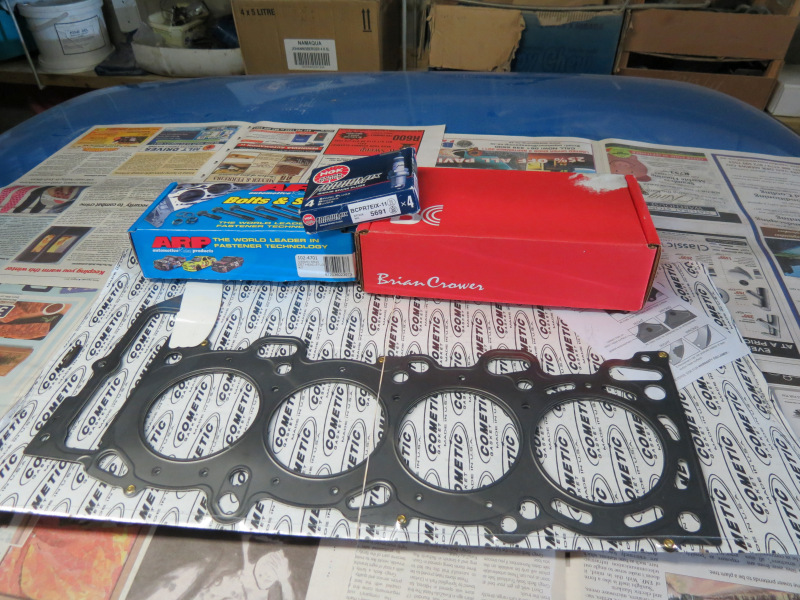 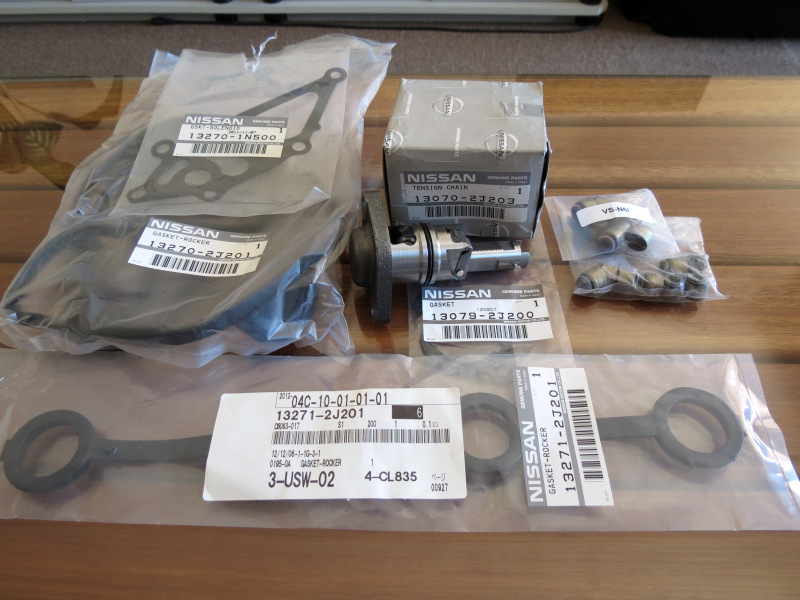 During this time RAW supplied me with another box of goodies to get the motor together in the form of a Cometic gasket, ARP Head Studs and some fancy NGK plugs. Also a separate order from the States arrived with more original Nissan OEM parts than ever graced my parts collection.  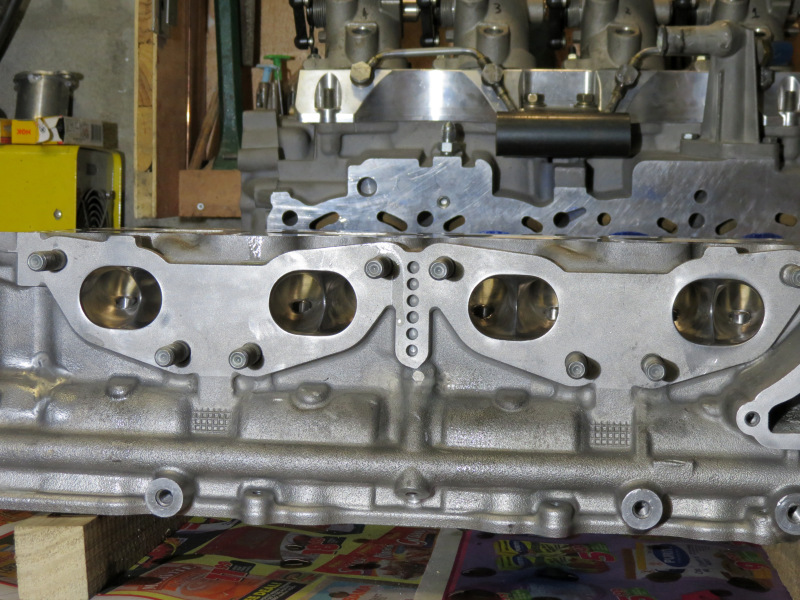 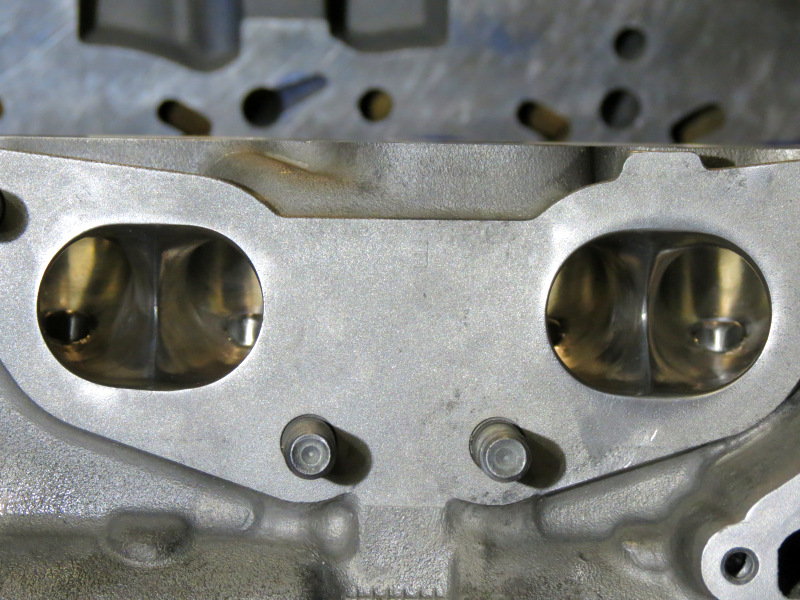 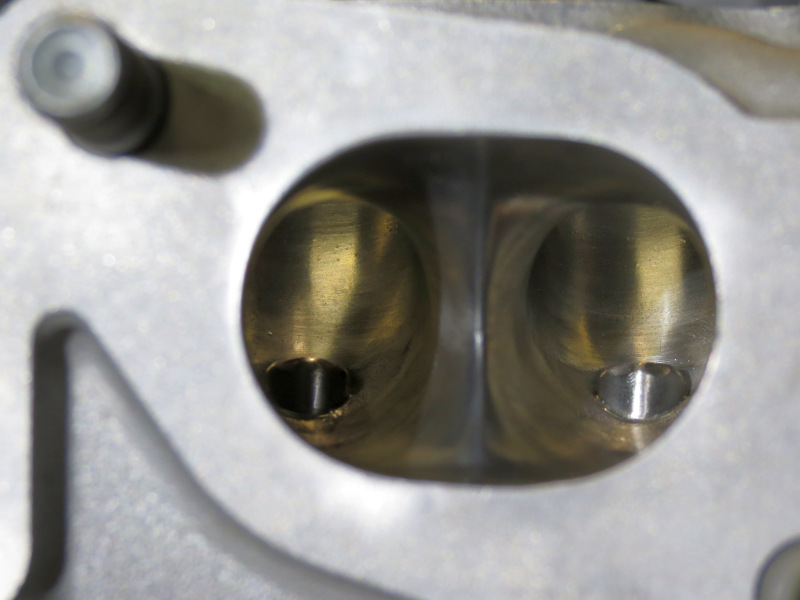 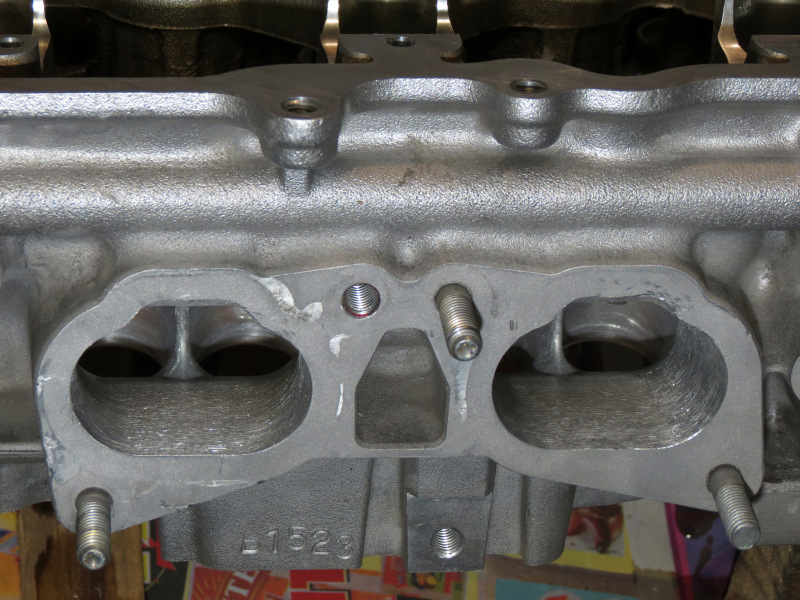 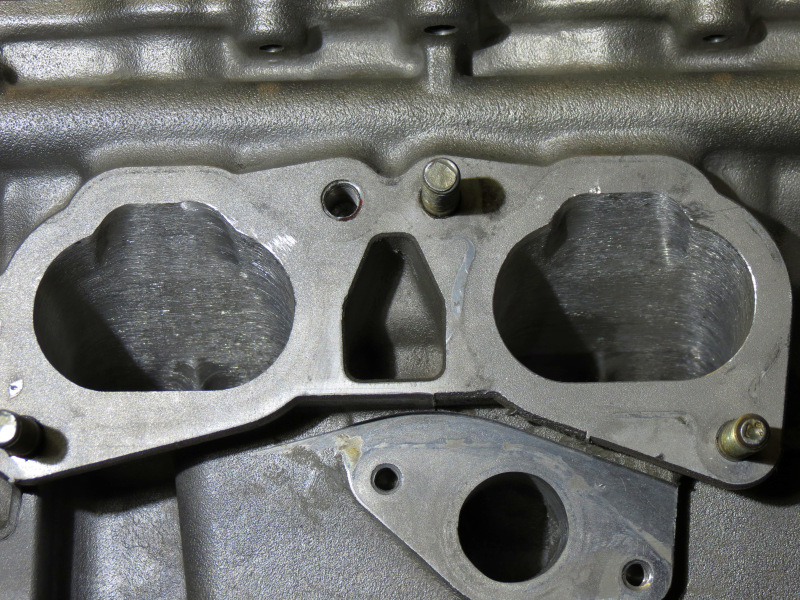 Port Polishing Port PolishingIt took more or less 3-4 weeks for the machine shop to finish with the head, once it came back, I decided that I will remove all the casting marks on the intake and exhaust ports, finishing the job by polishing the exhaust ports and combustion chamber to the smoothest finish I can manage and treat the intake adapter and ports with some rough sanding paper. My only rule before I started was that I will not touch the head with a carbide cutter as I don't have enough experience with it, yes chuckle all you want, but we all know a die grinder only follows its own head. I used a lot of sanding barrels and flap wheels to get rid of the cast marks and to polish all the ports, then the intakes was roughed with some 36 grid sanding paper and the exhaust and combustion chambers polished with my home made cross-buffs. At the end of the day I'm very happy with the outcome, I'm pretty sure the time (about 9-10 hours) and money spend to do this will not result in a mayor power increase if any, but I learned allot and it would just feel as if I did my best on the head before re-installing it.
Posted on: 2013/3/5 18:32
Edited by racetech on 2013/12/23 11:38:53
|
|
|
|
|
Re: racetech's 1200 SR20VE Project |
|
Home away from home Joined:
2009/4/16 10:37
From Cape Town, South Africa
Group:
Registered Users
|
D you're correct, the second pic shows a black thingy ma bob on the left side connected to a throttle shaft, that is just removed and replaced with a cable mechanism.
Posted on: 2013/2/13 12:34
|
|
|
|
|
Re: racetech's 1200 SR20VE Project |
|
Home away from home Joined:
2009/4/16 10:37
From Cape Town, South Africa
Group:
Registered Users
|
fiasss, yes, but only if you take me for a drive in your rally car one day when I'm blessed to visit your country!
PM me an email addy, I'll put you in direct contact with the maker, if that avenue does not work, I'll buy it from him and personally ship it to you.
P.S. this thing is petrolhead porn, the finish is excellent with only slight port matching do be done, it is almost as if BMW used the same specs on their intakes ports.
Posted on: 2013/2/13 10:27
|
|
|
|
|
Re: racetech's 1200 SR20VE Project |
|
Home away from home Joined:
2009/4/16 10:37
From Cape Town, South Africa
Group:
Registered Users
|
D: no, that ITB on the previous page is sold as I was unable to get them to idle low enough with my idle control setup. The new setup includes a CNC machined adapter plate and 4 x E46 M3 ITB's, in my opinion a much much better setup, but sure as hell not easy on the wallet or for the lazy ones as there is a lot of work to be done. Here is a pic from a setup in Perth, I'm using the same adapter:  
Posted on: 2013/2/13 6:54
|
|
|
|
|
Re: racetech's 1200 SR20VE Project |
|
Home away from home Joined:
2009/4/16 10:37
From Cape Town, South Africa
Group:
Registered Users
|
I do enjoy being out and about, all holiday I have that is not spend building the car is used to tour my own country, next year I'll visit 3-4 neighboring countries.
D, I'm lucky, but it is still so unnecessary, but at the end of the day a person can just sit back, reflect and do it better as I'm currently doing. The next update will include, a new ITB setup made from E46 M3 Throttles, custom velocity stacks, new fuel lines, relocated oil cooler for lower intake air temps etc. Also busy ordering the new gravel rally shocks.
Posted on: 2013/2/12 11:26
|
|
|
|
|
Re: racetech's 1200 SR20VE Project |
|
Home away from home Joined:
2009/4/16 10:37
From Cape Town, South Africa
Group:
Registered Users
|
January 2013 - Roadworthy & MappingFeels like ages since I've done an update, well the amount of work that I have been doing I feel a year older, never under estimate the amount of time needed to get a project car thru roadworthy, at least take your estimate multiple that by two and then again by two. All the little small things takes a vast amount of time, it's almost unthinkable. Jaguar 4x4 TrailersSince the car went thru Police Clearance and I got the final papers back from them a week later, I had no problems putting the car on my name. Luckily for me the previous owner is one in only a handful, each year he renewed the license for me, and this time round we just did all the paper work over, thanks a million. Just a final word on the subject of Police Clearance, since September 2012 all vehicles / trailers in South Africa that has to go thru Police Clearance is required to be fitted with Microdots, I would just like to let you know you have to be wake up when these said accredited installers fit these microdots to your vehicle. I went to a company called [url]http://jaguar4x4trailers.blogspot.com/[/url] as they are close to home, but damn what a mistake this turned out to be, just look at the comments about their attitude on South Africa's leading 4x4 forum:[url]http://www.4x4community.co.za/forum/showthread.php?t=48045[/url] . Let me explain what happened, took my car to Jaqueas, he applied his dots, after I informed him this is my pride and joy and do not want to see this crap. Once I returned and his dots dried, it was all over my bonnet, flares, engine bay and area between the bonnet and windscreen. It felt as if dust was under the paint, I was about to cause damage. I thought I'll give the man a change to explain and rectify his mistake by phoning him the next day, the conversation went like this: Me: Hallo Jacques, you added the microdots to my Datsun yesterday. Jacques: Yes, I remember the blue one. Me: Yes, since these microdots dried, it can see and feel them all over my right front paintwork, it feels like dust under the paint, but you can see the blobs of glue, I would like to know what you are going to do to rectify this problem? Jacques: I suggest you take a Lacquer Thinners cloth and see if it will remove the dots. Me:................(thinking, this could not be a professionals opinion) what, that will ruin the paint, please contact your suppliers and come back to me. Needless to say, I have not heard of him again, any mechanical person that can build a trailer surely must know that lacquer thinners and oil based paint does not match and these establishments calls themselves professionals, I beg to differ. For anyone that also ends in the same position than I, you can remove these microdots with a cloth drenched with petrol, it takes some rubbing to get the glue loose, but it works. It took hours, much more than I expected to get the car ready for roadworthy, but at the end I got it done and just as luck would have it, took the car for a drive, hardly 100m from home and all of a sudden the bonnet flew open, luckily I did not hit anything, drove the car home, in due time I will replace the bonnet and fix the shear marks that the hinges left behind. But the bad luck was still not over, a week before roadworthy I had to remove the Martin Bruwer throttle bodies as I was unable to get the car to idle low enough, they were replaced with the original intake that I converted for RWD use. What a mistake this would turn out to be, more about that later. Once at roadworthy the car passed with flying colours and the next morning I was up early to hand the papers in to get Datto's License disc. This was a long time coming, while I was at roadworthy I had the car on the scale, total weight came to a whopping 1080kg, I expected the car to be heavier, but not that heavy, but seeing that there is only so much you can remove from a Datsun, it is almost to be expected. I also got the front & rear axle weighed, the front came in at 540kg and the rear at 520kg, not bad weight distribution.  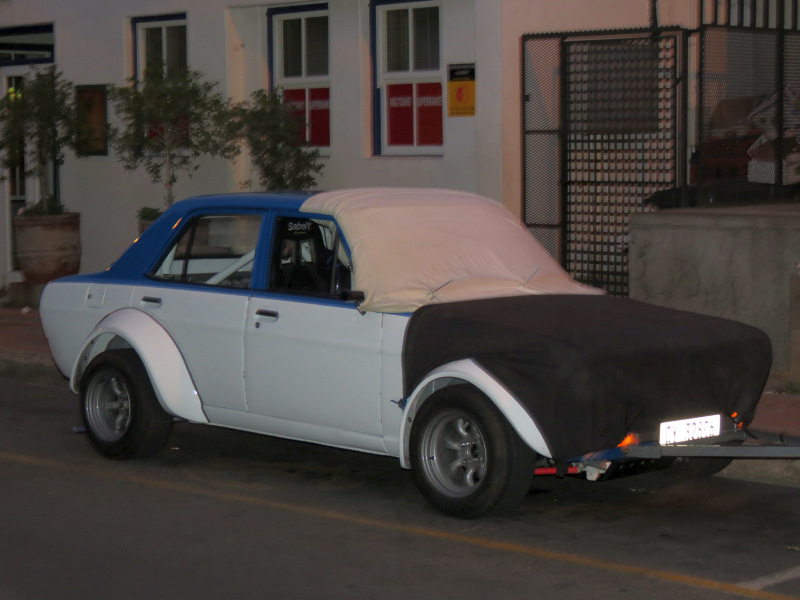  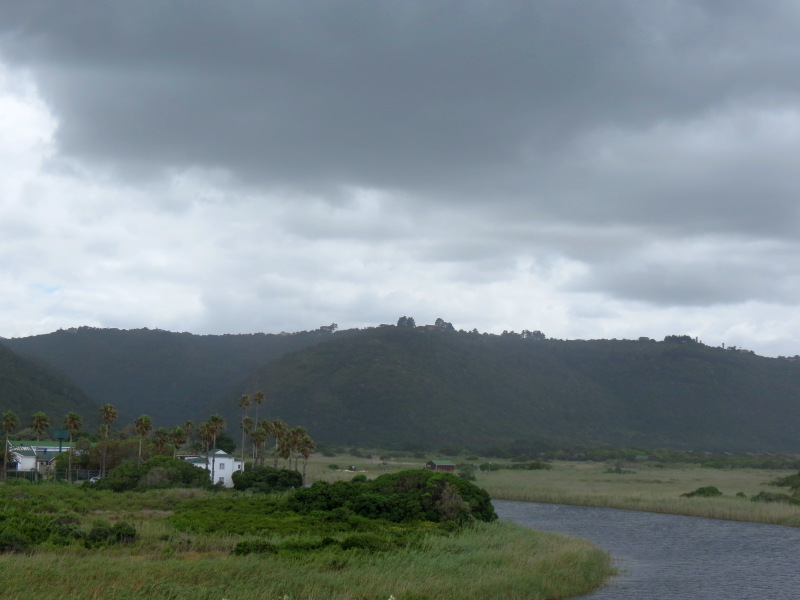 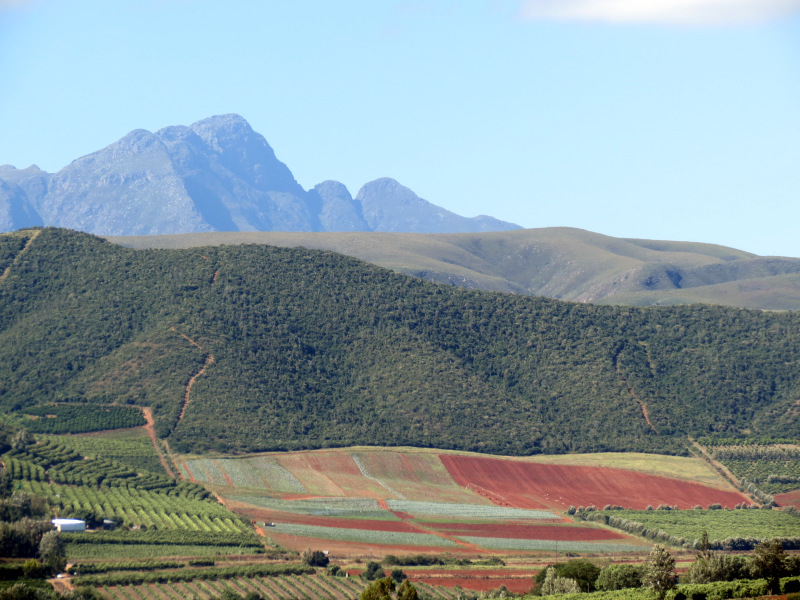  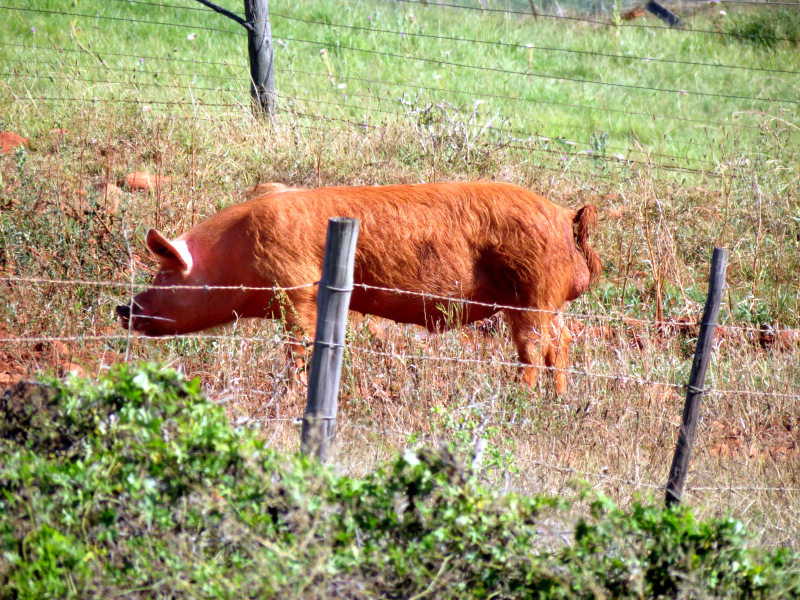 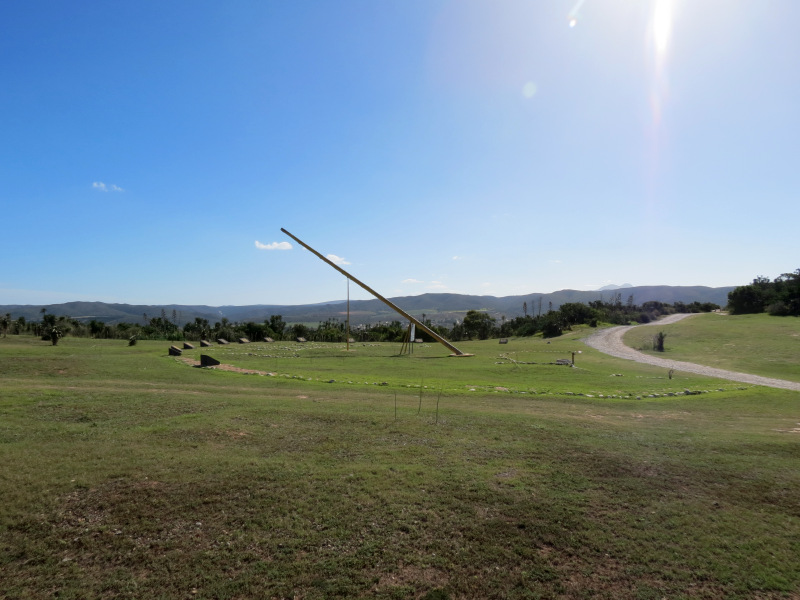 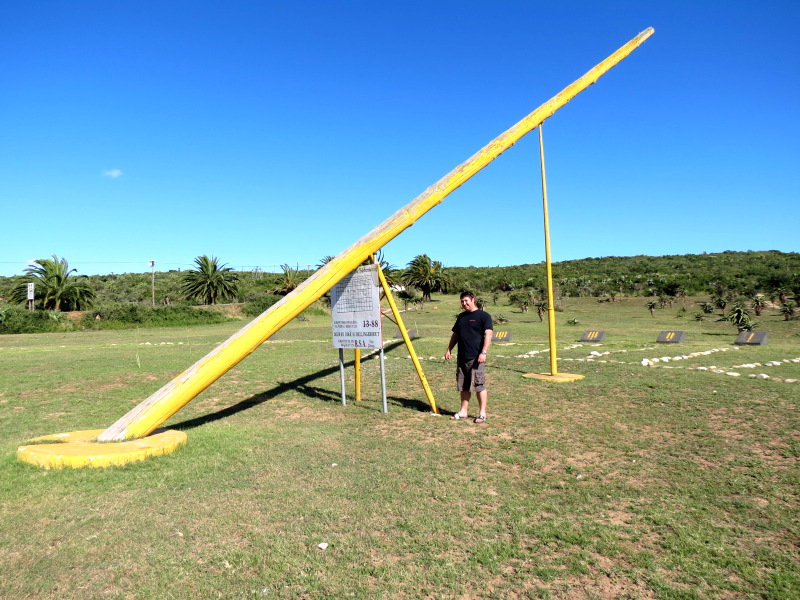 During the next week a few other small things was taken care off, before Datto's date with Ian Oberholzer from Rezlo Auto Works to do the mapping on the car. Friday 4 January 4am I was up, 04:50 me and Datto was on the road on our way to Villiersdorp to pick up my father that was going to accompany me on the trip. We approached the trip as a holiday away from everyday life, the views next to the road kept us happy and chatting away at the beauty of our country, especially the Garden Route. Since I booked us a spot between Hankey and Loerie, we felt the urge to show Datto the Gamtoos Valley, especially since the N2 was getting way to boring, it didn't take us long to swop the nice N2 toll road for the old N2, the poor thing, we towed him until the tar roads ended and we found a turning point just a few kilometres from the entrance of the Baviaans Kloof. This must be some of the most fertile agricultural ground in the Eastern Cape, just have a look at the red colour of the ground, even the pigs are trying to blend into its surrounds. On our way to our camping site we stopped over at the biggest Sundial in Africa just outside Hankey, standing 18m, 34.6m long and weighing an enormous 1000kg.   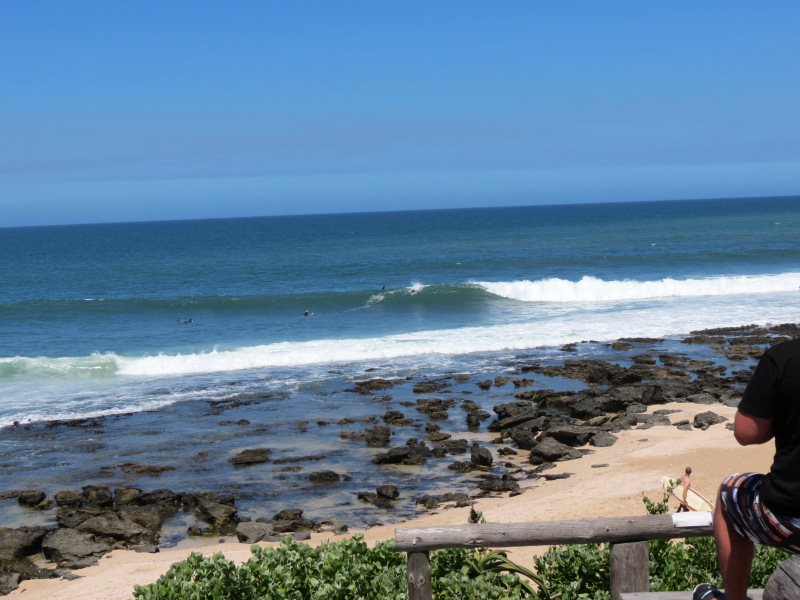  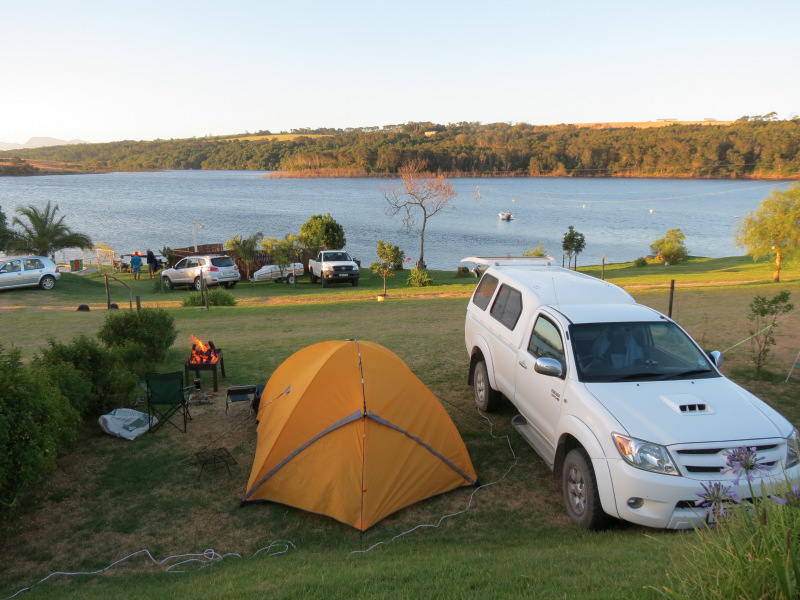 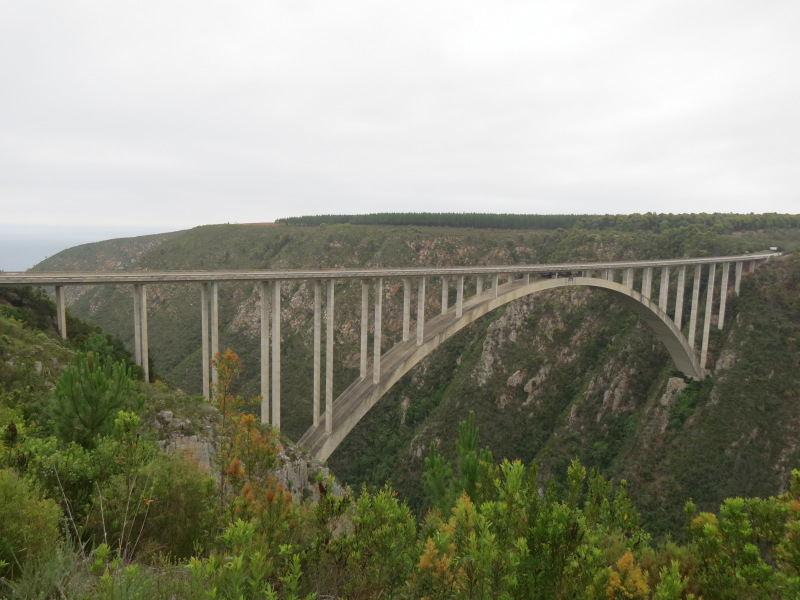 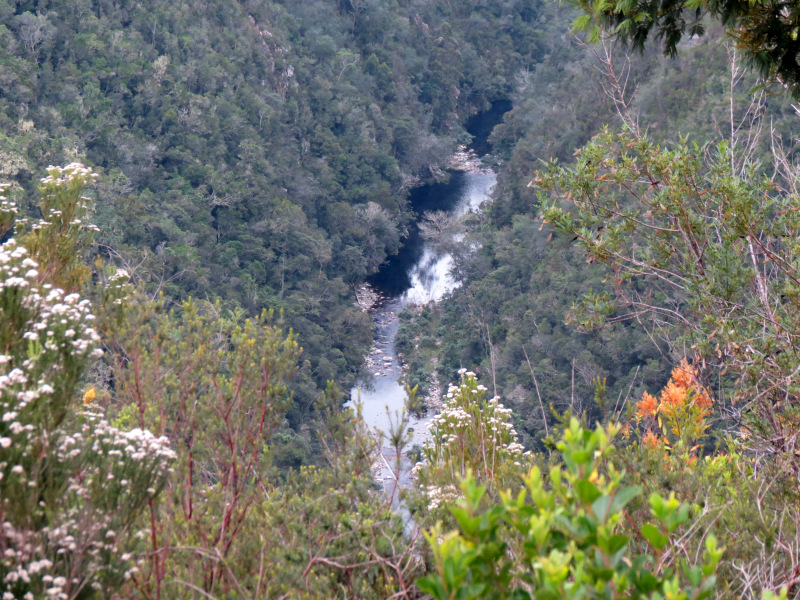 The next morning we got up quite early packed our stuff and towed Datto to Ian's premises, once there we were greeted by a man quite busy with fabricating a few parts for his race car. We started unwrapping Datto and I started and drove Datto into the driveway, Ian made a remark that usually vehicles that arrives normally must be pushed, a statement I will not forget. Even with his busy schedule, Ian offered me the change to ask a lot of questions and we discussed the whole process, from what his thoughts are and what I would like out of it. We left Datto in his capable hands and was at last free and could venture deeper into the surrounds that the Eastern Cape have to offer. We basically drove around Port Elizabeth following the coastline until we got to Jeffreys Bay, avoiding the N2 completely, it's a nice road, but damn boring. We popped into the legendary Supertubes before we drove to St Francis Bay to have a look at the devastation left by a few fires. We drove to Brakkeduine Camping site on the shores of the Klipdrift Dam to setup camp for the night. The next morning we left early as we still had a lot of coastal towns to visit, seeing that we on a road trip. We just had to have a quick stop at the Bloukrans Bridge, the Worlds highest bridge bungee. On our way back I got the best fuel consumption yet with the Toyota 3.0 D4D at 9.3l/100km. During the week I was almost provided with a daily update to the happenings of Datto by Ian. There was a few issues that I was unable to pick up seeing that I could not drive the car as Ian. it seemed that things was going well until I received a email the Friday evening with the following type of words in, misfire, tapper cover off, shim missing on intake valve 7, cams ok, etc. Damn not the sort of news I was expecting, luckily the cams was ok, seeing that they are worth more than the motor. The only theory we could come up was that a piece of welding from the intake that I welded shut came loose, that would explain the missing shim on cylinder 4, thus the piece of metal was stuck between the valve and valve seat, causing the shim to come out and the metal piece to start a party within the confines of cylinder 4, causing damage on the piston and combustion chamber. We decided that Ian would open the head in order to find the missing shim and evaluate the damage caused, unfortunately this motors is no joke to open up, seeing that they utilize stretch bolts OEM head gaskets is unoptanium in our country.   Seeing that the car was now a non-runner, standing in his driveway with parts weeks away, I decided to fetch the car. My brother and I decided we shall use his TDI Polo to go fetch Datto, this allowed my fiancée to accompany us and would hopefully save myself some money on the fuel bill. Very early the morning of the 19th January we left on mission go get Datto. We drove to George Caravan park in in go to setup camp for later the night, we were able to off load all the unnecessary stuff and lock it up in our private bathroom. Once we finished setting up camp we had some breakfast and this is where the Blue Monster started harassing my fiancée, obviously to my brother and myself amusement this was very entertaining, once you show a wild animal that you're afraid off it, they have the upper hand. We continued onwards to Ian refuelling at Humansdorp, fuel consumption a staggering 6.2l/100km, this with 3 people in the car, full of baggage and sticking to the speed limit. We arrived at Ian and went thru the list of problems that he picked up with the car, during this time we also went thru the plan in getting the car fixed. This time round we pushed Datto out to the road, what an irony. On our way back we had a huge argument with the Tsitsikama Toll Plaza management, so bad, my brother and I blocked the only open gate, we were about to kill someone. All of a sudden we had to pay for Datto, while Datto was physically linked with a solid A Frame. That was fine, we handed a petrol card to them, they swiped it and informed us that we need to pay for Datto in cash, seeing that there system does not allow multiple swipes of a card for a single transaction, immediately the bells started ringing. We were tired and wanted to get going, thus I handed them cash for Datto and asked for cash slips for both payment which they were unable to produce seeing that the system only allows a single cash slip per transaction, this was it I lost it, my brother tried his best but I was half way out the door by this time, they then notified us that if we want a cash slip for the vehicle on tow we had to go and collect it at the office. They even had the nerve to ask us to reverse with A Frame as we need to stop at the office, once we explained that it is physically impossible to reverse with a A Frame and they prohibited us to make a u turn in front of oncoming travellers, we lost it and proceeded to go fetch a cash slip at the office blocking there open gate. This forced them to send a new lady out with a fresh till full of money to open another gate to handle the queue that gathered behind Datto. While we waited for the written cash slip I asked for the rules that stipulates this crazy rules, once we got going again, it did not take me longer than 5 minutes to find the definition of a light motor vehicle and the sub sections stipulating that a vehicle with or without a trailer that is physically linked with a solid towing mechanism are seen as one. Anyways, we moved on and had a wonderful evening under the stars. The next morning we started packing up camp and once we picked the tent up we discovered the long toe frog underneath, the poor thing must have crept under the tent during the previous day looking for some shade, but then was laid upon for the duration of the evening. 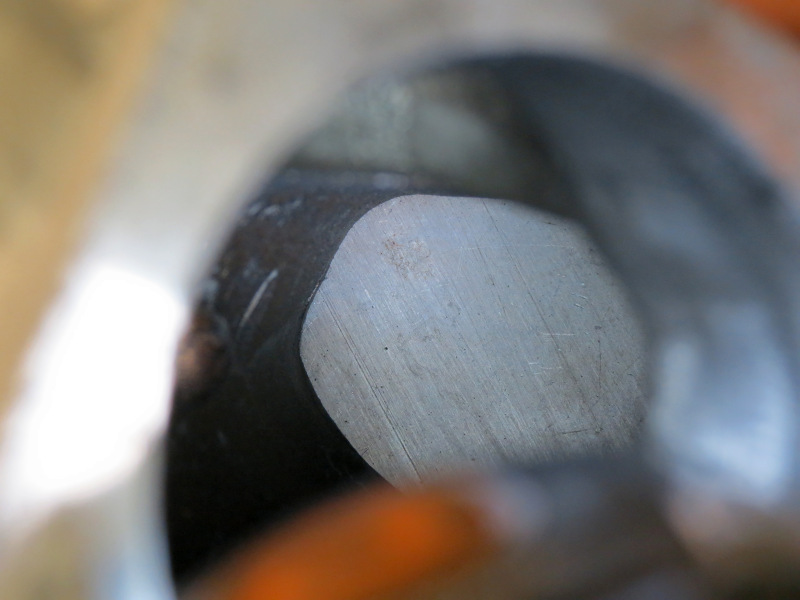 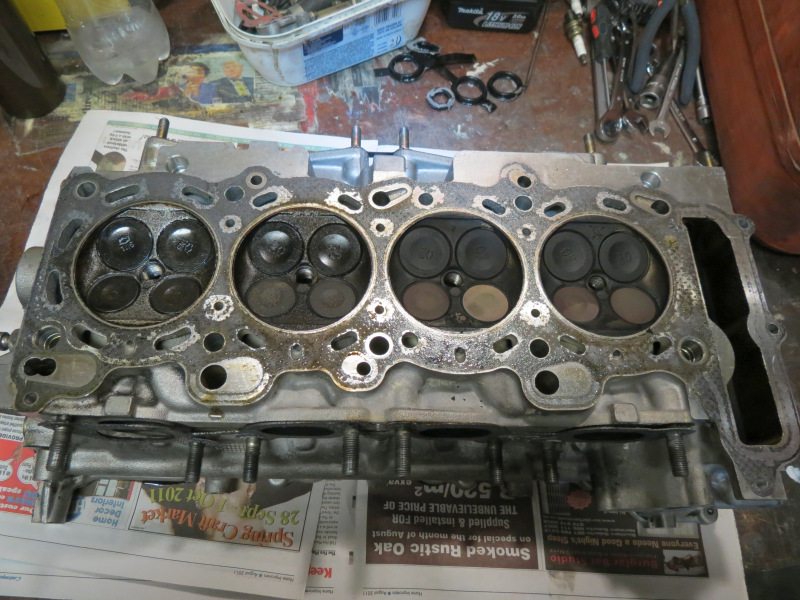   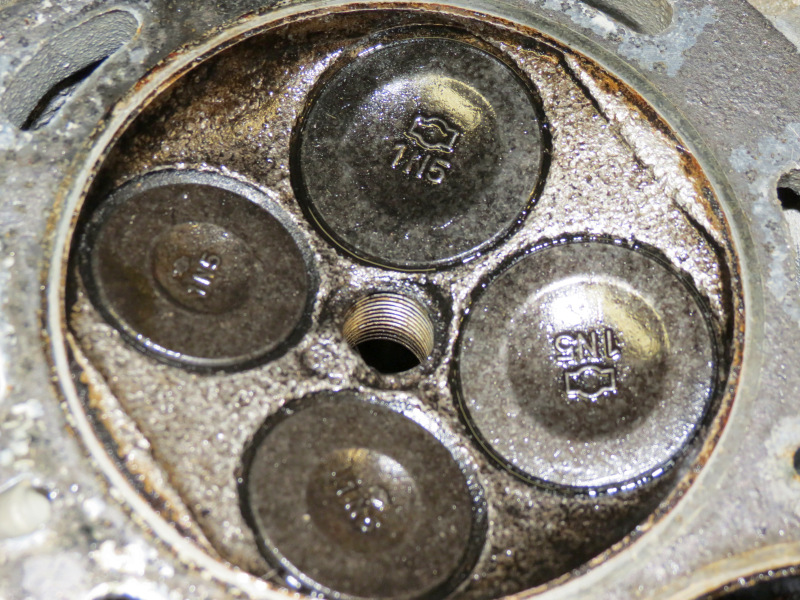   On our way back home we stopped at Heidelberg for some fresh coffee and to fill up the Polo, this time round with Datto at the back we got 8.6l/100km, once we arrived home the average fuel consumption for the entire trip was sitting at 7.4l/100km, I must admit the turbo diesel technology came a long way in the last 10years. After a rest I headed to the garage to start the stripping process that was halfway done by Ian. As I was taking everything apart I was constantly looking for some answers to the problem. Cylinder 4 showed the signs of the foreign objects path of destruction, luckily the damage is better than I expected and Ian and I agreed that it will be safe to leave the sub as ease. What was strange was that cylinder 3 also show the same signs of a foreign object that started a party. This must have been from the motors previous life in Japan. As I was stripping the intake assembly for cleaning I noticed a screw missing from the throttle plate, I found the problem, luckily it was not from bad cleaning of the Intake after welding, but from a freak in screw, just plain bad luck. Apparently this is a common occurrence on these motors, apparently I was warned, but I cannot remember anything regarding that specific conversation. Luckily the parts are on their way to get this little headache fixed correctly, we have compiled a list of things to fix before I will send Datto on another holiday. Next time round Datto will be much stronger.
Posted on: 2013/2/11 13:59
Edited by racetech on 2013/12/23 11:41:59
|
|
|
|
|
Re: racetech's 1200 SR20VE Project |
|
Home away from home Joined:
2009/4/16 10:37
From Cape Town, South Africa
Group:
Registered Users
|
Did quite a bit of work this past weekend, hopefully at the end of the week I'll be able to take the car for a drive with the dash installed.
Posted on: 2012/12/18 8:28
|
|
|
|
|
Re: racetech's 1200 SR20VE Project |
|
Home away from home Joined:
2009/4/16 10:37
From Cape Town, South Africa
Group:
Registered Users
|
Thx unfamilia,
But the car will stay like that for a while, I need to do a few measurements around requirements for the gravel shocks.
Last night removed the 3.63:1 LS Diff, will replace it with the 4.45:1 LS over the weekend.
Posted on: 2012/12/14 8:47
|
|
|
|
|
Re: 2L 1200 Ute |
|
Home away from home Joined:
2009/4/16 10:37
From Cape Town, South Africa
Group:
Registered Users
|
Smurf, keep the tank alu, the paint is nice, but the focus should be kept on all the custom bits/work.
my2c
Posted on: 2012/12/13 11:01
|
|
|
|
|
Re: racetech's 1200 SR20VE Project |
|
Home away from home Joined:
2009/4/16 10:37
From Cape Town, South Africa
Group:
Registered Users
|
November 2012 - Flares CompletedSeeing that November 2012 is a distant memory, at least I was able to complete the flares, let me add some detail.   I got the rear plugs back first, they looked good, but the body shop did take their sweet time in getting them done. Seeing that I prepped a few weeks earlier to make the molds I had the majority of components ready. First the initial prep work was done, wax and gel coat, then the fun started with the first mold. From day one I wanted to hide any fasteners and due to the shape of the flares, I had to make to molds per flare, this was necessary to get the end product out of the mold.    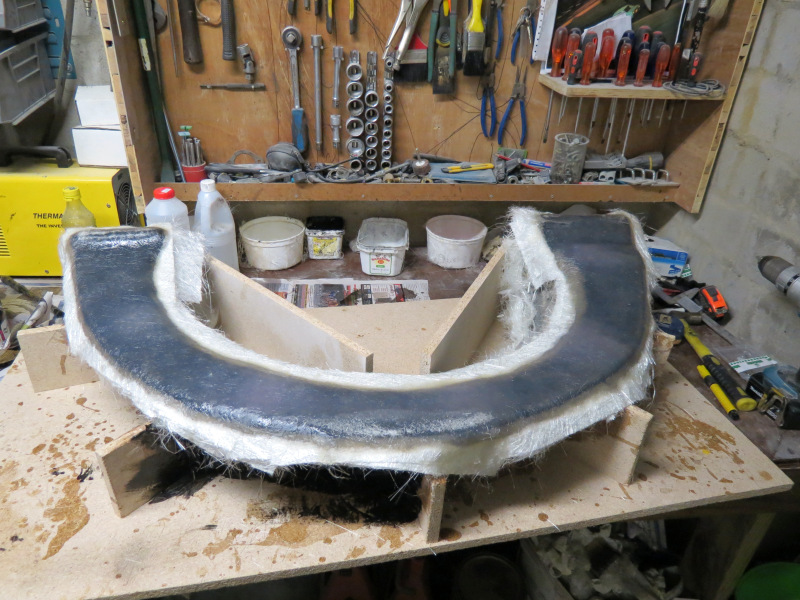 First off I started with the outside part of the flares, 6 layers of 450g fibre glass and 3 hours later the first one was done, later on when it hardened to some extend I turned it around on the main wood support and bonded it to the wood. Then I decided to add some extra support to make the mold that bit stronger seeing that remaking the mold will be a no no as I was pretty sure the plugs will come out in pieces. The next day the other side received the same treatment, a day later I removed all the excess material by cutting on the outside rim of the mold with a very flexible 1 mm cutting disc. 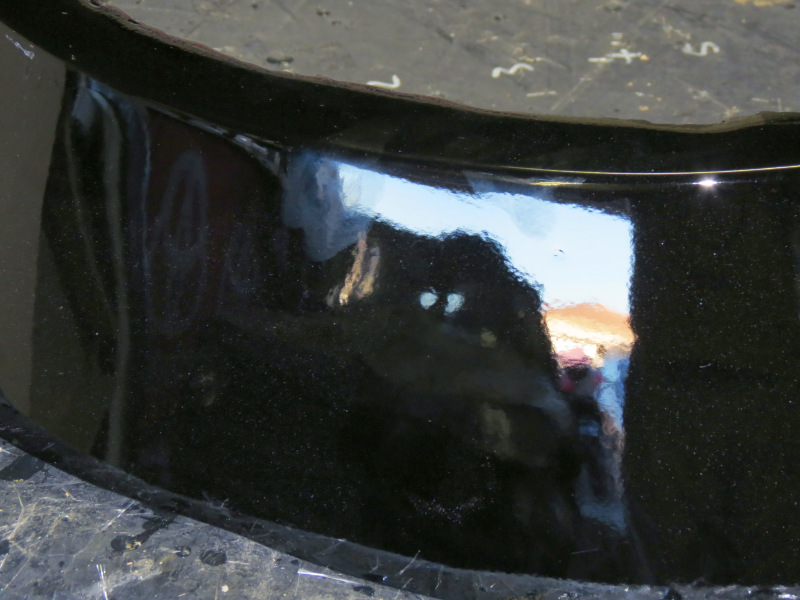 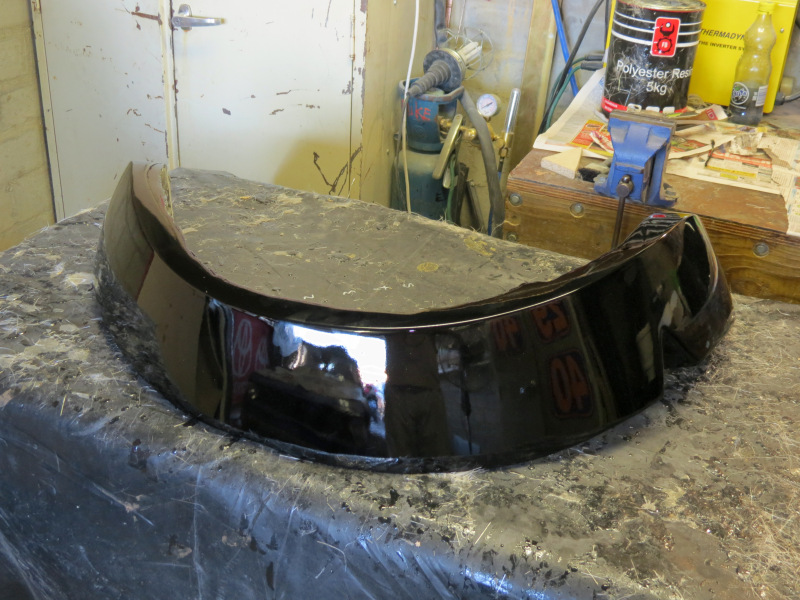 In the meantime the front plugs arrived, they also looked very good and I was quite amped to start with them, seeing that I learned a few tricks with the rears the fronts went a lot easier, but at this point it was quite apparent that my hands aren't built for this sort of thing or the latex gloves combined with the sweat and prolonged time without oxygen my fingers were starting to develop some issues. Well this was not going to stop me, I just had to buy some time and by that I mean a day or two without any fibre glass work. During this time I prepped a second set of supporting boards for the flanges and removed the plugs, well more or less destroyed them in the process, then proceeded to remove the excess material and start prepping the molds for the first set of flares, I opted to apply 6 coats of ram wax per mold, even this process I managed to save a lot of time by placing a fan on the molds or placing the molds in the sun to get the wax to dry faster. 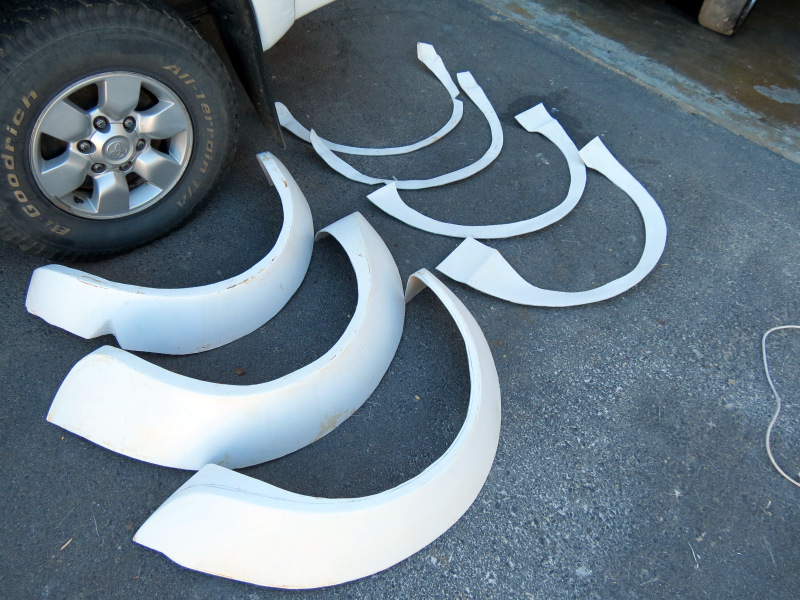  The part that I waited for ages seemed to be upon me, I started with the first components of the flares, this would also be the part that finally stretched my hands to their limits, my right hand thumb and index finger had blisters under a blister and quite sensitive, but strangely bearable when they are dry, but after a prolonged period in the latex gloves they became unbearable, after a day of soaking my hands in all sort of things and calling in the help of my favorite brand of dark rum I formed a new plan to continue, every 45 minutes I'll take a quick 10 min break, dry my hands and replace the gloves with a dry set, this worked at the end of the day like a charm. To this day, my fingers shredded two layers of skin and I still don't have finger prints on them, only a week or two ago the feeling started to come back.    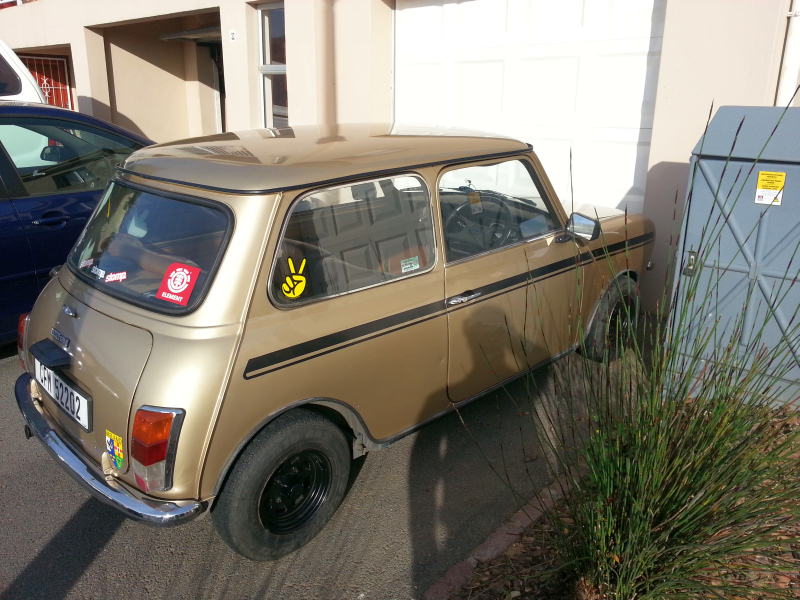 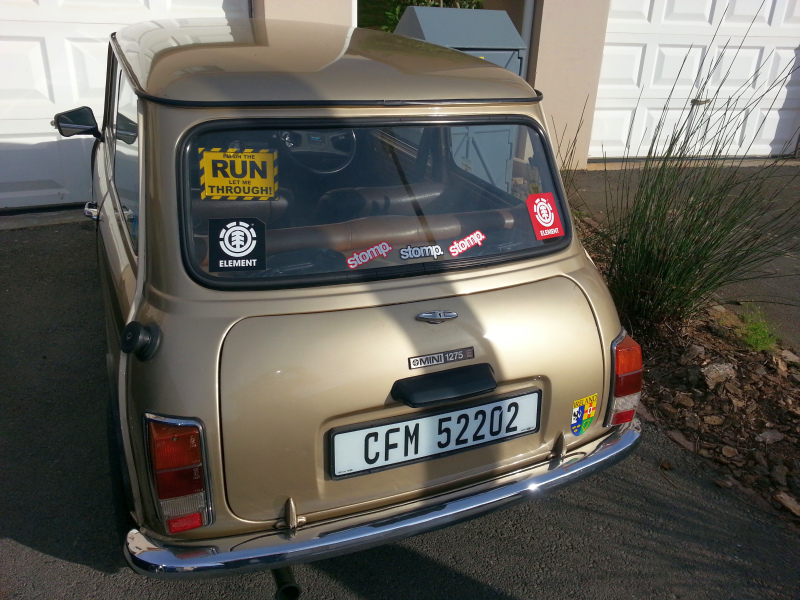 But I was a happy man since all my outers and flanges was done, seeing that I got the opportunity to buy myself a decent drill press for future work did help, but that's not all, I even found a decent set of 15" wheels for Datto, I hate a big wheel on an old car, but seeing that 15" rally tires are very common here, it just makes sense to make all necessary alterations to be able to use 15" rubber for rallies. Even if that wasn't enough to distract me, my brother decided to acquire this little thing and hog more space on the driveway, I love the "I'm on the run, let me through" sticker. I hope he decides to do a detailed build thread on this one, as I think it is going to be very interesting and a crap load of fun. I must say his timing is quite good, seeing that my car is almost done.   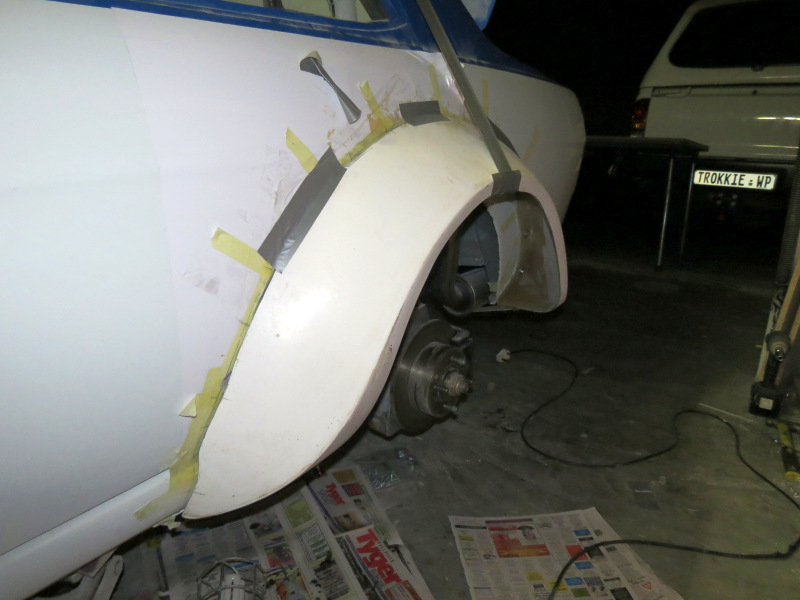 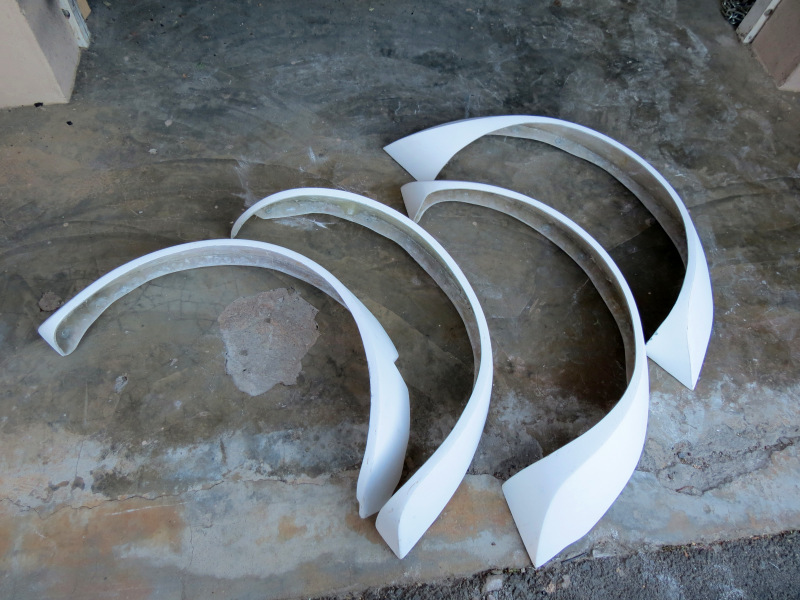 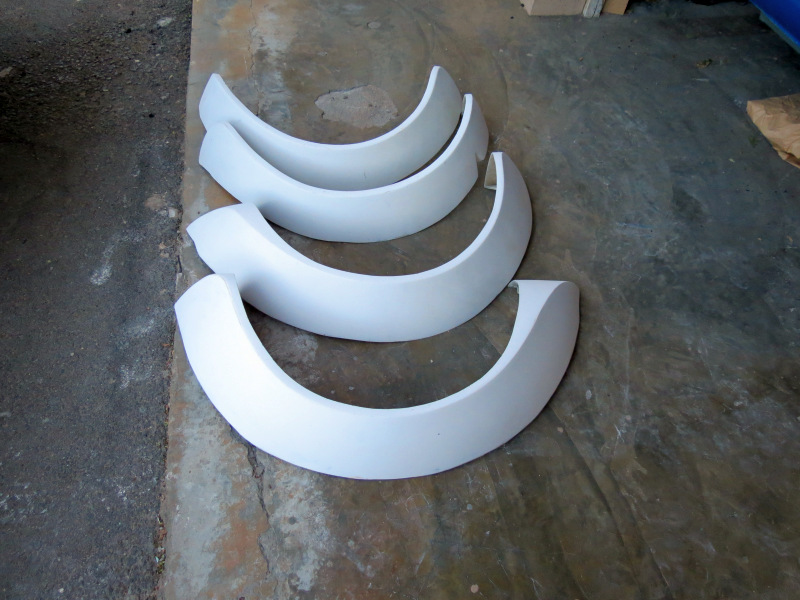 I spend a evening or two looking like Casper the smiling ghost while I trimmed the components off all excessive material, the next few evenings and weekend was used fasten the flanges to the body followed by making a few minor changes to the outers to fit nicely on the flanges and to follow the body nicely. Then I bonded the two pieces together on the inside with fibre glass and gave them a quick sand before taking them to the body shop for some final prep work and a few coats of paint. 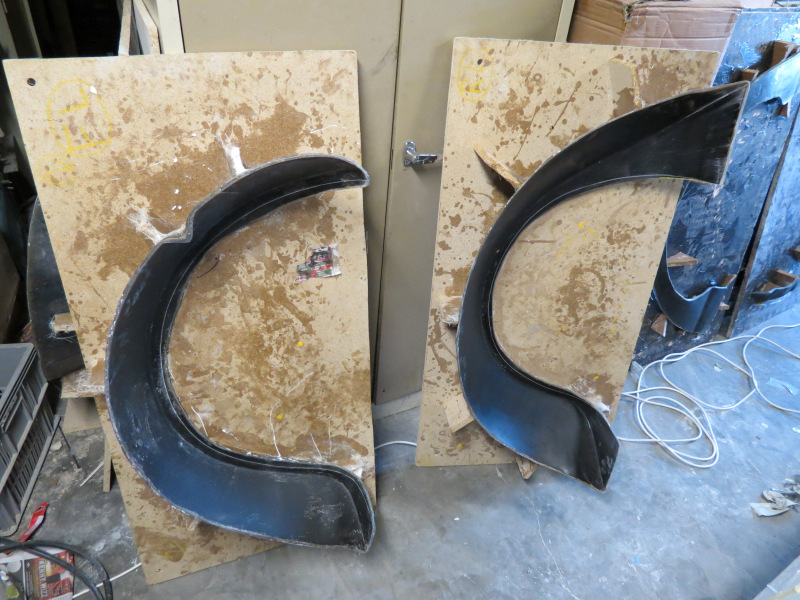 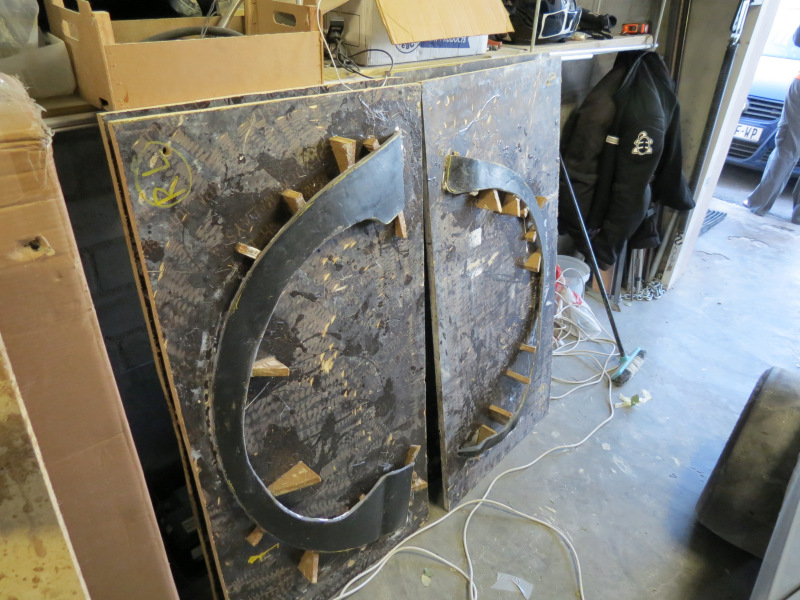 While I waited for the flares to be painted I had to make space in the garage, this was accomplished by moving the molds all 8 of them to storage as I hope to not use them that often. Once I had some room to move, it took about 2 evenings to get the garage clean, well cleaner than before, some of the dust will never come out of the poor thing. Afterwards I decided to lift the car, I managed to lift the car about 120 mm, it does look quite weird but much more practical for Police Clearance and Roadworthy, this will also help with measurements for the new set of shocks for gravel rallies. 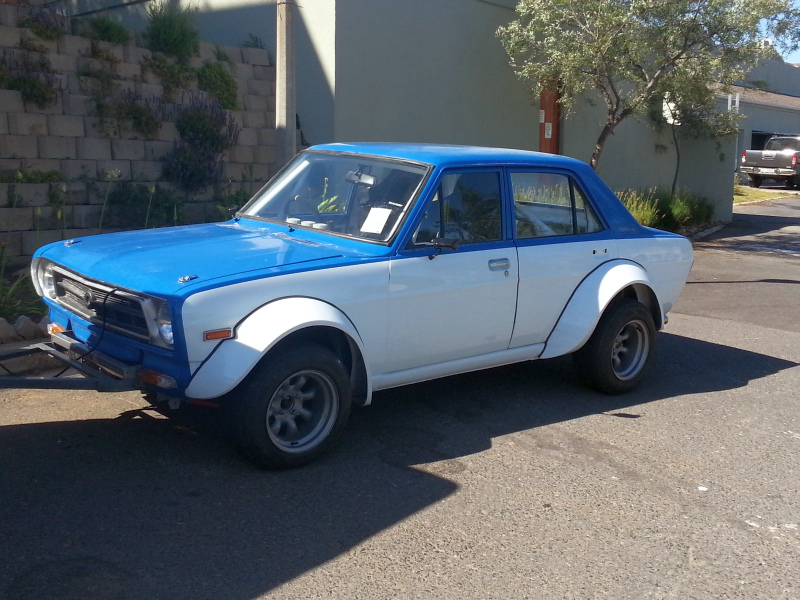  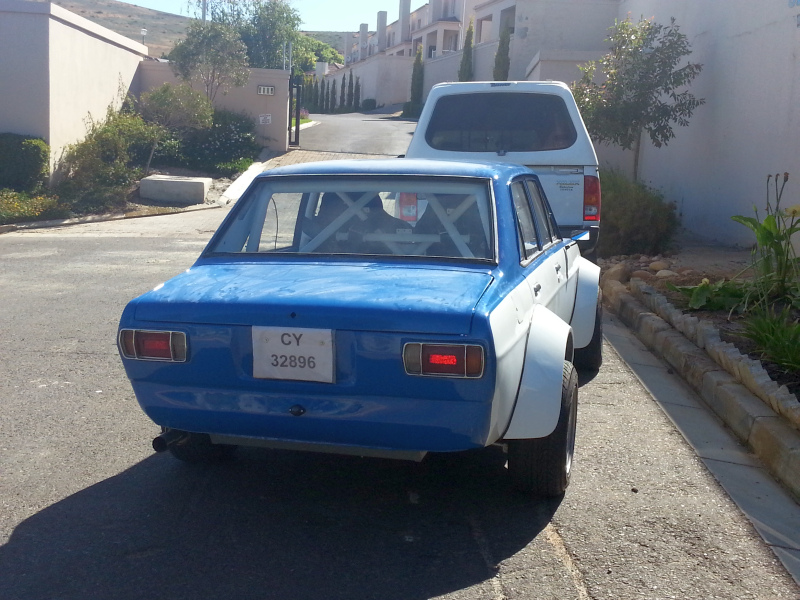 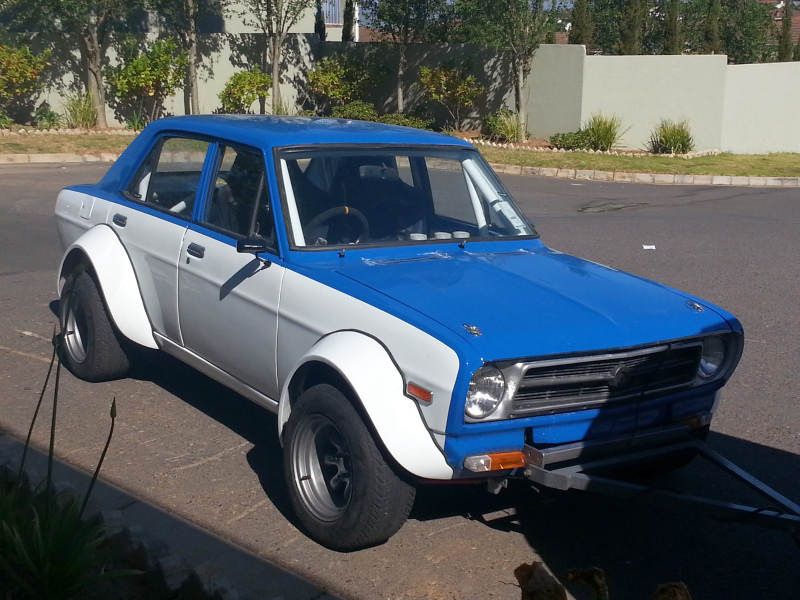 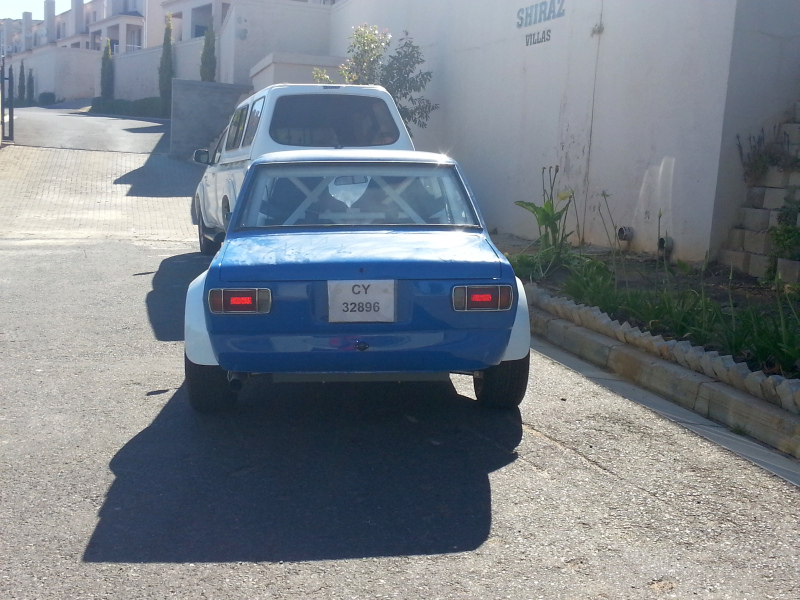 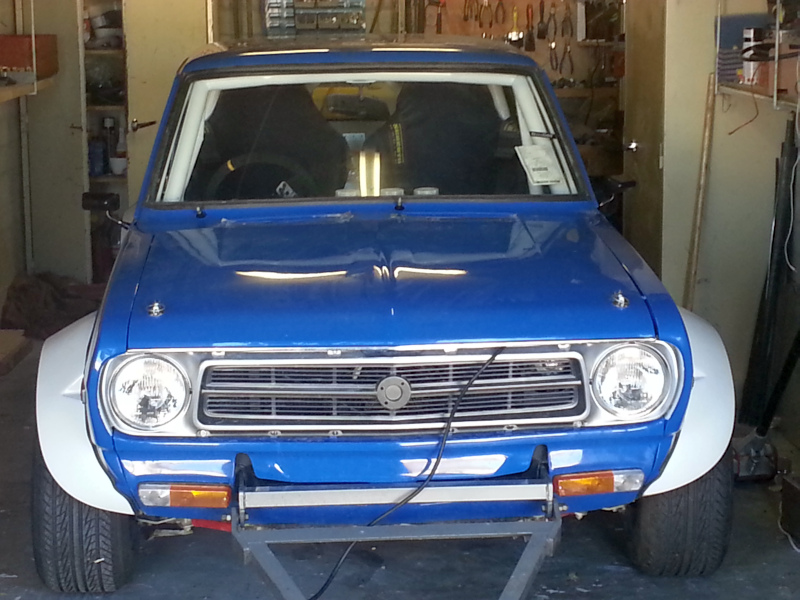 I got the flares back from the body shop, but I wasn't at all a happy man, so unhappy that I indicated to them that I will only pay for the work once I bring them back and they redo there work to my standards, at least they look ok for now, on closer inspection they look worse than a backyard job, anyways, enough of that. It took me and my fiance yes you read correct, I got engaged at the end of November, the whole evening to stick the rubber strip to the flares and fastened them, I'm quite happy with the end results, a few things I'm not 100% happy with, but if I build up the courage one day I'll fix some of them. I took the car for Police Clearance, now I just have to get the final parts assembled and then I'll be off to Roadworthy.
Posted on: 2012/12/13 10:04
Edited by racetech on 2013/12/23 11:43:47
|
|
|
|
 All Posts (racetech)


;)
;)
;)
;)
;)
;)
;)
;)
;)
;)
;)
;)
;)
;)
;)
;)
;)
;)
;)
;)
;)
;)
;)
;)
;)
;)
;)
;)
;)
;)
;)
;)
;)
;)
;)
;)
;)
;)
;)
;)
;)
;)
;)
;)
 Transfer

;)
;)
;)
;)
;)
;)
;)
;)
;)
;)
;)
;)
;)
;)
;)
;)
;)
;)
;)
;)
;)
;)
;)
;)
;)
;)
;)
;)
;)
;)
;)
;)
;)
;)
;)
;)
;)
;)
;)
;)
;)
;)
;)
;)
;)
;)
;)
;)
;)
;)
;)
;)
;)
;)
;)
