Just can't stay away  
Joined:
2014/1/18 5:51
Group:
Registered Users
|
@lamb_daquiri, somewhat belatedly: print the PLA, 5% infill and layer thickness of 2, cover any weird spots with hot wax, glue all the pieces (form, sprues) together with wax. Shove the whole thing in a bucket of water and roughly estimate volume for choosing how much aluminum to melt.
I mix plaster of paris and casting sand about half and half. What I should do is buy a big sack of Ransom and Randolph Plasticast, which is designed exactly for doing this, and I'll do that at some point. I usually use a plastic jug or a taped-up cardboard form about 1.5cm larger than the mold. Add water to the plaster, mix, vibrate to reduce bubbles, pour it over and inside the mold. Sometimes i weight the mold and pour around it. Sometimes i pour the plaster and press the mold down into it. It's so thick it won't float the mold out. Let that sit for a day, remove the coating/cardboard/jug so it's just a big chunk of plaster, and let that sit for a week to totally dry. (If there's much water still in it, it'll explode.) Ideally just after you pour the plaster you put it under vacuum to suck out all the bubbles. I don't do this because A: plaster sets up so fast my vacuum pump can't pull enough to be worth it, and B: because the PLA is mostly hollow, it would either collapse or get investment sucked into it if I vacuum debubbled it. So I just deal with air bubbles. Extra metal is okay. Not enough metal is the problem.
Casting day. I put the plaster mold upside down in a burnout oven that has a tray in the bottom, so all the crap melting out of the mold ends up in the tray not all over the oven bottom. Make this from steel NOT aluminum because you (I) feel really dumb when the tray melts and makes a mess all over the bottom of the oven. Burnout schedule for most of mine has been 1 hour at 100C, 30 minutes at 150C, 30 at 200C, and 30 at 240C. The wax comes out at 150C, and the PLA comes out at 225C or thereabouts. You have to make sure that your mold and vents are set up so the PLA can pour out. You can vaporize it out but that takes longer and the plaster/sand really begins to fall apart at the high temps you need to vaporize PLA. So you start your burnout, and then you go screw around with the foundry.
The foundry I have set up is pretty cheap. The furnace is an industrial metal paint bucket, like 20 liters. I packed in about 4cm thick of a mix of fire clay and sand and smashed-up bricks as insulation inside the bucket. There's a 30mm hole in the side at the bottom. My crucible is a chunk of steel pipe about 10cm in diameter, about 2mm thick, with a bottom welded on. I built a long pair of pliers to insert and extract it from the furnace. Originally I fired it with coal or charcoal with an air blower in the 30mm hole. This was an unbelievable pain in the butt. Now I'm using a homemade Reil burner running on propane. It takes about 45 minutes from when I light it to when I've finished pouring. Since I have about 50 liters of used engine oil I will at some point build an oil burner. One thing at a time. (There are good reasons to not use a steel crucible with aluminum. Graphite crucibles are cheap.)
So, light the burner by throwing some weeds and paper in the furnace, lighting them on fire, and turning on the propane through a nice needle valve. Usually I need to have the crucible in there because when it's cold, the flame blows off the end of the burner and extinguishes unless it has a little back pressure. I throw in whatever junk I have around, with the proviso that these days I have junk that was mostly cast already. Pop cans make lousy casting aluminum. Smashed-up heads and pistons and conrods make _fantastic_ casting aluminum. You can also cut it with bicycle parts and window frames and whatever else, just as long as at least half of it was originally cast aluminum. I have a top for the furnace. It's made of the same stuff, the same diameter as the paint bucket, but I put a pop can in the center of it when I made it and now that's the vent.
By the way. Mixing your furnace refractory out of fire clay and sand and broken bricks is really antiquated. You can buy castable refractory at home improvement stores, for repairing fireplaces, and it is WAAAAAY better than my DIY junk.
Put in just a little aluminum, like a muffin-sized chunk, up against the side of the crucible where the flame's hottest, and once that's melted add more. The increased surface area of the liquid aluminum transfers heat way faster and you save propane. Once you have as much as your displacement test said, plus 30%, you're ready to pour.
Back to the oven. Oh so carefully take out the mold. It's probably cracked. That's fine. I pour in a big container full of sand. I dig a hole in the sand, put all the pieces of the mold, which have cracked and fallen apart, back together and blow out any junk, and stick it in the hole in the sand, and scrape the sand up against the sides. This seals all the cracks so the aluminum will leak out a little but won't just pour out. I put some big steel plates on top so I don't float the top of the mold up on the aluminum if it cracks more.
The aluminum is ready when you can just barely see it glowing in the dark. There are other ways to test temperature that are more accurate but this works. Ideally you degas it by taking some salt substitute, potassium chloride, and wadding it up in aluminum foil and jamming this down into the melt so the KCl bubbles through it. You can also pour some borax laundry detergent on the top to help reduce oxidation. Just before you pour you scrape the oxides off to one side with a spoon or something. Then you put on EVERY BIT OF PERSONAL PROTECTIVE EQUIPMENT YOU OWN AND ANYTHING YOU CAN BORROW. Seriously. I have safety glasses and a face shield and a leather hat and a leather apron and big leather boots and a jean jacket. Coz when this goes wrong it shoots molten aluminum right at your face.
And then you pull the crucible and pour in a nice steady stream until it starts coming out the vent holes, and then you slow way down and pour very slowly for a second longer, and then pour the rest in muffin tins you bought at the dollar store because if you nick your wife's tins she will kill you. Turns out they have nonstick coating. Well, had.
And wait for 10 minutes and chuck it in a bucket of water.
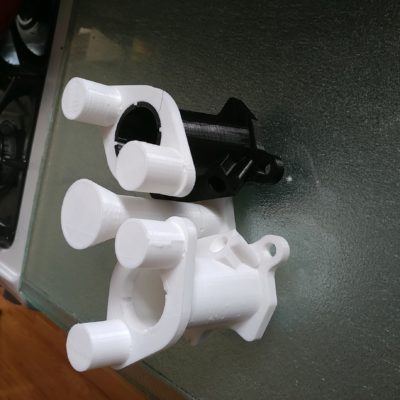
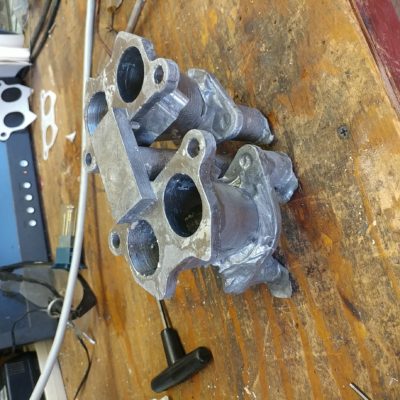
Make all sections at least 2mm thick. Cast dimension-critical parts once first, because they're gonna shrink about 2-4%, and you want to see how much it actually shrunk and oversize your next print by that much. On this casting I printed the bottom and top plates separately to assure sizing.
Aforementioned plasticast won't crack into pieces during burnout. That's one good reason to use it not plaster-and-sand.
You can also do green sand casting, where you put your form in sand. It's reusable and works really well. But some mold shapes (like this one) are pretty complicated to do in green sand. It's best for hat-shaped things, not for stuff with multiple flanges and internal recesses. (That's perfectly doable, but takes practice.)
Posted on: 2019/11/9 3:37
|
 All Posts (smellsofbikes)


 Transfer

 PLA_print.jpg (22.10 KB)