|
|
|
|
Re: racetech's 1200 SR20VE Project |
|
Home away from home  
Joined:
2009/4/16 10:37
From Cape Town, South Africa
Group:
Registered Users
|
sorry for the late reply, I took a break from racing, got married, broke my foot, but back at it.
I did all the machining on the spindles myself, only the heat treatment was done by professionals.
Posted on: 2019/2/1 11:35
|
|
|
|
|
Re: racetech's 1200 SR20VE Project |
|
Home away from home Joined:
2009/4/16 10:37
From Cape Town, South Africa
Group:
Registered Users
|
Datto Build - 2016 WBMK Ceres Rally - The Good and the BadAfter a very successful Klipdale rally we started early with getting the car ready, seeing that we had no issues at Klipdale the preparation works was limited to a few small items. After pulling the car from the trailer the day after Klipdale I realised we had a charging issue, luckily the diagnosis concluded that sense and supply wires to the alternator broke in the connector, Luckily Henk from Tygerberg Auto Electric made quick work of supplying a new unit. Finally my USB charger arrived, this one is long overlooked as my focus was always on keeping the GoPro powered and as of late the remotes died on my and I had to swop them at mid-day service, easier said than done, you have to pair each camera to the new remote, this is quite a crappy job, but then again there is worst jobs to do. <a href=" http://www.madev.co.za/3956" target="_blank">Car Boat & Truck also started work on the air vent for the roof, something that we would like to have for the National in September as it is normally quit dusty in September, they also repainted the two wheels we damaged at last years National. The rest of the preparations went as per normal, check every bolt on the suspension, look for cracks and anything out of the norm, blow the dust out with the air hose, vacuum, wash the interior and exterior, pack all the spares and tools and finally load the car on the trailer after a test drive. As normal driving to Ceres this time of the year, the road between Wellington and Gouda was quite misty, making overtaking quite difficult, on arrival at Ceres Toyota the final preparations were completed before the car could go thru scrutineering, this normally include, checking tyre pressures, filling the fuel tank, cleaning the windows, setup the cameras and making sure all the safety equipment is in the car. As normal the car passed scrutineering with flying colours. Once in Parc Ferme it was just a matter of getting the racing suit on and wait for starting orders.  Stage 1 In a blink of the eye my mood went from excellent to very disappointed. Well as we started the rally from Ceres Toyota we made our way to the first stage, barely out of Ceres it became quite apparent that the motor was down on power, with two stages before us and the service park we just had to keep our hopes up, not that easy. Ruan realised he forgot his balaclava in his bag and the service crew had to bring it down to us, we met them just before the stage, Ruan's melon now safe if it burns we proceeded to get the helmets on and enter the time control. The stage started off with a very fast section going into a a technical section before opening a little just before going over the hills and dam wall, after the dam wall it is very rough, we made it, but the motor was down on power.  Stage 2 Only 1 to go before the service park, but this was the long one with which we have history, midway thru the stage is the spot where the front stub axle broke 2 years ago, this section is so special we even dedicated sometime in the pace notes to convey our respect if we pass the spot. One thing is for sure, I do need to work on the more technical stuff as I misjudged the entry speed on a very sharp right hander, luckily nothing major. In these technical bits it was quite difficult in driving the car as we struggled a lot with power low down, half of the mistakes was due to me trying to drive thru it and the rest was trying to crawl back the time that I just lost. We passed our little spot of previous breakdown in style and then the fast bits came, what an enjoyable part of the stage, fast flowing stages between farms ending the stage with a section going up the hill, the car sounded terrible as the exhaust cracked somewhere.  Service We almost did not make it back to service, one of the hills we had to go to 1st gear to keep the car going, in service the crew started fitting new plugs, looking for obvious things like vacuum pipes, lose wires etc., nothing. In the meantime I was going thru the ECU logs, all seemed in order, fuel pressure, spark etc., besides the Air/Fuel readings, this seemed off all over the show. But we reckon it was a dead plug or two causing the AFRs to show lean.  Stage 3 and Service 2 When putting my helmet on I realised my spectacles were gone, damn I as dumbed struck, since I couldn't even remember putting them on the morning, neither doing stages 1 and 2 with them, can the day get any worst. As we excited the service area we knew the problem did not go away with a set of new plugs, we turned around, switched the ECU logging on and gathered some data. Seeing that we had a lot of time as the mid-day service was after stage 3, we started digging deeper, unplugging connectors, removing the distributor cap in search of some water, nothing, again the data suggested perfect fuel pressures, but still very lean afr readings. I got the bright spark idea of adding some fuel in the cells used for idling and immediately the AFRs came down, suggesting a fuel problem not ignition. We kept adding fuel over the entire maps until it was safe to race the motor. We went out to test on the road a couple of times and it made a big difference. Back in service we had lunch while and the boys gave the rest of the car a once over. Since we had a lot of time we searched high and low for the spectacles, but no luck.  Stage 4 As we set off the car felt new as we had some more power, not 100%, but at least you could get yourself out of trouble thru the corners. The first part was fast and flowing going over a few rough spots, before going past the spectators next to the road, it was nice to see the whole 1000m odd sections lined with spectators, we did our best to great all after the stage on our way back to service. After the spectators point the stage turns into a terror for a few hundred meter as it is very difficult judging the dips at speed, afterwards it opens and flows again, it is as if the dog shows you some teeth just in order to demand some respect.   Service 3 We had a motor with more power and happy with that, I can't even remember if we did anything besides setting tyre pressures as we decided to stick to our current tyres for the remainder of the day, as we had nothing to prove, we decided to just finish the rest of the stages and enjoy the rally even more.  Stage 5 On our way to the stage Ruan asked me what the plan was, well I have not seen the stage other than on the DVD, but we quickly came to the conclusion that we are going to be safe and just have fun. This was the one stage we were warned about, this thing apparently had big teeth in the first section, that as quite a concern, well what is a man to do than just getting on with it, we tip toed thru the first section as it was quit slippy. Once the scenario opens before you the stage is devilish fast and flowing and true commitment is needed, something we were lacking, and passing the rolled car in the stage did not help, neither did Ruan with some of the notes that was very slow, our new found speed got to him. We ended the stage with a 2nd fastest time for the day, something we are very happy about, would love to redo this stage one day and try to improve, but this is the type of stage that can turn into a high speed disaster very quickly.  Straight to stage 6, the way I like it We arrived at stage 6 and I can remember looking into the distance and seeing the 4 little square road signs indicating a very sharp bend, I just had to check the notes with Ruan just to make sure it is really as sharp as indicated, actually a nice to have road signs on a stage, if Ruan nod off I can actually continue. We exited the sharp left hander and immediately you could see this is big mans country this and you should be packing if you want your name at the top, we did our best on this new roads but one or two crests I just had to lift as we approached as my chest compressed even though the notes said flat, I just not had enough in me for them, but the last one my inner chimp stepped forward once he heard the flying finish is behind it, as he remembered it is straight and we should prove a point to the brain that the chimp is the strongest and we can flat foot it. Ok so lets just stop here for a second. Driving to your next door town going up and over crests is one thing we all are faced at least once a month, but doing it once a month on gravel roads while doing speeds above the normal 120km/h not knowing what is on the other side is a completely different ball game. Before I started rallying I never gave any thought to the word crest, a crest was a good spot for a photo, but in rallying the word crest will test your inner to the max. Back to the crest at hand we approached this thing and the chimp took over and pinned the throttle to the floor, we went over this thing at close to 160km/h wheels lifting slightly, on the other side we managed to add another 7km/h to the total and flew over the flying finish at 167km/h slamming on the brakes as the time control came closer at an alarming rate, what a rush, I think we were giggling like little girls all the way back to the road service, inner chimp happy with the fix until the next one. 3rd fastest time for the day, inner happiness.  Road Service A new concept to us, but seeing that we were humbled by the last stage and glad to be safe we had a blast washing the car at the road service.  Stage 7 a repeat of 2 Seeing that we did the stage earlier with a sick motor, I was happy to try my luck at it again. We went for it, and probably over did it as we made the same mistake at the right hander as in stage 2 then 30m later we almost ended in the fence, we recovered just to make another two corners later, then we got into it and everything started flowing, we paid our respect to the spot and proceeded to help the farmer plant some seedlings as we left the road and did some farming at speeds I might add but I got it under control and then onto the roads linking the farms, damn this is a nice part of the stage and we really enjoyed it as I had enough confidence to chuck the car into corners knowing there is power to get us thru it.   Stage 8 a repeat of 1 Just had to finish this one in order to record our only finish to the Ceres rally, well we did super rally but the first time we completed more than 3 stages. We took it steady over the jump, while it seems to me everyone else was out for their photo of the year as they went for serious air, as we entered the technical bit a made a few mistakes from trying too hard, after that I just went into a steady pace to get safely to the end, and we managed another 2nd fastest time. All in all we are very happy with the progress we are making in every aspect, 7 rallies done, not 1 Ceres finish, but I think this is Ceres way of telling us that we need to come back and finish it. Photo CreditsJacques Bartie Photography Street Motion Eric Joseph Jason Hanslo VideosStage 1 https://www.youtube.com/watch?v=bXVQMAU-ZoAStage 2 https://www.youtube.com/watch?v=1bwla4WIh3cStage 5 https://www.youtube.com/watch?v=V09IlG5GTk8Stage 6 https://www.youtube.com/watch?v=-BDDZLOMJi4Stage 7 https://www.youtube.com/watch?v=aiI5o2WmusYStage 8 https://www.youtube.com/watch?v=ZCk-XLg3iPA
Posted on: 2016/7/11 9:19
|
|
|
|
|
Re: racetech's 1200 SR20VE Project |
|
Home away from home Joined:
2009/4/16 10:37
From Cape Town, South Africa
Group:
Registered Users
|
Datto Build - March 2016 - Brake Upgrade & Klipdale Rally     As we arrived home after the Toyota Dealer Rally we parked Datto and replaced all the rally equipment with camping equipment. The next morning before first light we set of on our road trip to the Kruger National Park, a quick dash thru Swaziland, a steep climb up the Sani Pass and a colourful drive thru the Eastern Cape back home. I would just like to say one thing about this trip, all the people in the world that thinks Table Mountain is this beautiful thing surely havent been to the Drakensberg, never in my life have I seen mountains in our country better looking than the Drakensberg, magic and a slight touch of wizzary is the ingredients for those mountains.  The Morning as we were driving up, I made a comment to a family member that told me we should be careful in the rally car that, I'm safer in the rally car than on the mountain bike, if only I saw the irony in that statement, during the week back at home, a friend and myself visited a MTB trail we havent been to in a while, on our way down I ran out of talent over a table top jump, broken my left cartilage, right AC joint broken, my first stitches on my right eye brow from the helmet cracking on 8 places, cuts and bruises all over, a haematoma on my right leg (at least my physio gave me some nice Viking art for that) and lastly, no damage to the MTB, what a relieve.  Obviously the above caused some issues working on the car was very difficult as my one arm was in a sling, at least I kept my mechanical side sharp for a month or two by assembling my own MTB, there is something special building and riding your own specced bike, even maintenance on it is a nice affair as you learned all the tricks needed.   Seeing that we realised that we needed a better hand brake on tar and that we have a little heating issue on the front brakes, we decided to upgrade both front and rear brakes. Allot of effort went into searching for the best options, lastly we settled on a new pair of Wilwood DynaPro 1.75" Stainless Steel pistons units for the front coupled to a set of 298mm curved vane rotors to help with heat dissipation, for the rear we went for the same size 298mm rotors, this time normal straight vane and used the old front callipers. The above seemed like overkill, but hopefully it would allow us to use a slightly cheaper brake pad compound which could net a huge money save in the long run.   Seeing that the front was already radial mounted callipers, it was the obvious to start with them, with a little time spend on AutoCAD to design an ideal adaptor plate between hub and rotor that defined the necessary measurements in order to get the offsets correct, I was able to make some quick spacers in order to mount the calliper to test clearance between the wheels, all was happy.    It did not take too long to machine the required adaptors once my arm was out of the sling, drilling all the holes on the other hand was quite a task seeing that I needed my very weak right arm to operate the milling machine. After all the drilling I chamfered the sides in order to allow the maximum amount of air to be vented thru the rotors.   Packed the bearings with grease, installed some new oil seals and the front end was done and dusted.   The rear was a matter of much much more time and effort will be needed, especially since the old rear callipers were lug mount, this meant a whole new mounting must be designed and also a hat to mount the rotor.    After some careful option consideration we decided to go against everything we believe and not start from scratch, but rather use the old rotor which spigots 100%, cut it down to size and mount the new rotor to it, all in all it turned out to be a brilliant plan, just the machining took ages.    Mounting the calliper took some CAD (Cardboard aided Design) work, a lot of clamps some marking, drilling, tapping and time, I wouldn't bore you with the details. Due to the increase in piston count and increase size of the pistons, we had to swap the master cylinders from 0.625 units to bigger 0.750 units in order to increase the amount of fluid and decrease the pedal travel as I like a very high stiff stroke, that just sounds inappropriate.  We were invited to put the car on display at the KykNet Ekspo and take some passengers around a little track at Apollo Bricks, it was a nice day walking around all the vendors looking for new camping ideas, but the track was very dusty and chewed up tyres like never before, also the speed was very low, which meant testing the brakes at very high temperatures was not possible, but at least we had an idea that the new handbrake setup is working very good. Witzenberg Motor club held their annual awards ceremony at the beginning of the year, we managed to get some trophies for our efforts for competing in the Regional championship, but also some for the National NRC2 championship, something which is very strange to me, only competitors with national licenses were allowed on the podium, but those of us with only regional licenses are allowed to score national points, very silly in my opinion, but let's leave it be as I personally think rally scoring is a freak in joke in our country, again, how on Gods green earth can a competitor that did not make it to parc ferme finish before those that actually finished the rally.  Regional Championship Regional Championship10th Overall Driver 1st Class S4 Driver 10th Overall Navigator 1st Class S4 Navigator NRC2 Championship9th Class NRC2 Driver 9th Class NRC2 Navigator Klipdale Rally We haven't really planned to do an event this early in the year, but seeing that we did it last year and really enjoyed the good quality roads and higher speeds, we just could not pass on it, then there is the little fact that this is the location of our very first rally, which mean the event is close to our hearts.  The prep work on the car was quite easy as nothing was broken, the shocks was taken apart, cleaned lubed and put together again, new grease and oil seals on the hubs and the normal bolt check, cleaning, alignment and washing. We had quite a laugh at the state of the tyres that was still on the car since the All Tar, just goes to show that you don't need the best to have fun.   As usual the morning started very early as we decided to travel to Klipdale the morning of the event in order to save costs. On arrival it was still quite damp from the previous weeks rain and we thought the weather will be nice and cool, boy were we in for a surprise. Documentation and scrutineering went by without any issues, the team did a great job in getting everything setup. 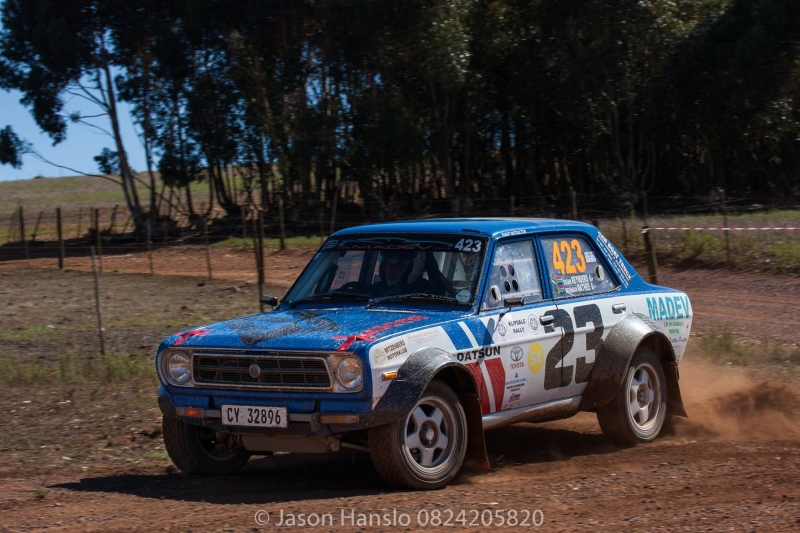  Stages Within the first few kilometres we realised that we were a lot faster with more commitment thru the corners, which is a very positive sign for us as it proves that we are concentrating on the correct order of things. Before the event I decided to use a heart rate monitor just for the fun of it and at the end of stage 1 we just had to look at it as we nearly lost the car going over the flying finish, my heart rate went from an average 146bpm to 178bpm in milliseconds, the whole incident happened so fast we could not immediately put our finger on what happened. I don't know if it is a good thing to have your daily scare on the first stage in order to slow you down or just to motivate you to look closer and concentrate harder. The crew had quite a giggle once we arrived at service and told them the story with so much laughter we could hardly get a word out. We decided that we will service after the first stage as the brakes were new and un tested and would stick to the old tyres until stage 4.   During stage 2 things just started gelling better and better, we took it easy over the very rough stuff and pushed on the more flowing stuff. For this event we tested a few changes in the way we make notes which turned out to help a lot, it saves time in making the notes and helps a lot with confidence, but we did not finish the stage without 2 incidents on the brakes, the rear was very snappy once you jump on the brakes, after some brake bias adjustments on the fly this seemed to get better and better. Back in the pits I had quite a long time to think about the brakes as we told the service crew it is ok they could stay out in the stages spectating as we will service ourselves, coming back to the brakes, the rear was so snappy due to the much bigger rear setup, also the reason why we almost lost it at the end of stage 1, after that scare I was prepared for it and could drive around it until I could put my finger on it and rectify, seeing that I'm not one for fiddling without knowing why.  As the day went on, we asked the service crew to come and service during the mid-day break in order to make us some food and help with tyres and refuelling. Again we had a good couple of laughs regarding the mistakes we made, at the end of the day the biggest one went to Ruan for forgetting to call a left 9, luckily we had enough space, but due to the language used I had to throw away the video footage as he was truly lost and felt very bad, I never laughed that hard during a stage nor after. The dumbest went to me for not engaging the clutch when pulling the handbrake in front of all the spectators at a hairpin right, dump ass. The last 2 stages was the best of them all, seeing that I made only a few mistakes and committed to everything Ruan told me and just had a blast. Our hearts went out to all the officials and marshals on the day as we saw temperatures in the car in excess of 43 degrees Celsius.   At the end of the day we ended with our best ever gravel results: 4th Overall, 9 seconds behind the podium 2nd Class S4, 9 seconds adrift of our 1st gravel class win. Very happy with our progress, almost almost getting to the point where we can remove the Learner sticker in the back window, for now we will continue to learn and be grateful for all the support and hard work from friends and family. Stage 3 https://www.youtube.com/watch?v=6zP6dTF70LIStage 4 https://www.youtube.com/watch?v=c07hZioqUZEStage 6 https://www.youtube.com/watch?v=E2IVcXBo-iQ
Posted on: 2016/7/8 12:35
|
|
|
|
|
Re: racetech's 1200 SR20VE Project |
|
Home away from home Joined:
2009/4/16 10:37
From Cape Town, South Africa
Group:
Registered Users
|
2015 TOYOTA CAPE DEALER RALLY & ALL TAR RALLYSince the last rally which was the 2015 WBMK Ceres rally we had a lot of sitting around to do, rallies were cancelled one after the other, postponed, postponed again, it made me quite mad, but looking back at it I'm able to find a few positives in it, next year we will focus on enjoying life and not rush for the next event. There we go I said it, there is more to life than just working and rushing for the next event. A few odds and ends  Since the Ceres rally we went for a fun day at a RPT Sprint, after which we discovered that we are starting to tear the front track rod mountings, luckily an easy fix since I know my way around a welder. Seeing that we had so much time before the next rally it were decided that it is a good time to get the dust caps fixed on the hubs, this time around decent caps were machined with a very rough thread to just screw them on, the final piece works a charm.  Since Ceres we went thru two steering quick releases, the metal on aluminium just is not strong enough, JOES Racing Products Steering Wheel Quick-Releases 13400 is the product I'm referring too, maybe good enough for the average looking to make his street car cool, but not for anyone else. Luckily for me I lost a few kgs around the gut and are now able to get in and out of the car much easier, thus I designed my own solution. The steering wheel is mounted rigid, well almost, well only if you fasten the bolts, the steering wheel angle can be adjusted with 3 x 8mm bolts, clever hay. The whole steering column assemble now uses a 13mm spanner and a 2 imperial sized Allen keys.  The night before the Ceres Rally the DASH2 started losing data intermittently, well this was caused by a non-stranded wire that broke within the loom, probably due the high vibrations within the car. I managed to source some high quality wire and descend Deutsch connectors, while busy I installed a switch in the serial data stream that cuts the ground between management and display, this is very needed during mapping as both the display and laptop uses the serial bus, which cause chaos, solution, switch the stream off to the display and happy mapping. Talking about mapping, we have spent hours on the road, behind the pcs, in order to learn and understand the whole mapping process better, this required lots of effort from my brother and also Ian Oberholzer from Rezlo Auto Works which assisted us over the copper wires. What an interesting process, especially if you are working with decent management with very good logging and analysis capabilities. The main goal of the mapping exercise were to activate the cams a lot earlier, well between 3500-4200 rather than 5000-5200, this would help keep the car on-cam between changes, seeing that we don't have money for a short ration gearbox. I must admit, it was a struggle , but the end result is much better, throttle control and driveability much improved on the gravel. Now it is just a matter of time and money before I can build a decent solid diff that would aid the changes in the mapping. Next time around we just need to invest in a inverter in order to keep the laptop powered. Sump Guard      Something that the car needed from day one, well a better one, I always knew I should invest in a strong unit, but with all the work it always took the back foot, seeing that we had to retire the Ceres rally due to this, the sump guard became the most important part to design and build before the next outing. A few hours later and I figured out all the angles and my brother managed to create one of his special AutoCAD drawings ready for some attention at the laser cutters. Since I waited for the parts to be delivered, my attention automatically drifted and all of a sudden I'm looking at buying my own high frequency AC/DC TIG, I managed to find a bargain after my usual price haggling and purchased my very own machine. Once you have tried some Alu welding you have a deep appreciation for those that have actually figured out the art and science to weld alu at aircraft quality levels. Saying this, I'll try my best to learn, but when it comes to parts that is made from thin materials and needs to look good, I will stay pay a professional. I managed to weld my sump guard on my own, well with the help of a few YouTube classes, it did not take long to realise welding 10mm Alu with a machined designed for 200A is a big no no, as it took 2 melted torches to get this thing done. All in all I'm satisfied with the end result. The guard is so strong, I had to reinforce the front metal work in order to justify this things strength, no help having a strong guard but every time you use it you sheer bolts from the chassis. The guard now bolts to the car with four 8mm bolts at the front and two at the rear, again 8mm bolts, standardising. The rear sports recessed bolt heads and the top a polypropylene spacer that takes the gap between guard and cross member, now the team can jack the car without worrying about any damage. Steering Rack   Besides the steering rack going in again for an oil leak I managed to spend a few hours in making a set of clevises to replace the racks ends. Timing was perfect seeing that the old rack ends started to show signs of play, the biggest motivation besides the elimination of rack ends is the fact that the front end can now use all the travel, previously the rack end inner ball to carcass stopped us from using all the travel, now it is free for all. Lightning  Seeing that we had two rallies approaching that needed some upgraded lightning, I decided to spend some money on cheap Chinese LED Bars, there not the best when it comes to focused light per lumen, but for the price and the frequency they will be used, they are perfect. For the majority of the forward lightning a 180W 800mm long Bar mounted just above the bonnet level where used and then two smaller ones mounted below the top one on a slide in order to adjust the angle, these two small ones is just to light up the pavements and walls. These things make so much light, I can understand why the authorities does not like these on day to day vehicles, you can cause accidents with these. Toyota Cape Dealer RallyWe managed to prepare the car about 3 weeks in advance, thanks to Jean and Ruan for the assistance, it made a big difference, after the day of prepping we ended the day with a huge braai, shared a few stories and I had a last to-do list to finish, luckily only small items. Well what can be said about this event if you're used to regionals, first of all it is a different world, the basics is more or less the same, but that is it. From the first piece of information/email it was quite apparent that this is much more professional than most regionals, first of all, the event actually took place on the set date. Everything where done in a very professional manner, from maps to general information. The notes, I loved these things, they are actually created using a clever little box full of gyros and GPS technology, linked with a video and you have a very attractive interface to use and study a set of base notes, I love it. The Rally consisted of 4 days for us. Day 1 - Wednesday - The Big Pack  Drop the rally car for a wash followed by the motorcycle and bakkie for a wash and polish at the local carwash. Once the motorcycle were done I had transport to go to Ruan in order for the two of us to collect our sponsored bakkie from WBHO that we could use for the weekend, thanks WBHO. On the way home we collected the trailer, thanks Car Boat and Truck, then stopped to buy all our drinks that we will need over the next few days and you will be surprised at the amount of fluids consumed on something like this. We moved on and collected the rally car from the carwash, once home we only had to finish the small bits like adding sponsor decals, apply the last layers of RainX, pack the bakkies, yes we used two and load the car. Oh yes, somewhere between all this we actually collected the bakkie from the carwash, but that detail is a bit hazy. Rally tyres were fitted to the rims that will be used, and then a very used set of tyres fitted for Friday seeing that we will only be racing on tar, no special tyres for us. I took the time to add some decals of the sponsors to my helmet seeing that every little bit of exposure helps. Day 2 - Thursday - Recce & Scrutineering Day  An very early start to the day for us and the car on the trailer on our way to Malmesbury, once we arrived at the showgrounds we un hooked the trailer, waited in line for our documentation and set off to recce our first stage, all of this being quite new for us seeing that it would be our first national rally event we will be competing in. Seeing that we had access to the recce videos from the Monday we had an idea what to expect, thus armed with a set of provided base notes we set of on our first pass of the stages.  We focused on making the notes quite safe, thus slow, but we wanted to finish the rally. After the first pass of the stages we started noticing all the cuts that started appearing as the big boys marked their territory.  During the second pass the waiting around before the stages started to get longer and longer, the end result a very long day and a lot of km behind the wheel, still a lot of fun, really enjoyed the whole National thing, could get used to the way of doing things. Seeing that we were lucky enough to be some of the last to scrutineer, we decided to drive back to Cape Town to take a rest and have something decent to eat before returning to Malmesbury to take the car thru scrutineering, a very clever plan, seeing that we would have had to hang around for about 4 hours doing nothing. As usual the car passed with flying colours, just got some lip in regards to our racing suits, apparently there are different rules for locally produced suits vs the big name imported units, something that is not written in the rules, but that is Motorsport South Africa for you. We arrived home just after 10, sleep was becoming a thing of the past. Day 3 - Friday - Tar Racing Seeing that the racing started a little later, we managed to sleep until 7am, what a treat. We finalised the last few bits and bobs and headed off to Killarney racing track to setup our service area. Again we had the opportunity to do a 2 pass recce of the stage, luckily for me and Ruan we know the complex quite good and have nick names for all the corners and service roads.  Drivers briefing was quite a laugh, but you could feel the tension between the big boys, while the rest was just happy to be abale to compete alongside them, knowing that if they make a mistake we will be able to say we finished and they did not. A lot of waiting around happened, the rally started for us on the ceremonial start ramp at Bidvest McCarthy Toyota Tableview, after which we moved back to Killarney for our first stage. Stages The first stage went past and it was quite fun, never in my wildest dreams would I have though an old rally tyre had that much grip. Stage 2 was more less the fun as one, except we started seeing some damage against the walls and cars parked here and there with damage. It became quite apparent very quickly that a decent handbrake for tar is needed. Once we arrived back in the pits we saw it was Leeroy Poulter car behind us sporting a lot of damage to the rear, all make sense, he and the wall met each other hard. Once we were done with service we had to drive the cars to Cape Gate shopping mall thru peak traffic, that made for some interesting looks from the other cars. We had a repeat mickey mouse stage in front Toyota Cape Gate. As we lost a lot of time due to an accident on our route to Toyota all of the back markers more or less lost the opportunity to walk the stage and had to go thru it blind, a little unfair I would say, but that is life if you rally on a budget. The new lights we fitted worked a treat, but the handbrake quickly moved to the top of our next modification list, what a frustration. All in all we managed to keep the car in one piece. We had to parc ferme the evening and took the car home for a decent service, it was quite entertaining having other people work on the car at home while I stood around watching and fiddling with the computer, normally I'm all alone working on the car. Day 4 - Saturday - The Real Rally  Up and about early the Saturday morning with a leisurely drive to Malmesbury showgrounds for day two, gravel and more gravel. At the start of stage 5 - Langgewens, we actually had this weird peaceful feeling to the whole affair, it was quite nice, as we lined up to the start of the stage we were met with quite deep ruts, something that would shock us later as we discover a S2000 rally should be renamed to "road destroyer" damn they think nothing of a good quality piece of road. About 1 km in we passed a rolled Golf, not a good site to take in right at the start, but we pushed on and soon it became apparent that this stage would become one of my favourites, the only downside was the fact that we caught the car in front of us within the first 15km and had to sit in its dust.   On the last stage of the first 4 stage loop we started noticing a slight vibration coming from the front left, we managed to get back to the service park injury free.   During mid-day service we traced the vibration to a loose wheel bearing, a new development issue. We also managed to ding the right rear wheel. With our tummies filled and newer rubber all round we set of for the second loop, 1, 2 stage, service, then again 1, 2 stage service, I like this 2 stages after each other before returning to the service area, not nice for spectators, but it helps a lot with the standing around and waiting, something Im not very good at.   During this loop we noticed some very very aggressive cuts and started using them, but the thing that really caught us was the way the stages deaerated, a small hole became one that would swallow a hole wheel, these S2000 sure know how the destroy a road. We had more and more fun out on the stages, passed more than a few of the big names, thinking that we will now finish in front of them, but we were in for a surprise as South Africa rally rules is very screwed up.  As the speed increased, the amount of braking did also and a new issue showed its ugly head, our front callipers started binding, all fine in the stages, but once we reached the end, the heat soaked the aluminium pistons causing them to bind, we had two instances that we had to wait for them to cool, the last one our time was limited to get back to parc ferme, that we had to use the water from our freshwater bladder to cool the brakes in order for them to loosen in order for us to drive on. This sealed it for us, the modifications will include a serious rethink in regards to brakes. We managed to ding another wheel on the same spot on the same right rear corner, lucky I don't think.   All in all we had a blast, some of the best fun in the car to date. Besides the crappy rules that allowed all the broken down S2000 and S1600 to finish before us, even thou they did not even reach parc ferme, it was a very memorable event and we will definitely be back, even if the crappy rules are still very crappy. Thanks to all involved making this event possible. CCMCC ALL Tar Rally  Just as the name would suggest, a rally that is held on tar only, not really our thing, but we know the track well and thought it could only be fun, our motto being, do not destroy the car as concrete is harder than fences. We gathered some of our oldest rally tyres, some of them with more than 3 events done, strapped them to the wheels and we were ready for some serious side ways fun, since we learned that rally tyres are more fun than can be described on tar. The first stage was on the Friday evening, quite glad I went thru all the work in getting the LED lights mounted for the national as the combination really works nice on the faster stage, would still like to see what they do on a fast gravel stage. Just look at the amount of light these make in an lighted area: https://www.youtube.com/watch?v=hfKis4jZ0rwAt the end of the stage we only had a few minutes to remove the lights and check what is needed to do on the car the next morning as we had a service after parc ferme opened. Again the wheel bearings was an issue, something was causing the bolts to loosen, the cause will be found. 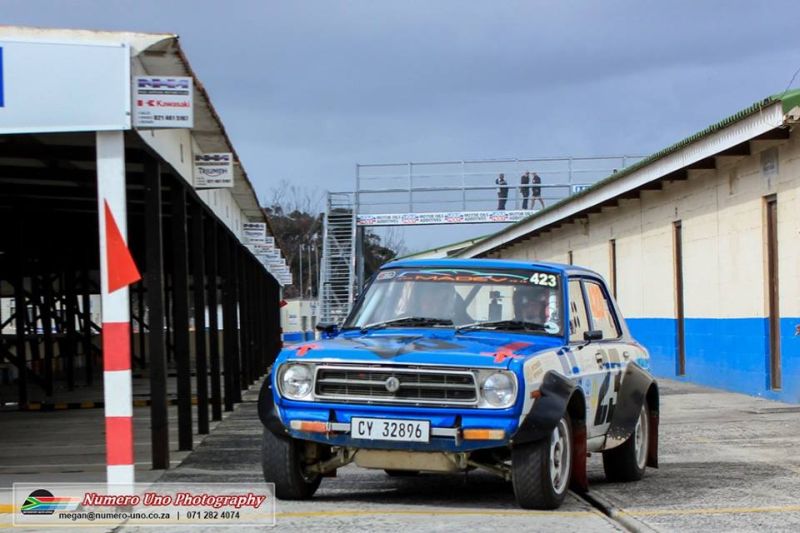    Saturday morning back at the track we waited for parc ferme to open, once the car entered service we quickly helped to check the bearings and get the rest sorted, the rubber we left as is, we wanted to see how far we could push them.    After each stage we just started having more and more fun, kept everything controlled and started climbing the leader board, as everyone want to win and push harder and harder until they either hit something or break down. At the end of stage 6 we had to pull off the road after the finish to cool the brakes, luckily we had 10lt of water on-board just for that, in less than a minute we had them cooled and on our way to the service area.   The only thing that got to me on this event was the fact that after each stage we had to service, that is a lot of standing around and practise to get strapped into the car.   We managed to finish the day with one set of very knackered tyres, our first class win, 4th overall and unofficially 1st on rally tyres, very proud of this achievement, but more proud of the fact that we drove the car home.   Again thanks to all involved in making this event possible, and especially thanks to our service crew and family members for their support. Just their dedication in getting our tummies fuelled is testament to the fact that they also enjoy these events.   Stage 4 https://www.youtube.com/watch?v=w-YJAT_ErMMStage 8 https://www.youtube.com/watch?v=3K2YbrLdIAEThanks to all the photographers for the stunning photos.
Posted on: 2016/6/29 8:54
|
|
|
|
|
Re: racetech's 1200 SR20VE Project |
|
Home away from home Joined:
2009/4/16 10:37
From Cape Town, South Africa
Group:
Registered Users
|
May 2015 - Ceres Rally & RPT SprintCeres Rally, it seems that this event became my nemesis, always causing me some sort of issue, last year we broke the stub axle, well this year it did go a slight bit better, but if things go as it is currently, it will take us a few years to finish all stages on this event, all I know is that this is most definitely no rally to mess about.  The weeks leading up to this event were crazy, with spending more time awake in the night hours than day due to some work that could only be done between 11pm and 6am, this alone really throws one of your normal routine. That was followed with a little break from work and rally with the only worries being the apes and cold of the Cederberge in autumn, hell the one morning we got on our bikes at 7pm without realising it was -1.2C outside, no wonder it took me about 45min of cycling thru the mountains before the tingling feeling in my toes disappeared, they must have been frozen, mental note, do not get out of the tent and walk in your slops without socks as you would do at home, stuff sticking out will freeze. Cederberge, for those that is not accustomed to it, make a plan, it is a magical spot, for MTB, hikes and beauty.  Luckily the week before the Ceres Rally I was on holiday, but seeing that there were still so much to do, to get the last done for the Ceres event, the stress levels were at an all-time high. Poly windows had to be fitted, new front suspension had to be assembled, fitted and tested, steering rack fitted after a complete rebuild, final prep and a dozen other small issues.  The funniest thing regarding this whole saga were probably the power steering rack, well at the time it really was not funny, more like heart breaking, seeing that it could have ended the idea of starting the rally. The rack went in for a complete rebuild, once it came back, I had to build new mountings seeing that I had to cut the old ones off, never ever use counter sink Allen caps on a rally car or any other part you want to remove again, especially if it will operate in water, mud and dust. Needles to say the rack were installed, the new steering quickener fitted. Placed the car on its new rubber, started it up, turned the wheel left, and the wheels move on its own to the right, same goes for steering right, wheels will move on its own to the left. After some furious swearing, my brother suggested turning the pipes around, easier said than done, about two hours later, the rack were back in its location and all working.  Polycarbonate aka Lexan windows were finished at about 9pm the night before the rally, the steering quickener were removed from the system the Thursday night as it made the steering to heavy, pretty damn fast, but just too heavy, a plan were executed to keep the dust caps in place etc, needless to say, that evening at about 10-11pm we went thru the pace notes, well it was my first time going thru them, by this time I was so mentally drained, I do not think it helped a lot.  Saturday morning after arrival at Ceres Toyota, the last pre event prep work were done, documentation and scrutineering completed. All of a sudden microphone were forced onto me and I had to give a interview that they actually wanted to use at a later stage, not that nice, luckily for the audience as far as I know this footage is still unseen. GoPro, if you haven't heard of these okes, it is seriously time to jump in your grave and retire. The most known, used and claimed action camera on the market, they do have their issues, even after 3-4 different iterations. I had my issues with them, but the biggest one to date is the fact that it is an action camera and never designed to work on permanent 12V while operating them by Wi-Fi remote, these things lose sync with the remote and never starts when pressing the record button at the start of a stage, by this time you are so strapped down by all sorts of belts, restrained with more straps than in a modern torture dungeon that there is just not enough time to loosen everything to turn your back and start the camera, what a pity not enough people need this features in order for the developers to work on it.    Stage 1 Seeing that time were against us, we had to start the rally with only RPM, Fuel level and Speed displayed on the screen, due to some sort of issue. No time = no time to find issue. Luckily we are using a LinkECU, these electronic management units comes with more safeties build in than necessary.  On our way to stage one, the most important things to do were bed the brakes, seeing that we were using the old damaged units we really worked them hard, the new front suspension were the last of our worries after we weaved a few times from left to right and it did what we wanted, even thou it was only tested for about 5km on tar the previous day.  At the start the main Gopro did not switch on, I'm still hating it for that, besides that everything went good thru the first few turns, took me while to place my trust in Ruan again after a year of not rallying on his navigating. Everything felt damn good, it even felt as we were more commit and actually keeping some pace thru the corners. 7km into the 14km stage I heard a rattling sound coming from the front left, not sure what it could be I dismissed it as Ruan would have said something seeing it is coming from his feet. About 2km later I just had to ask him seeing that the brakes felt weird, every time we went over a bumpy part with the weight removed from the left corner a mega rattle emerged, Ruan was just like "Nothing to worry about, probably just the shock bottoming out", well at that time that words were reassuring that all was fine and I should just anticipate the car moving to the right on braking and just keep on it. Coming to think of it, a shock bottoming out is not reassuring words, it is words for serious concern, but at that time it was so nice just to be back that it made sense. As we finished the stage on our way to the end control, the two of us were quite impressed with the run we had thru the stage after a year of absence.  As we approached, the marshals indicated our left wheel had severe camber, snap, I knew something was wrong, but the speed was good. We stopped in the road section and noticed a little camber, probably 5deg. It did not take a rocket scientist to realise the spherical bearing at the top of the shock ripped the sir clip out and was the cause for 1, shock bottoming out according the mister calm next to me or 2, the moer of a big rattle when unloaded, seeing that there were no way to re-install the spherical next to the road we phoned the service crew to bring the trailer and recover us. We lowered the jack,(by the way, a modified BMW 3 series jack does work nice on a rally car) placed the tools in the car and decided to drive the car to a better location seeing that the crew would not be able to turn with a trailer in that narrow road.  Scenes of Bredasdorp 2014 flashed past me with Ruan's invention of the IPhone hands free device for the navigator. As we drove we struggled with signal and had to relay all information via family to the service crew, As we moved we realised that we just completed 7km in a stage on this shock strut, another 10-15km open section would not heard on tarmac if we kept the speed down. At this stage our crew, family and friends were on their way to assist loading the car. I'm also pretty damn sure my brother executed the first Scandinavian flick with a car trailer attach to the bakkie, as that road was not big enough to find a spot, that fast for a u turn with a trailer and still be able to reach service seconds behind us.  As soon as we pulled into our service area the crew had the car on the sill stands and in an almost poetic rush of madness the shock was out, I grabbed a bucked with water and a few clean rags and headed over to Allen Martin service fan, his crew volunteered to weld the bearing to the top retainer, at least that way we could continue. At the end of the day we managed to not meld the inner lining of the bearing, a huge thanks to Allen Martin and his friendly crew that know their way around an Arc welder. While all of this was going on the rest of our crew went over the car, they quickly installed and assembled the suspension and we were cleared to leave service, we missed stage 2 but were in time for stage 3. A huge thanks to the team and to the new suspension as everything were designed to be worked on with ease.      Stage 3 were delayed, once we got going, we were in suspension testing mode and only tried to get more kilometres on the suspension, but obviously the driving were very cautious, the start of the stage were slow and it got better as we went on, the suspension took some serious hits and but all were good, that said the sump guard suffered a huge hit somewhere in the stage, were I do not know. We did hit a rock on the left side but that left a small mark, something else hit the guard harder and more to the middle. As we stopped for the time control at the service park, a friend indicated to the front of the car, we got out and realised we were leaking oil, Ruan quickly rushed inside and retrieved our environmental blanket to contain the oil spill. Once in service the team removed the sump guard and it was quite obvious I'm not willing to take the change to continue this way, a sad ending to the day, but better than risking a motor.    Back home I removed the sump and it was quite obvious that we hit something so hard that the poor 3mm mild steel sump guard smashed into the sump cracking the welding. All in all the event turned out to be just another test of patience, as we discovered that we need to design a skid plate not a sump guard, stay tuned for the upgrade. Thanks to Patrick Vermaak, Patick Johnson and Selina Botes for the photos. [url]https://www.youtube.com/watch?v=HQ33lELSaaM[/url]  RPT Sprint @ Apollo Bricks Seeing that we needed more time in the seat testing the new front suspension, the RPT Sprint turned out to be the ideal playing field, one stage over and over, more or less like a big testing session. The suspension seemed to be much stronger than I'm willing to do to it, which is a big bonus and a huge sigh of relief. Seeing that we can still improve on the Ackerman, but that is a project for the future, I'm very impressed with what Mike managed to design, thanks brother, I know working with me is a battle on its own. The huge benefit for me about the RPT events is the fact that we can take family, friends and general public around the course and this way we can actually give something back to all the supporters and crew sacrificing their own time to help us live a dream. Ruan trying to stay interested [url]https://www.youtube.com/watch?v=niAlb6ohVLM[/url] Bjorn Venter trying to focus on the notes, it did not last long, he at least got past the first line [url]https://www.youtube.com/watch?v=MOho1iLAYOA[/url]
Posted on: 2015/12/11 13:13
|
|
|
|
|
Re: racetech's 1200 SR20VE Project |
|
Home away from home Joined:
2009/4/16 10:37
From Cape Town, South Africa
Group:
Registered Users
|
April 2015 Front Suspension V3 CompleteA few things happened during the final design and manufacture of the front suspension components, besides the previously mentioned, a mad rush to get the side glass replaced with polycarbonate units, steering completed and a bunch of small items taking ages.      Steering SteeringThe main idea around the steering were to keep things simple and that was done to the end, only a 13mm spanner is needed to assemble and dissemble the new components. Luckily only 1 new bracket had to be welded to the cage to facilitate the new changes, the rest consisted of a few bend sheet metal parts and a flange bearing.     Polycarbonate Side Windows Polycarbonate Side WindowsDust problems, yes you could have guessed it, we have it, the primary reason for changing from glass to polycarbonate plastic were to install some much needed vents, the idea around them is to create a higher pressure inside the cab than outside, this way keeping dust out. At a earlier stage the vents, also polycarbonate units were sourced from the UK at a company called ACW Motorsport Plastics http://www.acwmotorsportplastics.co.uk/, great bunch of lads to work with. For those that use mainstream vehicles, changes are good they have kits for your car or will be able to make a set, unfortunately for me, I had to use all my CAD(Cardboard Aided Design) skills. As with the majority of work done, everything was designed and build in-house, even the machining of the slides, as a lot of keyboard ninjas reckon you need very special equipment to work on plastics, it turned out a jigsaw with a wooden blade and a 10mm end mill is very special. At the end of the day, the windows turned out looking very good, just hope they will help with the dust, otherwise I will have to give in and mount some sort of roof intake.  Hubs HubsWho would have ever thought drilling a few holes would remove 250g of weight, before the holes the units weighted 3kg each, now boosting a slimmed down weight of 2.75kg each. Drilling the holes was quite nerve reckon, considering all the time and money already invested, luckily everything worked out as planned and they are done.            Uprights UprightsThis was another beast altogether, seeing that the CNC bug bit with the spindles I search high and low for a company to create the uprights at an affordable price, at the end I had to settle for a few dozen drawings with different measurements, a few sharpened end mills and some serious hours in front of the manual milling machine. Even the fiancée tablet went from house gadget to milling machine DRO. Just looking at the raw material was quite intimidating for a while. For those that have worked with a mill previously, would be able to understand the amount of man hours that went into these, but at the end of the day, I'm glad I did them myself, now I know I can make a set between event, hell I'll be able to make a set in two weeks without rushing it. For those with a sharp eye, you will be able to see a mistake I made, just to prove I'm human.           Lower Control Arms Lower Control ArmsI'm pretty sure the set of pictures will be able to explain these a lot better than I'll ever be, but let me take a stab at it. All started with a piece of tube and a few lasered metal pieces with a lot of small holes, these holes had two tasks, the first to allow me to align items on top of others and secondly as the basis for all the stitch welds. These were designed in such a way that they can be used on the left or right side of the car. The tube forms the basis, with a threaded bush on the one side and a spherical bearing retainer on the other, in that configuration it would be strong enough for any normal road usage, then all the ribs and internal strengthening parts were added and then covered with sheet metal just to keep them all in place.   Steering Arms Steering ArmsOne of the only items on the new suspension that is orientation specific, bend a left unit and you will have to have a left unit in the parts bin. I'm very glad that my brother managed to design them entirely on real CAD, which making more or changing a few geometry specific settings quiet easy, a matter sending a file to the laser cutting company, wait for the parts, weld them together and off you go, brilliant.          Brakes BrakesSeeing that I made the calliper mounting brackets a few days earlier, mounting the callipers was a breeze, I think it took the longest to tap the tread for the bolts securing the callipers. Almost hoped the picture showing the pads would not make it to the internet, seeing that we are a privately funded team, we just had to use the old damaged pads again, they will age good with time. Finished ProductAll in all, the new suspension took more or less a year to develop and build, more than I actually wanted it to take, but sometimes live happens and something must be placed on hold, a crap load of man hours were spend on each and every component, these 3 pictures combines all these hours: Left- all the hand made parts, Middle-complete front suspension in parts, Right - assembled    The only thing left to do is setting the car up with the new suspension and enter a rally, hopefully the suspension will survive.
Posted on: 2015/7/22 14:43
|
|
|
|
|
Re: racetech's 1200 SR20VE Project |
|
Home away from home Joined:
2009/4/16 10:37
From Cape Town, South Africa
Group:
Registered Users
|
[quote="benny"]Has it been determined that moving the loading on the stub axles further away from the base of the stub axle, via the use of the custom hub assemblies has contributed to the stub axle failure? i.e. more leverage applied to the stub axle.
Would be interesting to know the analysis of the axle failure. Look at the failure under a microscope to determine if it started as a hair line crack that grew until finally snapping etc. Would be worth checking out the other strut for signs of metal fatigue and cracks.
Our final conlusion is that the spacers were at fualt, I had a metallurgists look at it and he came up with this:

Posted on: 2015/2/10 8:56
|
|
|
|
|
Re: racetech's 1200 SR20VE Project |
|
Home away from home Joined:
2009/4/16 10:37
From Cape Town, South Africa
Group:
Registered Users
|
January 2015 New Front SuspensionHallo Everyone, it is 2015 and I'm still very frustrated, why you ask, well more than 8 months without being able to compete. Thanks to Tiaan for taking me for a spin in his MK1 Rally Golf, what an eye opener and at least I have more memories to keep me going until Datto is back in action, if you want to refresh your memory, have a look at our terrible luck here: <a href=" http://www.madev.co.za/projects/datsu ... 14-wbmk-ceres-rally" target="_blank">2014 WBMK Ceres Rally</a> , maybe it is harsh to say terrible luck, seeing that I do not want to get on the wrong side of lady luck before a new season, let's rather look at it as a lesson in patience and a learning curve that just started. Seeing that we are learning, a lot happened while we were offline, early development started on a control panel for non-essentials, heavy parts were designed and in the final stages of production, relocated to a new house, etc etc. While we are busy reflecting on 2014, 2015 can only be better, let me show you the last of 2014 and the current 2015.    A few things had to change in the car, the first of these items being the whole steering column/steering wheel setup, buttons on steering wheel had to be re-thinked, fuel filler neck had be clear to help the service crew, integrate intercom audio with one of the cameras to prove that I do not really swear when driving but actually squeak when I scare myself #OOPS#less and finally improve camera picture with the use of UV Filters (Yes I know when using spot mode, focus the spot on the front windscreen and not the dash). New tool holders were also build and I must admit, these are serving quite helpful not only in the garage around the car but anywhere we need to carry n bunch of tools.  First things first, strip the front right corner to have a good look at the damage, it seems that we got away with only minor damage that can all be fixed, especially the calliper. While all of this was going on it was decided to design and build a WRC type setup used on the MKII Ford Escorts of the 80s, but more of this later.    After spending a few days rethinking a few things around the steering wheel it was decided to build a switch/button panel for the DASH display controls, this would free space on the steering wheel for the future wiper controls. This panel will now reside where the rear-view mirror used to be, it would communicate with a Arduino micro-controller controlling all cameras, wipers and providing vital status feedback via the lights, all being in touching distance but also out of view. Luckily I'm a big Le Mans fan and it provided almost 24 hours to build the wiring harnesses. Connectors can be bought here: http://www.chargeconverter.com/store/sandisk?product_id=150The Arduino will be used to power and communicate with the cameras, while the Peltor FMT 120 Intercom audio will be send to one of the cameras via the above connector and seeing that I'm a Radio HAM I just need to install a 2way radio in the car to communicate with the service team. In the diagram provided, you will see how to communicate between helmet via the intercom and radio. This would also enable us to use a cell phone via the intercom and use normal earphone/mic that comes with cell phones these days for open sections.    Another item that took some time designing was wheel dollys, these are used extensively in the States to easily move vehicles around. You basically get two types the expensive ones comes with jacks to lift the wheel from the ground and the ones that you need to jack the vehicle up and place the dolly below the wheel. My design uses the latter seeing that I had two major requirements, one, the top had to be without any extrusions like bolts etc. as I want to use them to cmove heavy items around like engines etc., the other one was to hold my centre stands, this way I have the best of both worlds, a car on centre stands without wheels and moveable, brilliant hey. What you see here is just a mock-up dolly, the final items will be made from 8mm thick aluminium to make them as versatile as possible.     Steering Steering, while it looked very need, it was as in practical as can be. Whenever I had to work around it, it turned into a swearing contest, 30 things to remove to get to the price, then there was the little issue of the hub coming lose. Before you all jump on my head I know it was causes by incompetence by not securing every bolt, that being said it was decided to eliminate the complexity around the whole setup and remove the wiper/lights stalks and replace them by switches on the dash as they are not needed when fastened in the harnesses. Next remove all the bulky components like the quick release, spacer and flange adaptor, then mount a steering quickner, use only components with splines, build an extended shaft incorporating these items in order to not use a spacer. The quickner is a brilliant piece of kit, almost as if they thought of rallying when designing it as it uses planetary gears to make it more robust, the thing is actually filled with Redline Shockproof oil, you just got to love the Yanks. You will notice a bearing on the steering shaft, this is in fact a flange bearing normally used to support a steering shaft going thru a firewall, I'll be using it to support the steering wheel in order to remove all stresses from the quickner bearings and the display will be mounted to the bracket holding the bearing. All this have a few advantages, seeing that the bearing can be mounted at an angle it would help with alignment, all bolts on the new steering components will be M8, making life a lot easier. If any road side work needs to be done, everything will be accessible with only one spanner and one Allen key.   You will also notice I opted for a Joes Racing quick release, these have a good reputation in the States and is a very small item compared to the old one. The one little trick I stole while watching some ERC rallying was the use of slots on the adaptor between steering wheel and quick release, this enables the team to quickly align the steering wheels, in the case I forgot to tighten the bolts I can just do it while driving to a stage as everything is accessible while sitting.  Then we have the little front suspension issue, how could I forgot this little pain in my arse, maybe I'm still in denial, but let me share with you a few little things before I show you why we designed our own. You can buy a complete kit for the MKII Escorts at a mere 2100 pounds here <a href=" http://www.motorsport-tools.com/escor ... n-hub-assembly.html" target="_blank">Escort-mk1-mk2-rix-engineering-special-wrc-type-front-suspension-hub-assembly</a> once you convert that little amount to South African Rand you quickly realise why we opted to design and build our own, R 36.5k without freight and customs, not something I would add to my cart and checkout in the near future. Again if you go this route and not use it in a MKII you have to rework a lot of the little items to make it work on another car, thus the designing started, a big thanks to my brother as he is the AutoCAD wizard and did the design with a little input from my side. One of the biggest advantages to this design is the modular approach, as you have a lot of small universal items that can be used left or right, making spares a lot easier. If you break/bend something you just replace the affected items and off you go again. No need to import crap expensive items from our friends with the Pound currency, by the way Zuma you are killing me, stop marrying kids and put together plans to strengthen our Rand it is currently almost as weak as your presidency. Enough of our Rand ruining president, back to parts. After we recovered the car on the Ceres rally we returned to the service area, this is where an older gentleman approached me and asked me if I have considered the spacers to be the culprit why the stub axle broke and immediately after he said it, I knew he was on the money with the suggestion. Thanks.  During the design phase the first items that were selected was the bearings, seeing that the stub broke on the face the inner bearing located, we wanted to enlarge this, but it came at a price, if we chose the bearing s we wanted we needed new hubs as the old ones just did not have enough meat to house them, taking slightly larger ones we could have used the same hubs, but would then miss out on all the nice features new ones could offer like, direct fitment of the brake rotor, incorporated spigot for the heavy rims etc. Guess what, we opted for the biggest bearings we could source locally and fit in a reasonable size hub. As an example, the new bearings inner diameter went from 28mm to 40mm. Look at the picture, from left to right: Standard Escort Bearings, Uprated Imported Strut Bearings, New Suspension.      Spindles / Stub Axles Spindles / Stub AxlesOn this, what is the correct name, Spindles as it is a complete separate item or Stub axles? First off all, the old stubs were machined from cast steel, we decided that it was time to spend the money and learn to work with the good stuff EN24 or better known as 4340, being much more expensive than normal shafting but still actually relative affordable for the man on the street. Using 4340 also enabled us to have it tempered and hardened (44 Rockwell to be specific), hopefully they will bend around any obstacle rather than break. It was the first time in my life I worked with such big pieces of metal and took me a few tries and moments of depression to get a decent finish. The toughest part was getting thru the outer course of the metal, only then the real machining could start. These things took like a million years to make, well at least the roughing up to 2mm from size, once the basic shape was done it went to Cape Steel & Heat Treatment for stress relieving, came back and machining was done to 0.2mm from finish, but this time the threads were also cut. Again Kobus at Cape Steel & Heat Treatment was used to temper and heat treat the spindles, once they came back the final 0.2mm were removed and the bearing faces cut, probably the most stressful time of my life, how I did not start to smoke again, I still do not know. I'm very happy with the finish product and all work entirely my own. Will I do it again, NO, more about this later. Words of advice, 4340 is quite dangerous in the lathe, the cuttings is very strong and flexible, I did all work with gloves to prevent cuts, still I suffered a few. During this whole ordeal I learned another valuable lesson, never trust a digital vernier, as I lost a R400 piece of material due to the vernier losing 5mm.     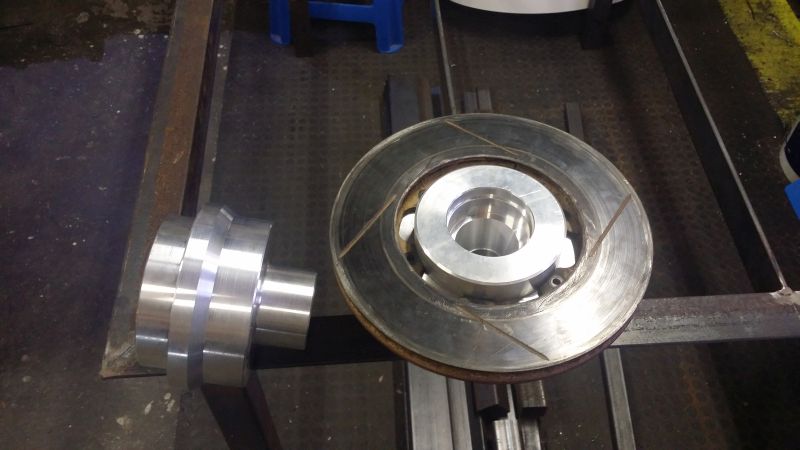 Hubs HubsSeeing that we decided to design and make new hubs I had to go out and buy a 4 jaw chuck to machine the bearing faces as the work piece had to be clocked up once turned around. The good and the bad about this is, I never needed it which is good, but the money could have been used for something else. While the spindles was in and out at the heat treaters, I bought to large chunks of aluminium and started doing the rough cutting on them, again until 2mm from size, seeing that it was just a rough cut, I still took the time to experiment with finishes and was quite happy with what I achieved. At the beginning of December I took the 2 hubs to TJ Engineering in Worcester as we know him from their staring days, Tiaan the owner was more than willing to spend the time to put together a program to machine the hubs on his CNC lathe. Seeing that I was a little late, his shop closes like all the rest over the festive season and had to wait until mid-January, I'm very pleased with the outcome, now I just need to drill all the holes, tap the threads and press the bearing cups and wheel studs in. Almost forgot, before I can do this I need to make some grease caps. Tiaan also advised me that I do not need to do the rough cutting on the hubs as his program needs to run from the rough sizes to the final product, what a relieve that will be when I start on the spares, I do believe he will also be making the spare spindles. Fuel money to Worcester is nothing compared to the time needed for manual machining.         Odd Suspension Components Odd Suspension ComponentsWhile I was waiting for the hubs, I finished the machining on a few bits without names, the first being the pin that will press in from the bottom on the blocks housing the shocks, spindles, calliper, steering arm and lower control arm. These will house the steering arm and be kept in place by the cone shaped disc. The cone will slide over the pin, once fastened to the block it will keep the steering arm in place. The bottom part of the pin will house the lower control arm in the form of a spherical bearing contained in a housing with a circle, in turn the housing will be welded to the lower control arms. What a mouth full, let me read it again before anybody imagine a space ship with the above explanation. All in all, look at the pictures as it worth a thousand words.        Seeing that it is a lot easier getting in tight places with a MIG welding gun than a grinding disc, I opted to just cut the shock tubes off the stub axles rather than swear them out after countless cutting disc. I actually bought 10 cutting discs, 1 grinding disc and two flapper wheels for it. Seeing that I cut them off they were to short and this had to be fixed. At this point 99% of normal sane people would have seen the extra work as a burden, I jumped at the opportunity as I could fix GAZ Shocks f*^kup. They properly gave my shocks to their (just left high school, not mechanical, no pride in his work, the only tool he played with for more than 2 minutes being his third leg (if a lady, well then one of those vibrating ones)) apprentice to tap the threads on the bottom of the tubes securing the shock, as I was never able to remove the shock to add more bump stop rubbers. As you can see, I opted for some sleeves over the original tubes (severely lightened) for the length, a welded disc at the bottom to secure the threaded disc on the shock. Damn, now I'm confused, let me explain. Assembly 1 on 1: Insert shock thru tube Add a set amount of bump stop rubbers Screw disc on shock and fasten with lock nut Fasten disc on shock to tube via 3 M6 Allen caps Bolt to block and try not to break them at the next event. As you can see from the components that is finished the new front suspension will be completely modular and would be able to work either on the left or right hand side, if I'm successful even the lower control arms would be lefty/righty items, only time will tell. All of this would make replacing an item a breeze, making spares easier, all in all a much better front suspension. The next steps obviously is reworking the rear suspension to use the same shocks and tubes as the front, if you then have 1 spare on a rally you need to break 2 units on any corner before putting the car on the trailer, wouldn't that be nice. P.S. thanks to Ruan and his superb planning, he managed to pick the first rally date as his wedding date, meaning I have more time to finish more work.
Posted on: 2015/2/10 8:50
|
|
|
|
|
Re: racetech's 1200 SR20VE Project |
|
Home away from home Joined:
2009/4/16 10:37
From Cape Town, South Africa
Group:
Registered Users
|
May 2014 WBMK Ceres RallyTwo rallies completed, both we were able to finish, on paper all seemed to go well and as planned. A few big lessons learned like wipers is more important than a spare wheel, muddy water is transparent as it can magically appear under the seats and the interior of a rally car gets very hot after a hour in a race suit and 35+ degrees of nice Overberg sunshine. Well we were about to learn our biggest lesson and drop a pot of ink on that paper stating that everything went as planned.     Fixing the damage Fixing the damageSeeing that we bend both front lower control, arms going thru the furrow on Stage 8 of the Bredasdorp Rally, we had to build new ones and improve them a little as time was limited and a total redesign was out of the question. The bend parts were removed, did I mention it took quite a bit of tricky maneuvering of various cutting tools to get rid of them. Once this was all done I could TIG weld in the new bits, seeing that I learned quite a few tricks from the last roll cage that we build, I managed to get in with the TIG torch in positions previously impossible. Another piece were added to strengthen the part that bend without affecting the position of the ball joint. This time round I painted them seeing that I could be working on them in the near future again.   Wiring WiringNext on the list were the addition of a brand new <a href=" http://www.race-technology.com/dl1_sport_2_28.html" target="_blank">Race-Technology DL1 Sport</a> GPS data logger. The fancy part to this logger is its ability to log everything the AX22 were able to log + the data send from the ECU. Swopping the two loggers were the easy part, adding a switch on the steering wheel to activate the windshield washer pump turned out to be a little more complex than originally planned as all of a sudden relays had to be added seeing that the current draw of the pump would have been too high for the wiring to the steering wheel.   The GoPro mountings were also changed for frame mounts which would allow the 12V-MicroUSB power supplies to be connected to the cameras for a continues supply of power to them, another thing removed from the service list during the lunch break, no more charging cameras before or during an event. Something small, but you would be surprised at the amount of thing that should be remembered/done before an event. These new frame mounts would also facilitate the use of the rear 30 pin bus connector on the cameras for the newly planned witchery the team are busy with, this being adding external audio to the units, power, start/stop recording via the GPS Logger, etc. Interesting things to come, and as always, we will share all the info, just to upset some out there that wants to make money from every little thing. Wiper WashersAdditional washer piping were added directly to the wiper arms to help with water directly in front of the arms, the idea behind these are that if I can get enough water on the wind-shield the use of the wipers could be forfeited in some instances, but these will also help clear muddy water if used in conjunction with the blades. Seeing that time were limited I fastened the pipe to the blades and made small holes in them, not ideal but a start. Since then I learned that I need drain back valves on these and that I need to find a better way to direct water in the correct positions on the screen.   Bits & Bobs that did not help Bits & Bobs that did not helpCar Cover, my mother being a genius at operating a sewing machine were called upon for some help, food and board was exchanged as a means of payment and she managed to make a custom fit to my specification cover for the car, this thing will help keep the stones away from the car especially to events, as added feature I asked for some reflective tape to be added to add some colour and make the car more visible in the dark when towing it.   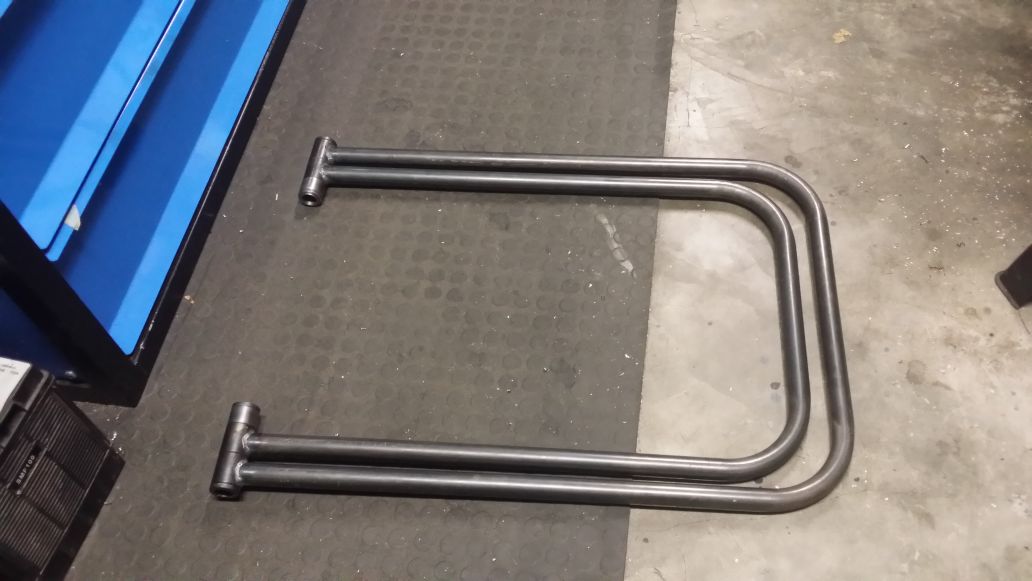 Paper Towel Stand (Elephant Toilet Paper), Paying R400 bucks for a paper towel stand just seemed way to expensive for my liking, thus I decided to build my own, way over engineered, but why not, at least this one folds away flat. On the management side we lowered the first activation point by 200rpm and increase the gap between the cams to 600rpm, hopefully this will help.    As the prep work were done we had to do the alignment, during this we had to adjust the steering wheel to be straight again, luckily I did all the adjusting of the steering wheel, more about this later. We had to remove the rear part of the exhaust to adjust the rear ride, seeing that the exhaust rubs the tyre on full compression I deemed it a very good idea to keep it removed and fit a bend to direct the gasses to the ground, only down side to this was the fact that the pipe excited at the bottom of the car. Hopefully the car sounds a little more like a rally car seeing that the car now only had one box left. I must admit, packing for a rally is becoming easier and easier every time I'm doing it, this is probably due to the fact that my packing list is adjusted every time and I have a dedicated set of boxes only for rally spares, fluids, etc. The majority of these boxes is just placed in storage until the next event. The weather for the event looked bad, a lot of water came down the week leading up to the event, travelling towards Ceres the morning, the mist was quiet thick and a few heavy showers fell, as we approached the mountains surrounding the Ceres the skies cleared and it seems that the weather were going to turn out to be in our favour. The start of the event were at Ceres Toyota, we off loaded the car and the team made quick work of completing the final prep work and getting the car thru scrutinering and into parc ferme, as we drove the car I felt something out of place on the steering, but just could not put my hand on it. Seeing that the rally started quite late , we had a lot of time standing around chatting, all the time I could not figure out why the steering felt so disconnected. We started the rally and as we drove out to the first stage I realised that the steering wheel flange was coming loose as I only nipped the two little 5mm Button Heads when we did the alignment, I knew for a fact that this is going to rattle loose and cause some sort of head ache in the stage. Once we stopped at the stage, we quickly jumped out, Ruan adjusted the tire pressures while I tried to fasten the only 2 out of 8 button heads, with the column switches in the way I was unable to fasten them with Allen keys as the set in the car did not have ball ends, lesson learned. I ended up using a pair of pliers as it was the only thing able to fit in the tight space, the fact that the button heads were stainless did not help for grip, well I managed to get it fastened enough that I felt at easy about the whole situation, the rough 25km stage that laid in front of us on the other hand did not help. Stage 1Due to the start of the stage being delayed, our steering fixed and the sun starting to come out we had time to test our new hydration system which worked a treat.  The first section of the stage were quite tight, made a little mistake on a right hander and then it opened up as we travelled next to the main road on the wheat fields. The one thing that were quite obvious were the fact that once the cams activated the exhaust note were loud as hell in the car, luckily Ruan anticipated this and adjusted the intercom volume on our way to the stage. I must admit I like the sound of the exhaust, but it will have to move to the rear of the car as it should be, exiting under the car makes it way to loud on the interior. 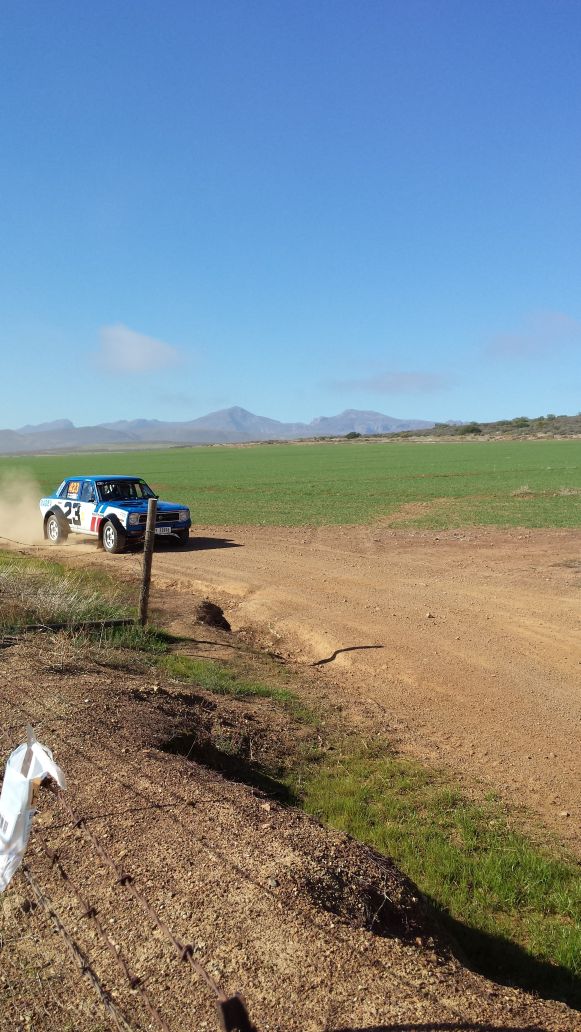  The first part of the stage the notes were very good, as the stage got rougher and Ruan started having small issues, luckily for him and unlucky for us the steering started coming loose after only about 8km, this put me of as I had no confidence, after this the driving were bad as I had to concentrate on keeping pressure on the steering wheel to add tension on the bolts, I knew if even only one came undone we had some serious issues on our hands. I decided just to take it easy, get thru the stage and fix the damn steering, my singe biggest mistake of the whole season. Lesson learned, if you start with something, finish it before moving on to the next item, if that is impossible, make a note on the To-do list.   Concentrating on keeping pressure on the steering got to a point that I concentrated more at it than the road and we hit a furrow quite hard and bend the left lower control arm, Yes again. This broke my mood for the stage completely, the "rhythm", "feeling" and the will completely went out the window. I went into survival mode and basically coasted thru the stage, while figuring out in my head how to fasten the 8 bolts on the steering without stripping the complete dash. As my plan was made, the stage opened up, what a relief, about 5-7km to go on easy ground would be a bonus to nurse the car to the end as the service park were basically next to the stage end.   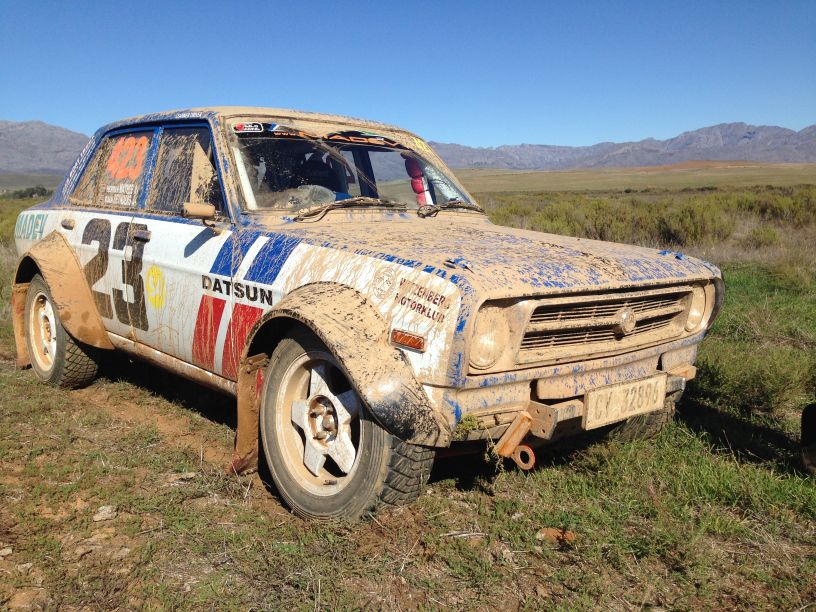     And....... it went south, we went through a slight ditch, nothing mayor compared to what we went through previously, we just heard a rubbing sound coming from the right front, my initial thoughts were that horror strut through the bonnet picture, we pulled off the stage onto an opening, switched the car off and immediately got the "OK" board out, assessed the damage and saw the stub axle broke, snapping one of the caliper mounting bolts in the process, this were the end to our rally. Madev Datsun 1200 - Ceres Rally 2014 - Stage 1Luckily for us the Clark of the Course allowed our service crew into the stage to recover the car seeing that the stage would be repeated. The team made small work of loading the three legged car onto the trailer, even though it took us the better part of a hour or two, later we learned that the stage were delayed due to a huge accident. Once back at the Service Park the relevant documentation were handed in, service area packed up and Selina and I left for home with my tail between my legs, seeing that the rest of the crew Cape Town were in a faster car they could at least watch a stage. Once back home it was the same ordeal just in reverse to get the car of the trailer and back in the garage, luckily we had enough lights, man power and girl power that fed us coffee.       Needless to say the rest of the evening were used to consume vast amounts of mixed beverages trying to figure out the best way forward as clearly we had an issue on our hands.
Posted on: 2014/7/3 12:46
Edited by racetech on 2015/2/10 8:49:05
|
|
|
|
|
Re: racetech's 1200 SR20VE Project |
|
Home away from home Joined:
2009/4/16 10:37
From Cape Town, South Africa
Group:
Registered Users
|
APRIL 2014 WBMK BREDASDORP RALLY   Let's start with the aftermath of the Klipdale Rally, on return home I had to get the car cleaned, especially since the inside was covered with dust. We did not have any dust issues on any one of the stages, just the open sections when opening the windows to allow some fresh air in, any way some time will have to be spend looking for some better solutions. I actually thought cleaning the car was fun, seeing that with each pass of the high pressure hose a clean patch of car emerged.  Before any work started on the car, I finished welding the container I had bend for the trailer to transport 3 spare tyres in, seeing that I always have 1 tyre in the car as a spare I only needed space for three in the container. Once this was done the trailer and container returned to Car Boat & Truck for some TLC. The whole trailer was given some love all round and fresh paint.  Some of the biggest things that we noticed at the Klipdale Rally as being issues was the refueling, rear suspension hitting threw the bump stop rubbers and bolts coming loose. I was quite determined to try my best to get these three fixed, since my father gave me 4 of these lovely red cans, they are very strong and stack able, but useless at throwing fluids without causing a mess, one was the perfect candidate for an experiment. Not just was the container a issue, the fact that one person had to hold two funnels while a second poured was just unnecessary. I solved this with a nice long 20mm hose fastened to the cap, seeing that the container now could move 20mm of fluid, I needed to allow 20mm of air moving inwards, which was solved with a decent breather. A couple of plugs to keep dust out while not in use further and the container was done and performing exceptionally fast. On the suspension front I added another bump stop rubber and swapped the 225 lbs/in spring for something a little harder in the form of 300lbs/in, these are 10" long units compared to the 12" that came out, but once I'm happy I'll order a set of 12" units.  Next on the list was the bolts that came loose, I have never thought that a heavy duty spring washer and nut would come lose until the rally. After talking to a few old hands and researching the net to bits, I dove in and bought literally a handful of each size flanged nuts, what makes these nuts special is their teeth that keeps it from coming loose. The other marvel that the net produced was a thing called a Nord-Lock washer, basically two washer on top of each other, the outsides having teeth like the flanged nuts and the insides having cams at a very specific angle, you read all about it at: http://www.nord-lock.com/nord-lock/we ... ing/washers/introduction/Here is a good video showing their performance: [url]https://www.youtube.com/watch?v=mgwmuZuJ02I[/url] These Nord-Lock washers aint cheap, but in my experience worth every cent, these can be sourced from the Bearing Man Group. We started with the rear suspension components that does not require frequent removal, on them the nylock nuts and washers were removed and replaced with a single flanged nut and 277 Loctite. Then on items like the CV bolts and front lower ball joints we immediately opted to use the Nord-Lock washers especially on the CV as they did not have a bolt & nut configuration.   While we were replacing the CV bolts ( we never re-use a Allen cap bolt on a CV that uses a 6mm Allen key or socket, if you do, be warned, it will bite one day.)and installing the Nord-locks we realised that the side shafts were sticky when rotating, well it did not take long to realise that we destroyed two inner CVs. We stopped replacing nuts and washers and I started stripping and cleaning CVs, I hate this type of work, everything you touch is full of grease. After having a nice and long look at the CVs, well the pieces it became quite apparent that I opted to use Spirex CVs on the inside due to the fact that I had to re-drill the holes from 8mm to 10mm and never replaced them with better quality units. The one you could actually see grinding marks on the inner cage suggesting that it is a recon unit and not a new unit as it is being sold, beware of these cheap pirate part manufacturers.   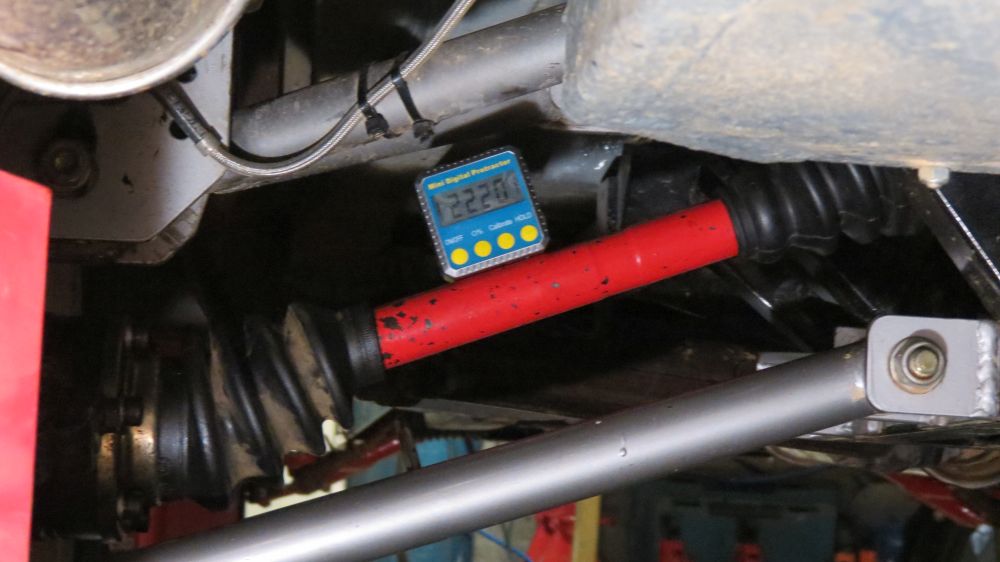 Before replacing them I first went threw a exercise of dry installing them and spacing the CV on the inner and outside to see if spacers would help, but at the end of the day, these normal off the shelf units are just not designed to be used with 22 degree shaft angle. The solution for now will be to use decent limiting straps as the cable broke on the rally and that is why the CV broke. After this we had to cancel our appointment at Dynotech for a few pulls to determine were the motor makes power. This being a huge thing currently as the motor is very unpredictable due to the fact that once the cams activate on loose gravel the rear steps out. The dyno runs will help in choosing away forward, either by removing the N1 cams and installing the stock units or activating the cams earlier in order to smooth the power delivery, thus could mean a few lost kilowatts, but for now 20 less kilowatts that is more predictable is worth all the lost ones. This will be continued. The Tuesday after Easter Weekend I collected the car and trailer from Car Boat & Truck that made sure everything was in perfect condition for the rally. Seeing that my bakkie were booked for a holiday with a friend attending the annual AfricaBurn, I collected the roof rack that I build from the galvanizers. Once back the big pack started, this time round it was not just rally equipment, but also the tools needed to install the roof rack and solar panel on the bakkie. We all know you cannot go without cold beer in the wicked Karoo sun. We arrived at our holiday destination in the wee hours of the morning and went straight to bed.    I only had a roof rack to install, mount a solar panel and do the last prep on the car, how long could it take, I had 3 days and even packed some magazines as I was sure I was going to become bored, boy was I in for a surprise. It turned out that time was against me, a 3 day holiday with a few hours of worked turned into a slave drive to get everything done. The end results was a finished roof rack, 85W solar panel charging the battery thru a MPPT charger which in turn makes sure the fridge in the back is keeping the beer cold. The car were fully prepared including replacing the nuts and washers on the front suspension with flanged nuts and Loctite or Nord-Lock washers. Newly made limiting straps and all the suspension bolts marked with a paint marker.   Our Terratrip Geotrip 303 GPS rally computer and helmet Hammock also arrived and needed fitment, the hammock went in quite easily, the ODO took a little longer seeing that a little wiring had to be done, luckily this unit uses a GPS to determine distance and speed struggling with speedo probes were not needed. Looking at the weather, some serious water fell in the area the week before the event and the forecasts suggested 1mm of water for the Saturday starting at 2am and stopping at 8am, at the coastal areas that is what we call mist, boy was we in for a surprise, as Ruan and I left Pearly Beach the heavens opened, the gravel roads to Bredasdorp was so wet that I had to tow the car at 60km/h otherwise it started floating around. While I was trying to keep the rig on the road it hit me that I forgot to pack the gazebo thru the mad rush to get out of the city. A very big fail on my part. Not only were we going to be wet, but we were going to be really wet without a gazebo and struggle with a pissed off service crew.  Luckily for us just after we arrived it started clearing up, dis helped a lot with the final preparations. We went thru the normal pre-race documentation and briefings, waited for our start time to arrive in order to strap ourselves in and leave parc ferme to travel to the first stage. As we drove along the country side roads we realised that this is going to be some very new as there were still a lot of standing water. Seeing that this rally is the fastest one for the year, speed and slippery mud does not mix, we didn't know what to expect, we just had to follow our game plan and that is to gather km in the seats and get the car thru the rally in piece. One thing in general that was different on this rally was the way the organizers Witzenberg Motor Club decided to run the rally, stage 1 & 2 directly after each other, service, stage 3 & 4 which is repeats of 1 & 2, lunch service, stage 5 & 6 at a new location, service and then repeating 5 & 6 again as stage 7 & 8. This setup were very spectator friendly and thought us a few new things about the game, the one nice thing about this was less waiting and more driving. Welcome to the 2014 Witzenberg Bredasdorp Rally 83km of stage distance, 122km road section Stage 1: We took it easy, just settling in and getting used to the notes. Ruan marked all the crest that we could take flat out beforehand which helped quite a bit to help settle in, never the less, it did cause the hair on my back to stand upright from time to time. The stage was quite wet but here and their started to dry. Wipers, never used them on the car besides roadworthy, after this stage I started making all sorts of plans to add a second wiper washer switch for Ruan and changing the wiper switch out in order to activate it via switches, one for Ruan and one for me in reach and not at the back of the steering wheel. [url]https://www.youtube.com/watch?v=d6rpTNHBQfs[/url] Stage 2:As we stopped at the time control we heard the front suspension making all sorts of squeaking sounds when turning the steering wheel. We looked at each other and he just said we made it here without steering issues we will be fine and we started the stage, at service we will ask the team to have a look. We need to look at some sort of way to communicate with the service crew without removing our helmets. One thing that worked much better was the camera remote location and just the sequence in which I started the ECU, GPS Loggers and finally the cameras. The new DL1 Sport GPS logger from Race-Technology arrived in the meantime that would make this process even easier seeing that I can start the logging on the ECU, GPS logger and camera by pressing one button. [url]https://www.youtube.com/watch?v=rLmhhPZSaj8[/url] Service 1: In the service park we had a gelled crew consisting of my father, brother, Jean van der Westhuizen and Andrea. It actually felt that Ruan and I were in the way, thus I started concentrating on relaxing. The car was dirty on the outside, but boy it was very dirty on the inside below the seats. The rear wheels used the wheel arches to pump the muddy water over the door seals and into the car, luckily we packed the elephant toilet paper which cleaned the mess. The squeaking noises turned out to be the muddy water all over the components, Mike came up with a brilliant idea just to spray the moving parts with some lubricating oil which fixed that one. Stage 3:  Stage 1 repeat, this is going to be nice, well the speed was better, understanding the pace notes and interpreting them better and then all of a sudden we entered a left 3, changed gear and between the time my hand moved from the gear lever to the steering wheel the back stepped out on a muddy patch, countered, countered and went farming, luckily we did not cause any damage or got stuck. This was supposed to be lesson one for the day when it comes to muddy patches. [url]https://www.youtube.com/watch?v=_zrkWpmxncU[/url] Stage 4:  Everything was getting dryer and just a lot more fun. Besides the fact that we had to show the spectators at the one spectating point that we can also do a 360 everything was fine and we were quite relaxed about the conditions and ready to tackle the rest of the stages. [url]https://www.youtube.com/watch?v=3SB9mDcVCSo[/url] Service 2:  Lunch time, charge cameras etc. Damn the car was dirty, less mud in the car, but that is due to the stages being dryer. Jean eventually mastered the refuelling rig and Ruan just had to show us how a pregnant man looks like. Stage 5 - The roller-coaster The stage started out dry, but as we started moving more to the mid-point it started raining again, at some stage some serious water was falling, we dropped into a valley and it were wet. We got a few warnings and all of a sudden we hit a very bad piece of mud, luckily the speed was low but still too high and we were flung from the one side to the other, all I can remember is fence, safe, fence, heart rate thru the roof, continue. Just after this we passed a two cars in a short period of time. We pushed on further and all of a sudden Ruan shouted and showed all sorts of gestures with his pace note book, we were about to hit trouble and then I saw it as I saw over the blind crest, sudden left 9, do not overshoot, these people were quite serious about this, managed to get rid of the unnecessary speed, overshoot slightly and made it. I think it is at this point that both of us tried figuring out if our pants are still clean and handed in our resignation. This sport is fun, but seriously dangerous if you only miss one pace note. [url]https://www.youtube.com/watch?v=xnN-zA6HSpY[/url] Stage 6: Luckily we did not now the roads in the area and the only directions we had was to the next stage. The surface still wet, but being a little higher meant less muddy spots and just more enjoyable. Probably the stage with the highest speeds, we managed at the one point to get up to 150km/h, if it wasn't for the big ditch before the turn leading to the long straight stretch of road higher speeds was on the cards. A very enjoyable stage, just what we needed after the previous one. [url]https://www.youtube.com/watch?v=43IcU-PM-x8[/url] Service 3:  Since everything was still intact, no way to check if the bolts moved seeing that everything was covered in mud, dirt and stones, the crew checked everything over, filled us with fuel and set of for the spectator point at stage 8. Stage 7: The repeat of the roller-coaster, given Ruan clear instructions to warn, shout, swear at me if it seems to him that I'm not slowing down at our two heart attack zones, this time around no rain and it turned out to be a very enjoyable stage. Who would have thought what difference a few millimetres of rain can make. [url]https://www.youtube.com/watch?v=qtqXfauCDxY[/url] Stage 8:Were we going to see dust on this stage, well at some points it could have been possible. As we moved thru the spectator point I decided to go over the ditch on the left hand side this time around as I had a picture in my head that it would be better, well just before we hit it, I saw it is very deep on our line and changes my line, a big no in the rally world, we hit it very hard, as the car settled after the knock I immediately noticed the car feeling strange and the steering wheel moved, we had a case of bad alignment at least, all the strange thoughts started creeping around in my head as we continued on the high speed straight. Just as we approached the braking zone we noticed a drunk spectator on the route, somehow he must have entered the route, luckily he was travelling in the same direction as us, which is a start, secondly he was competing in his own rally and trying to out run us. Even though we were limping home with a car with some suspension issues, speed was good enough that we lost time behind this future star, Ruan instructed me not to pass as we do not know what the oke was going to do. Luckily the other spectators managed to wave the star down and we could pass, maybe it was a good thing that this happened as it forced me to take it easy and the car back home. Ruan on the other hand went quiet, no pace notes just mumbling and all of a sudden I see him pulling out his phone, dialling, attaching the phone to his helmet (the new Iphone mount) and waiting for the other party to pick up, no answer I thought, maybe I'm going to get some notes, no, he redialled, this man is pissed off. I was driving on what I saw, until we got to a right 8 I almost did not see that I instructed him to navigate. We managed to get to the end, instruct the marshals of the future star and rove back home to parc ferme. From their everything went smoothly on the road back and made it to our second rally finish. [url]https://www.youtube.com/watch?v=_ZEzPpeNuaI[/url]  We have some work to do before the next one, fix the front suspension, think of a better wiper/washer system, install the new data logger and maybe mount a decent hands free kit for Ruan, that way he can atleast keep his hands on the pace notes. Thanks to the farmers and community for allowing us to use their area, Pierre van der Westhuizen from Witzenberg Motor Club for organizing this brilliant rally. A special thanks to my team (Pieter & Mike Mathee, Ruan Reynders, Jean van der Westhuizen, Selina Botes and Andrea) and friends that attended.
Posted on: 2014/5/19 12:52
Edited by racetech on 2015/2/10 8:39:59
|
|
|
|
 All Posts (racetech)


 Transfer

;)
;)
;)
;)
;)
;)
;)
;)
;)
;)
;)
;)
;)
;)
;)
;)
;)
;)
;)
;)
;)
;)
;)
;)
;)
;)
;)
;)
;)
;)
;)
;)
;)
;)
;)
;)
;)
;)
;)
;)
;)
;)
;)
;)
;)
;)
;)
;)
;)
;)
;)
;)
;)
;)
;)
;)
;)
;)
;)
;)
;)
;)
;)
;)
;)
;)
;)
;)
;)
;)
;)
;)
;)
;)
;)
;)
;)
;)
;)
;)
;)
;)
;)
;)
;)
;)
;)
;)
;)
;)
;)
;)
;)
;)
;)
;)
;)
;)
;)
;)
;)
;)
;)
;)
;)
;)
;)
;)
;)
;)
;)
;)
;)
;)
;)
;)
;)
;)
;)
;)
;)
;)
;)
;)
;)
;)
;)
;)
;)
;)
;)
;)
;)
;)
;)
;)
;)
;)
;)
;)
;)
;)
;)
;)
;)
;)
;)
;)
;)
;)
;)
;)
;)
;)
;)
;)
;)
;)
;)
;)
;)
;)
;)
;)
;)
;)
;)
;)
;)
;)
;)
;)
;)
;)
;)
;)
;)
;)
;)
;)
;)
;)
;)
;)
;)
;)
;)
;)
;)
;)
;)
;)
;)
;)
;)
;)
;)
;)
;)
;)
;)
;)
;)
;)
;)
;)
;)
;)
;)
;)
;)
;)
;)
;)
;)
;)
;)
;)
;)
;)
;)
;)
;)
;)
;)
;)
;)
;)
;)
;)
;)
;)
;)
;)
;)
;)
;)
;)
;)
;)
;)
;)
;)
;)
;)
;)
;)
;)
;)
;)
;)
;)
;)
;)
;)
;)
;)
;)
;)
;)
;)
;)
;)
;)
;)
;)
;)
;)
;)
;)
;)
;)
;)
;)
;)
;)
;)
;)
