User Login    
 + Register
  • Main navigation
Login
Username:

Password:


Lost Password?

Register now!
Fast Search
Slow Search
Google Ad


Browsing this Thread:   1 Anonymous Users


« 1 2 (3) 4 5 6 ... 14 »


Re: Datsunbeginner's Daily Ute
No life (a.k.a. DattoMaster)
Joined:
2010/6/2 13:35
From Toowoomba & New Jersey USA
Group:
Registered Users
Posts: 2341
Offline
So I set out to finally paint the ute after hearing some girl at the train station go to her mom "eh mom look at that orange t-h-i-n-g". Wanted to smack her. I do admit, it is kinda an eyesore with grey splotches here and there on the bright orange where I've done sanding and bogging over the past year or so. Kinda reminds me of the movie "Joe Dirt" with his superbird. Never painted a car before so this was going to be all new to me.

Went to Inspirations paint and bought some fresh paint to match the old in two pak which they coined "blood orange". For a whopping $495 I walked away with 4 litres two pak, 4 litres thinner, 2 tins of hardener, and 4 litres 2 pak compatible primer and an empty wallet. They did give me some friendly advice though which was nice.

The last two weekends I've spent about 36 hours or so prepping, sanding, bogging, sanding, bogging, and more sanding to get the body where I think its up to snuff to start painting. Took the tonneau cover hooks which were pop riveted off, and the holding angle off as well. Don't plan on putting these back on and they are all intact if anyone wants them and the sports bar for a cheap price let me know. Bogged up the drill holes and sanded some more. Went over the whole ute with a big fat pen and marked out all the spots where there were slight imperfections which was a technique I thought worked really well in the longrun to track my progress. Patch primed the bare metal areas to be left for the next week when I was to prime. Left the interior and engine bay mostly as is because I decided not to paint these since I am putting the original color back on. Plus I would have no clue how to take all the mechanical bits out and put them back in successfully.

Stripped all the exterior bits off, tailights, bumpers, etc.. but I left all the glass and window rubbers on and just made sure I masked around them real accurately. Taking all the stuff off was kinda fun actually because it made me think about how all that stuff works. Oh and I found a small fender bender behind the bumper which was previously bogged up with about 2 inches of bog which I chiseled out. Most people take the glass out though don't they? Broke the lock on the fuel compartment taking it off ...doh! One more thing to fix haha.

So last weekend we finally got a coat of primer on her. Had a bit of trouble with the spray gun and compressor which I am borrowing from a friend who has kindly let me do the whole operation in his garage! The gun was just spraying real inconsistently which you can see in the photos in some spots...had a rant about this in a post on the main forum think its all due to the smallish old compressor he has. Will be getting a new gun and compressor to try this weekend hopefully with better luck. Oh and I have NFI why the primer is banana yellow either. Kinda unique I suppose. Reminds me of big bird somehow. Has anyone seen this color two pak compatible primer before?

Can't wait to get the color on hey? Its been alot of work till this point and I have TOTAL respect for people who do this professional as I now know why they charge so much $$ to have it done.

I'll post pics of the finished job if we get done this weekend. Wish us luck!

Attach file:


jpg  p1_back.jpg (168.01 KB)
13419_4da7026031a19.jpg 550X309 px

jpg  p2_side.jpg (167.82 KB)
13419_4da702709e6db.jpg 550X352 px

jpg  p3_side.jpg (177.58 KB)
13419_4da702809d108.jpg 550X348 px

jpg  p4_back.jpg (196.32 KB)
13419_4da70290a1ad4.jpg 550X438 px

jpg  p5_otherside.jpg (198.84 KB)
13419_4da702a2ee9cc.jpg 550X335 px

jpg  p6_front.jpg (186.87 KB)
13419_4da702bd9e346.jpg 550X365 px

jpg  p7_bonnet.jpg (121.77 KB)
13419_4da702ca4513b.jpg 550X378 px

jpg  p8_rear.jpg (151.86 KB)
13419_4da702d8d1eb3.jpg 550X290 px

jpg  p9_close.jpg (195.43 KB)
13419_4da702eb64160.jpg 550X388 px

jpg  q1_side.jpg (156.03 KB)
13419_4da70302abf1a.jpg 550X330 px

jpg  q2_rear.jpg (114.57 KB)
13419_4da703140ecb3.jpg 550X279 px

jpg  q3_rear.jpg (164.95 KB)
13419_4da7032410a30.jpg 550X389 px

jpg  q5_me.jpg (133.79 KB)
13419_4da703419fcab.jpg 550X307 px

jpg  q4_side.jpg (172.93 KB)
13419_4da7035beb1ba.jpg 550X347 px

jpg  q6_close.jpg (105.44 KB)
13419_4da7036bced58.jpg 550X305 px

jpg  q7_bigbird.jpg (169.50 KB)
13419_4da7037e83fbb.jpg 550X453 px

Posted on: 2011/4/14 15:30
_________________
---1976 B120 "THE GENERAL REE"--- Former build
---1980 B120 Vanilla Ice --- current build
Transfer the post to other applications Transfer


Re: Datsunbeginner's Daily Ute
No life (a.k.a. DattoMaster)
Joined:
2010/6/2 13:35
From Toowoomba & New Jersey USA
Group:
Registered Users
Posts: 2341
Offline
Final coat of primer went on today! New compressor worked much better with the spray gun. Pretty pumped about getting the color on tomorrow. Although everyone keeps telling me 2 pak is a very bad idea. Really hoping everything turns out okay and all that hard work so far will pay off.

Posted on: 2011/4/16 12:26
_________________
---1976 B120 "THE GENERAL REE"--- Former build
---1980 B120 Vanilla Ice --- current build
Transfer the post to other applications Transfer


Re: Datsunbeginner's Daily Ute
No life (a.k.a. DattoMaster)
Joined:
2008/6/4 16:28
From Rosewood, QLD
Group:
Registered Users
Posts: 2534
Offline
2 pack is the best, if the prep work is good then 2 pack will pretty much last a lifetime

Posted on: 2011/4/16 13:33
_________________
1971 B110 sedan project.
2012 Nissan Micra daily.
Transfer the post to other applications Transfer


Re: Datsunbeginner's Daily Ute
No life (a.k.a. DattoMaster)
Joined:
2007/12/20 23:37
From Nyngan, nsw Australia
Group:
Registered Users
Posts: 2376
Offline
coming along...question i see the front lights grill been taken off, why not the bummeretts and t/lights if your going to the trouble in total re-spray......maybe lazy :P

Posted on: 2011/4/16 23:24
_________________
living is good,.....
Transfer the post to other applications Transfer


Re: Datsunbeginner's Daily Ute
No life (a.k.a. DattoMaster)
Joined:
2007/1/22 23:06
From East New Britain, Papua New Guinea
Group:
Registered Users
Posts: 6981
Offline
Whoa!

You're doing a good job, and so fast too!

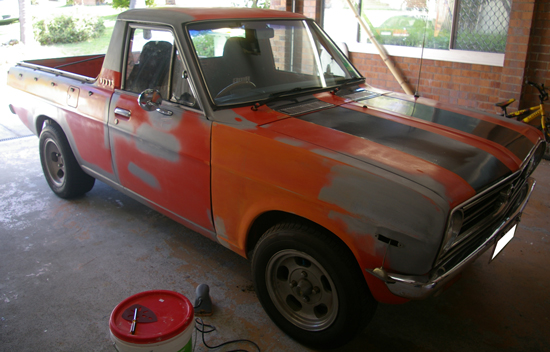
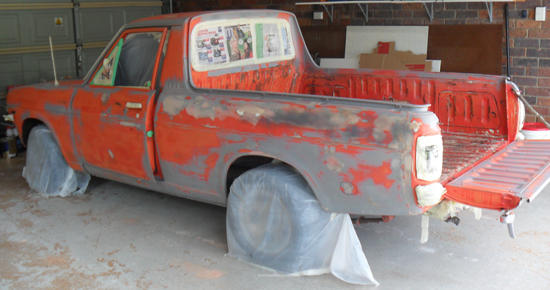
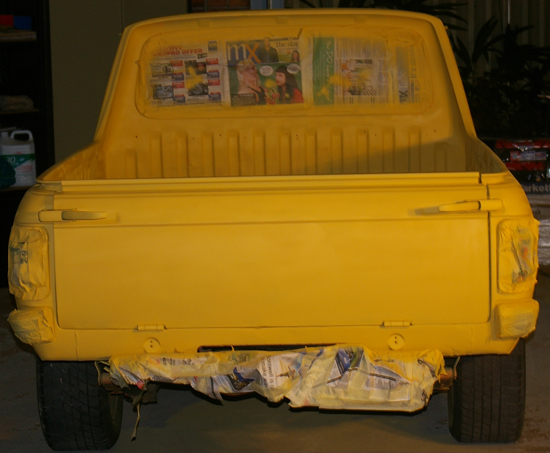
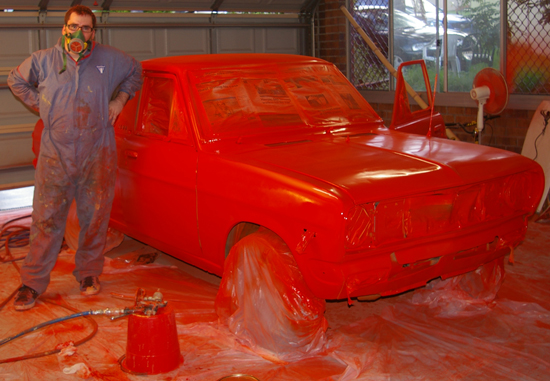
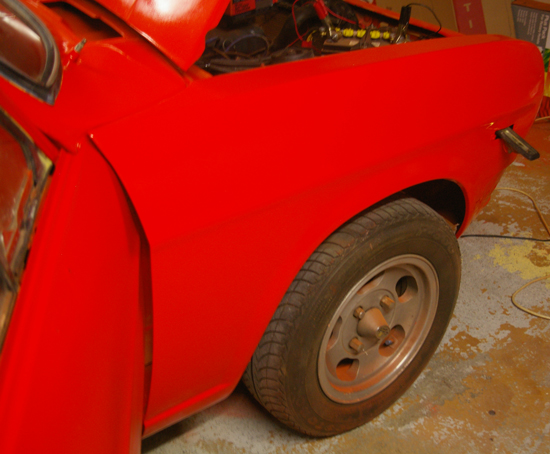
I hope you don't mind but I'd like to offer a little advice, in this 
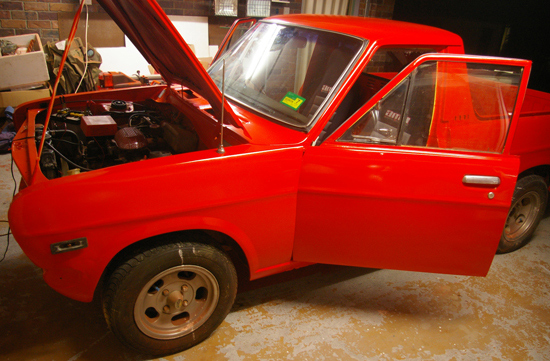
image here you can see the streaking from the gun, although this isn't too big a deal in the priming stage it can be very visible later on.

That streaking generally indicates that the fan of the spray gun (which is the web of paint that the gun sprays) is much too narrow so it is casting thick (thick as in laden with paint) and inconsistent paint leaving that streaking look. In the prime stage this isn't a big deal as you can block it back and feather the streaks out. You can even throw a new coat on after you've done that.

What you can do to reduce this streaking is:

1. Adjust your gun nozzle to properly vapourize the paint and increase the width of the fan of paint that the gun sprays. A wider fan gives a softer edge, thus a better overlap as the softer edges can lay into each other with much less definition. A softer definition at the edge of the paint you spray down means you'll have less of a streaking effect.

2. Clean your gun nozzle to ensure no coagulated paint is affecting the spray fan.

3. Purchase a quality gun (I recommend Graco hand-pieces not automotive specific but a good gun nonetheless) that has a bit more adjust-ability and nozzle options. Ironically the gun kinda works like a carb, if it isn't jetted or tuned right (which are your nozzle sizes and mix settings on the gun) you won't get what you desire.

4. Up the air pressure and hope that the extra pressure will produce better paint dispersion from the nozzle.

5. You can also adjust your paint mix ratio to thin it out or thicken it. The viscosity of the paint will have a HUGE effect on how it leaves the nozzle and thinner mixes tend to flash off quicker and dry quicker.

I suggest you consider 3, 4 and 5. But it's only advice.

Posted on: 2011/4/16 23:46
Transfer the post to other applications Transfer


Re: Datsunbeginner's Daily Ute
Home away from home
Joined:
2003/6/26 4:32
From Wellington
Group:
Registered Users
Posts: 199
Offline
Hope it works out well for you....but at the end of the day if you "'truck it up", it can always be redone.....its only paint.

Posted on: 2011/4/16 23:57
Transfer the post to other applications Transfer


Re: Datsunbeginner's Daily Ute
Quite a regular
Joined:
2008/11/17 5:09
From Sydney, Australia
Group:
Registered Users
Posts: 45
Offline
If you gonna go ahead with spraying in in your garage, spend the better part of a whole day cleaning, hosing, and blowing out the whole area with compressed air, roof, floor, everywhere. Make sure the car has been washed after you rub your primer back, fit a moisture trap to the air line, and one at the gun. Gun setup around 1.4mm. Do not rush anything just to get the colour on, buy some tack rags and paint strainers from a paint supply shop, use as low as pressure as you can. I noticed your primer has gone on a bit dry (can see stripes..) need to get your technique going a bit before you apply your colour. Buy a 2k mixing stick with the correct ratio on it. And practice a bit first, you need to spray it on wet, but not to wet. 2k iff sprayed to light will look rubbish, and too heavy will be full of runs. Figure out how your gonna attack it before you start, when you go around the car finish in a spot thats not very noticable.

Oh and personally think bonnet needs more work, them black stripes are gonna show up in finished product. and buy a buff! will need it. Good luck dude, practise 1st on some old panels!

Posted on: 2011/4/17 5:46
Transfer the post to other applications Transfer


Re: Datsunbeginner's Daily Ute
No life (a.k.a. DattoMaster)
Joined:
2010/6/2 13:35
From Toowoomba & New Jersey USA
Group:
Registered Users
Posts: 2341
Offline
Thanks for the comments everyone.

Finally, the 2 pak color coats went on today. I think it turned out pretty damn fine for my first ever paint job! I am really satisfied with the color. Its definitely not a perfect job by any means, there are a few drips here and there, a bit of an uneven coat on the bonnet and roof, some orange peel on a few panels, but overall not a bad job at all. I'm sure everyone will notice the blemishes on the photos but bottom line is I am satisfied. But.....if I ever do this again I won't be doing it in a garage and I won't be doing it with 2 pak either

Chris your advice is very appreciated and I am saying that without any sarcasm. Although I did not read your post before I painted today, it is still a very good guide for anyone else reading this and I suggest that they follow all of his steps. I wound up doing all of those steps on my own except number 3 simple because I couldn't justify buying a really good gun for a 1 off job. But in hindsight a good gun would definitely have provided a better finish.

The streaking in the primer was due to the s!@#$y compressor that I was using at the time. Borrowed a brand new bigger capacity compressor and cleaned the gun thoroughly and it definitely helped in the respray.

Lastly, if I had to do this again I would have probably either done it in a proper booth or built a make-shift one myself out of plastic and some temporary walls. We did sweep and blow the entire garage with the compressor but there was still dust, I think its impossible to avoid this in a garage. Paint strainers also would have helped to keep crap out of the gun. Steven you are on the money with all your comments as well.

Okay enough typing here are the pics from today...I will post more after all the bits are back on.

Attach file:


jpg  p1_primertwo.jpg (165.79 KB)
13419_4daadf25bb74a.jpg 550X362 px

jpg  p2_freakingmess.jpg (193.50 KB)
13419_4daadf3d4d63b.jpg 550X381 px

jpg  p2c_front.jpg (138.60 KB)
13419_4daadf4d29af8.jpg 550X272 px

jpg  p3b_rear.jpg (180.94 KB)
13419_4daadf5d0fb26.jpg 550X406 px

jpg  p3b_rear.jpg (180.94 KB)
13419_4daadf6cd698e.jpg 550X406 px

jpg  p3c_rear.jpg (160.29 KB)
13419_4daadf7dba9e1.jpg 550X304 px

jpg  p4_side.jpg (190.49 KB)
13419_4daadf8f8d9bc.jpg 550X389 px

jpg  p5_overall.jpg (179.61 KB)
13419_4daae04721443.jpg 550X361 px

jpg  p6_overall.jpg (178.77 KB)
13419_4daae058a77a1.jpg 550X396 px

jpg  p10_close.jpg (123.32 KB)
13419_4daae0690fcae.jpg 550X287 px

jpg  p11_close.jpg (177.66 KB)
13419_4daae07c38d4e.jpg 550X325 px

jpg  p12_close.jpg (173.63 KB)
13419_4daae08b427e0.jpg 550X454 px

jpg  p13_close.jpg (156.91 KB)
13419_4daae0a307fda.jpg 550X403 px

jpg  p14_close.jpg (149.89 KB)
13419_4daae0b919ec6.jpg 550X400 px

jpg  p15_close.jpg (94.36 KB)
13419_4daae0c62a23c.jpg 550X366 px

Posted on: 2011/4/17 13:45
_________________
---1976 B120 "THE GENERAL REE"--- Former build
---1980 B120 Vanilla Ice --- current build
Transfer the post to other applications Transfer


Re: Datsunbeginner's Daily Ute
No life (a.k.a. DattoMaster)
Joined:
2007/12/20 23:37
From Nyngan, nsw Australia
Group:
Registered Users
Posts: 2376
Offline
love the ventilation system

Posted on: 2011/4/17 22:23
_________________
living is good,.....
Transfer the post to other applications Transfer


Re: Datsunbeginner's Daily Ute
No life (a.k.a. DattoMaster)
Joined:
2007/6/15 10:47
From MOOROODUC. Victoria
Group:
Registered Users
Posts: 1471
Offline
Yeah dust is your mortal enemy

so, the 'paint' hit the fan ... hehe

Attach file:


gif  crab_hitting_fan.gif (21.81 KB)
8710_4dab6d571b398.gif 59X43 px

Posted on: 2011/4/17 23:44
_________________
Red 1200 Coupe (Build: DEMAC's 1200 Coupe)
Blue 1200 Ute, CA18DE Auto (Build: DEMAC's 1200 Ute)
Green 1200 Sedan (Build: Kermit the beat up sedan)
Green Sedan #2 (Current build: DEMAC's 1200 Sedan)
Brown 4 door AUTO Sedan for sale...
Transfer the post to other applications Transfer


« 1 2 (3) 4 5 6 ... 14 »


You can view topic.
You cannot start a new topic.
You cannot reply to posts.
You cannot edit your posts.
You cannot delete your posts.
You cannot add new polls.
You cannot vote in polls.
You cannot attach files to posts.
You cannot post without approval.

[Advanced Search]