|
|
Browsing this Thread:
1 Anonymous Users
|
|
Re: racetech's 1200 SR20VE Project |
|
Home away from home  
Joined:
2009/4/16 10:37
From Cape Town, South Africa
Group:
Registered Users
|
March 2014 Rally Practise Three weeks before our first rally we secured a venue to test the car on gravel, Friday 14th March we loaded the car and enough tools to rebuild the car if the need arose. Saturday early morning, Ruan (co-driver) and I, poured ourselves another cup of coffee and headed out for Porterville for some testing. Stopped at the fuel station next to the road and filled the fuel containers, one thing that we wanted out of this session as to gauge the fuel usage of the car. We knew the route was short and extremely rough as we inspected the venue end of last year, but at least this could count in our favour, the one thing we did not take into account was the surface as it turned out to be extremely lose, more of this later.   As we turned off the main tarmac roads and started travelling on the gravel we immediately started making a list of thing to do and remember as we realized that in the future we need to over the nose of the car with some blankets as the entire engine bay was being filled with dust, not even to mention the stray rocks that hit whatever in came in their path. Turned off the main gravel road onto the narrow road leading to the farm house, we were concern that the trailer being very low would get stuck going through the holes and dips, to our amusement the back only scrapped once. It took us quite a while to get the car off the trailer and ready to tackle the road. Seeing that the whole process is new, we made quite a few notes to improve the process.   Once all the car was ready, we proceeded to make some pace notes of the route. Let me just say for a team without any knowledge regarding pace notes, this turned out to be quite some fun with Ruan writing whatever I told him while paging back and forth looking for the short cuts. We made some notes going up and down the route and returned to put our helmets on. I don't know what we were afraid of the most, damaging the car two weeks before an event or trusting our own notes.     As we counted ourselves down, pulled away and shifted to second to keep wheel spin to a minimum, a quick thought went through my mind that this is why I have spent the last 4 years building the car, a very big moment. This thought soon disappeared as we hit 5200rpm and the cams activated and immediately the rear stepped out, shifted to third and the same thing, wow and oh #OOPS# was all I could process for the moment. The first part of the route went OK with Ruan making all sorts of noises over the intercom, but in my mind he was speaking to himself as I was trying to keep this car on the road. As we approached a very bumpy hairpin I shifted down and all of a sudden the rear stepped out and it took more than 10 brain cells to keep the car on the road while trying to recover, after this all I could process was "mofo". As we entered a dip followed by a crest I had no idea what is after the crest and all of a sudden everything went quit in my helmet and then the annoying voice on the intercom broke the silence and repeated a call stating left 3 opens into right 4. All of a sudden I realised what his role next to me is, not just to annoy me, but he is the boss and I just need to drive, he will give me instructions to follow and tell me when I have time to visit the toilet.  The day went on and we did about 35km of testing, I started to relax a little and drive around the violent power curve change of the cams and down shifted a little later to not lock up the rear seeing that the car has a 2 way limited slip differential. All in all we now did enough kilometres to work out an average fuel consumption and the only problems besides dust was the loss of one mud flap and the rear wheels rubbing.   The following days the car was cleaned and the dust problem isolated to one of the rear shock covers, someone forgot to close it up. We did a complete bolt check on the car and found the outer cv bolts loose and the steering rack. These were all replaced with new bolts and heavy duty spring washers. The rear shocks were removed and another bump stop rubber added.   Only days from our first event and I think Ruan and myself went into shock seeing that we had a lot to do, still had to attend Rally School, pack, plan etc. Luckily for me I was so busy planning and packing, reality still had to kick in.
Posted on: 2014/4/11 12:20
|
|
|
|
|
Re: racetech's 1200 SR20VE Project |
|
No life (a.k.a. DattoMaster)  
Joined:
2000/1/10 8:43
From Snohomish, WA USA
Group:
Registered Users
|
Very nice report. You are very proud of what you have accomplished. Car looks good! Do you know what your HP is? Never have rally raced but I'm sure its fun. With drag racing, the adrenaline last a few seconds. With rally racing I'm sure its non stop for long extended periods of time. I may have to try it some time. 
Posted on: 2014/4/11 18:18
|
|
_________________
'73 2 Door Sedan
KA24DR, Twin Webers 38/38 Sync.
Crower Stage 3 Cams/SS Valves
Forge CP Pistons/ Eagle Rods
Eaton M62 SC 10 lbs. Boost / 150hp Progressive Nitrous
GM 2 Speed Poweglide/Transbrake 3500 Stall
Ford 8.8 Posi/4.11
|
|
|
Re: racetech's 1200 SR20VE Project |
|
|
Guest_
|
Great work! Would have felt great driving out there.
Posted on: 2014/4/12 3:56
|
|
|
|
|
Re: racetech's 1200 SR20VE Project |
|
Home away from home Joined:
2009/4/16 10:37
From Cape Town, South Africa
Group:
Registered Users
|
HP figures I do not now, enough for wheel spin on gravel in 4th especially with cams activating.
Will take it to dyno in the next month or two, car was road mapped.
Rallying is a very strange feeling, the driving is only one aspect of it, the timed chaos is something else. Taking a blind crest flat out is a very weird feeling.
Posted on: 2014/4/14 8:51
|
|
|
|
|
Re: racetech's 1200 SR20VE Project |
|
Home away from home Joined:
2009/4/16 10:37
From Cape Town, South Africa
Group:
Registered Users
|
March 2014 CCMCC Klipdale Rally First things first, let's look at the facts: Klipdale is not just a name someone thought off, this little farming community got its name from the terrain just like the name suggest, Klipdale, this place is littered with stone banks that attempts to rattle the fillings out of your teeth on every pass. Every time we went over a series of these stone banks the only thing you can hear on the intercom: "Eina, eina eina" and these weren't used to describe my fillings trying to jump from my mouth but my poor old car was taking a beating. Then there was the event itself, seeing that I'm normally one of the radio marshals (Yes, for those that wondered, I'm a Radio Ham) in the background, I must admit that the event was well organised and I did not encounter any problems. Thanks to the community, farmers, organizers, marshals and everyone that I missed for making this a very special day. Let's start with the week leading up to the event: Ruan and I just finished doing a complete bolt check on the car and in the process we made a complete list of spanners needed for each critical part on the car; and by critical we categorized everything that could come lose and help us into a ditch, this list also ended up being the items that we wanted checked during the service breaks. I had to replace all the CV bolts, inner and outer with new units and heavy duty spring washers as they came lose on our practise, also all the bolts on the steering rack were replaced with new units and seeing that the sump guard covers them, I locked them in place with spring washers and Nylock nuts. I always said you can lose your brakes but not the ability to steer. Then it was onto all the small things, window washer bottle, tow strap, jack, spare wheel had to be mounted, well the list did not stop, it is all these small things taking all the time. Tuesday was set aside for Rally School, yea you can laugh, well we did laugh our arse off for ourselves attending rally school days before the rally. From what we learned from Patrick Vermaak it was quite clear we were ok on the car building and preparing side, but the rally side was something else, he basically had to teach us what rally was really about, time controls (TCs), dead time, Penalties, lateness etc. the list goes on, the biggest things to remember never reverse in a control area and time has never been so important in your life. The weirdest thing about rally is the fact that it is probably the only place in the world that it is better to be late than early as the penalty for being early is greater than being late. We completed a mock rally on paper to teach us how to work out all the times between stages, when and how to TC etc. All the information helped to settle the nerves but it was also such an overload seeing that we now knew about so much more that could go wrong or done incorrectly. Thanks again Patrick for all the help and stressing us out further, well more Ruan as I had so much on my plate, I did not have the time to think about this. Wednesday evening was used to get some of the smaller stuff done and then I spend the rest of the evening laying on Ruan's couch while I watched the Pace Notes DVD and him navigating us through the stages with me constantly stopping him to make some changes. On our events a set of instructions called tulips are included in the entry fee, this is a very basic set of instruction just highlighting the major instructions on the route, luckily for us we can purchase a separate set of instructions called Pace Notes, this include a booklet with very detailed instructions and a DVD showing you the actual route. Some people would argue that pace notes is the wrong way of learning rally as it can have disastrous outcomes if you just look at what happened on the last WRC Portugal event due to pace note errors, but the key word is WRC, for us we believe it is the new way of doing things and the more information would put us in a better position to be safer on the stages. Thursday I just had to call in some help in the form of Nico Botha to take the bakkie for a new set of rubber and later the evening to help me load the car on the trailer. Thanks Nico. One thing I noticed while strapping the car down was the fact that I need my own set of ratchet straps as it is quite a pain in the arse to work with a set that is for loading cargo rather than strapping down wheels. The rest of the evening I just packed, well not that easy as it involved sorting out spanners for each part of the car, figuring out what spare parts and materials I'm going to take with in case of emergency fixes. Friday morning early up to pack for another 2 hours before work, 8 hours sleep an evening became a statistic at this stage of the fight. Seeing that we were also going camping did not easy the packing effort at all, to make matters worse I forgot to fetch the tent from the garage as we normally sleep in the bakkie, but seeing that it will be filled with tools and parts it was out of the question. As it was a the start of the Easter School Holiday we were very happy that we could be over Sir Lowrys Pass before the traffic started picking up, we had a nice leisurely drive to Riviersonderend to fill-up with enough fuel to get the car and service vehicle back to Cape Town. Only a handful of kilometres backwards we arrived at Khomeesdrif Camping Resort, all ready, relaxed and amped to pitch the tent and relax for the rest of the evening after the huge effort to get to this point in time. For a few moments we did worry about getting stuck with the super low profile trailer of Car, Boat & Truck. In true Ruan fashion he managed once again to have his timing 100% perfectly timed to arrive just when we wanted to sit down at the camp fire. We spend the next few minutes helping him pitch his tent before we could relax.   Saturday Saturday morning, up nice and early, strapped the headlight to my head and went searching for the showers in the pitch dark mist covered ski. For some strange feeling we weren't that hungry, I managed to force a sandwich down with a cup of coffee, must probably have been the nerves. Filled out travel mugs with another cuppa and left for Rally HQ. On arrival we quickly got a nice secluded spot to setup our service area. A few minutes later we were joined by friends and very importantly my father and brother that were going to help in the service area. After documentation we quickly washed the car, finished a few smaller things on the car like making sure the cameras is working etc. Took the car to the scrutineers, my biggest concern, luckily for us we passed that test with flying colours and received a lot of attention due to the car as everyone loved the amount of attention to detail and the neatness. Finished the car and took it to Parc Ferme.  The nerves started building as all our friends started talking about leaving to see the first cars at the spectator points, thru my mind all sorts of thoughts flew by, the start of this whole new rally thing is about to become real, ready or not. After drivers briefing we discovered a very empty pit area, we went thru the starting list again, seeing that we are new, we were seeded last, just as we wanted it. Our nerves were shot by this time, especially due to the fact that we started last and the wait was quite long, during this time we looked at what the other competitors were doing while entering the first time control, just to easy ourselves a little, it did not help, next time I'll take a chair and a book to keep my mind occupied.   Stage 1 - Antoinette Stage 1 - AntoinetteStanding outside parc ferme, hands shaking.....all of a sudden Ruan gives the command, zip up the racing suite, enter the time control 10 minutes before starting time, walked to the car, made sure the bonnet clips is secured (all the weirdest things were popping up in my mind) balaclava on, helmet on the roof, get in car, grab helmet, Leatt on followed by helmet, strap the harnesses in correctly, Ruan speaking, can't hear a thing, in actual fact it was very quiet in my helmet besides the huffing and puffing from my racing breath, kept on going, stressed some more about how much time is left before TC, had a glimpse upwards and noticed 3 competitors before us, what a relief, we still had some time, finished with the harness, plugged the helmet in, still no Ruan, went into a mild panic, had to look to my left to make sure he is still there, luckily for me he was also trying to get himself settled, but still the deafening silence, I can hear Ruan talking, but can't hear him. What know I can't hear him and he were the one with all the answers, a bright idea popped up, start the car, turned the ignition ON and all of a sudden Ruan was with me, started the car and realised that the intercom only works with the ignition turned on. As our competitors left the TC area we inched forward and on Ruan's command entered, the go ahead was given and Ruan instructed me to leave, we took what we would call a leisurely drive to the stage start, just to realise half way there we need to get a move on. As we sat in the car waiting our time to enter the TC area, it seemed that Ruan knew what he think he had to do, I was relaxed, we were given the command approached the start line, stopped and sat waiting, Ruan's clever watch started beeping, selected 1st gear, hand on the hand brake, nerves building and waited what seems like an eternity. Ruan counted down in 10 sec and all of a sudden the watch beeped on every second and Ruan counted down the seconds.  This is it, seconds from our first rally start and no freak in way we are getting out if this, only way out is thru the stage, marshal, Ruan and watch all start screaming in my ears, the natural thing to do was release the clutch, control the wheel spin to gain as much traction as quick as possible to get rid of this noises coming from all corners. As we drove up the hill Ruan gave a Right 7 call if I remember correctly, as we went over the crest the turn was in front of us. All I could think of was is this how a right 7 looks, my life flashed twice in front of me, managed to get thru the first corner a live, the next section was downhill followed by a left 2 up hill, not trusting anything I even managed to nervously tap the brake pedal before entering the corner and just as we went thru it think to myself that, that was unnecessary.  As we approached the approached a right hand corner Ruan instructed something like 150 flying finish, I was so relieved at the words "flying finish" as we were about to finish our first stage, that once I excited the corner I waited for the Flying finish board to appear, once I saw it I realised that there was very little road between it and the stop board, in true fashion I worked out the best plan to get this car stopped before the stop board but still fly over the flying finish board. Once across the board, I was very hard on the brakes, down shifting with the rear moving from side to side, I was so determined not to mess up our first stage and getting all the marshals angry, got the car under control in second ready to stop and all of a sudden Ruan shouted go go go 5m in front of the end board, which turned out to be the flying finish board as we previously passed the flying finish board. We had quite a good laugh about it with the end marshals.  A very indescribable feeling went thru me, the car was in one piece, we were in one piece, we knew it was slow but did not care, we just finished our first gravel rally stage and in a position to tackle the next one. Ruan did the math and told me we had x amount of time to get back to the following TC which would be a service, again our drive was to leisurely as we made it just in time.  Service 1 Service 1It's hot in the car while sitting with a helmet, balaclava, 2 layer race suit, shoes gloves, closed windows and waiting to enter the service area. Once in proceeded to our area, parked the car as my brother instructed. One thing you must realise, even thou I worked 4 years on this car and .would like to believe I'm the boss of it, once you enter the service park for the first time, you realise that you are just the driver that could feed some information back to the crew, but that is about it, they are in control. Ruan gives the commands being when to stop where and when, the command to proceed etc. and very importantly read the pace notes. He is also the one giving the service crew specific instructions what to do and point them to the attention areas as I instructed him during the open section back to the service area. The service team you just have to trust, part of their job is to do a bolt check, once you leave the service area, you can't be wondering did they fasten that bolt or that one. This is very much a confidence sport, you have to have confidence in the person next to you (the co-driver has one big list of duties to take care off, not to mention the responsibilities), those in the service part making sure the wheels stay on, your family and friends at the spectator points having the confidence in you to safely drive the car thru the stages in order to go home after the event and start planning the next one, all this must be done to the second. I like to call this Timed Chaos. 20 Minute service time, 0sec go, pull away, drive to the service crew, stop, while the first member opens the bonnet, the other readys the jack, we get out while remembering the sequence ( pull harness straps to release tension on the belts, unplug helmet from intercom (keep in mind, know your co -driver can't hear you anymore), release harness, open the door, unbuckle helmet, remove helmet and neck brace and place it on the roof, remove steering wheel, get out of the car, remove balaclava, feel the ground beneath you). We decided to keep the car full of fuel, one less thing to worry about while on stage, thus we need to refuel, Mike gets under the car and start checking bolts, especially the CV bolts, my father helped Ruan with the fuel, I'm under the car, up again, checking that, doing that, finally settling to check the engine bay, oil is good, the rest looks good. All of a sudden Ruan gives the command to get ready and in the car. Hell, I have not even rested or had anything to drink, grabbed a bottle of water, had a few sips, suit on, in the car, helmet on, 3minutes before our TC out time, I can feel the car being lowered, started the car, got the OK from Mike to leave the service area, reversed and proceeded to the TC. 18 minutes gone. What just happened, apparently this is what they call servicing, I was supposed to catch my breath and relax, in the meantime I'm overheating in the mid-day sun with 5 stages to go and another 4 of these chaotic services to go.  Stage 2 - Geskenk Stage 2 - GeskenkWe will repeat this 13.8km stage later the day, on the open section we decided to drive a little faster on the open section 14km long, we arrived a little before time and had some time to sit still and relax, most definitely the way to do things. This time around we felt a little more at ease with the whole timing side of things as Ruan managed to get us into another stage without any penalties. Being the first time we were on this stage, we took it gentle, but the biggest thing about this stage was the stone banks, it was littered with them, every time we went over one it felt as if someone was trying to tear my heart apart, the poor car. Probably one of the reason why we will never be super-fast, I will never be able to drive this car to the limit as I have too much feelings for the poor thing.  A very nice stage, a little more technical than the previous one. Ruan especially enjoyed this stage seeing that he had less time to look around, it seems that he likes to be kept busy, I'll think of something to add to his list to do. We had a few issues with the notes not being read fast enough, but purely because we changed them due to watching the DVD it seemed that you had more time, but that bit us, if the calls is underlined it is done so for a reason. Well seeing that our speed is still slow enough we managed to make it and learn from our mistakes. This time around as I heard the call coming over the intercom for flying finish I knew to attack the second board and then brake to stop before end control marshals.   Service 2 Service 2As we did coming to the stage, we drove faster than 60km/h back to Klipdale co-op 18km away, due to the fact that we do not have an ODO in the car, we almost took the wrong turn off. Once we arrived at the service area we were about 7 minutes early, got out of the car, removed the helmets, opened the suites and relaxed, all this while we had the time to have a nice chat about what just happened and what needs to be done in service. This is the way to do things, I even managed to use the wiper blade as a clothing drying line to dry a little. Proceeded through the TC and stopped in our service area, all relaxed, told the crew what we wanted done. Mike proceeded at jacking (we need to get rid of the wooden spacer on the jack) the car up while I inserted the stands, Ruan and my father started the refuelling process, Mike started checking bolts and I made sure everything under the bonnet is in order. Once Ruan and I were done with our duties we had time to stand around, have some cold refreshments and relax. Once Ruan gave the 5 minute call we got in the car, started strapping on and in, in a much more relaxed way, 3 minutes before we had to be at the TC the car was on its wheels and we proceeded out. A much more relaxed way of doing things, as we were waiting in the line to enter the TC I realised that we need to buy more time in the service area.  Stage 3 - Antoinette Stage 3 - AntoinetteWe were starting to feel more at easy, but I still did not trust these gravel tires and struggled with forming the pictures from what is ahead by listening to the notes, or it was just matter of I just drove on what I saw and did not listen to Ruan, seeing that I'm a master at pretending to listen and only remember certain keywords to make enough sense when caught out (did I just say that out loud). This was also the stage that we nearly soiled our suits, we went down a hill, the road opened and you could probably see the road for 1km ahead, we entered an easy right, I had the car positioned on the inside line and all off a sudden I saw a ditch on my line that must have washed out during the previous weeks rain, I changed my line successfully missing the ditch which looked like it could remove the front right wheel, but as I tried to bring it back to the racing line the rear stepped out, we left the road and ended on the grass doing +-100km/h, managed to keep it next to the fence trying my best to get the car back on the road, Ruan looks up and is just like: get it back on the road, get it back on the road. I did not say anything but were thinking to myself, what is he thinking I'm trying to do. Being about 1.5km to the end, I actually hoped the flying finish is in sight.   Service 3 Service 3Again we had time to relax before entering the TC, this time around I checked the tyre pressures, not realising that they are still hot, I deflated the left rear wheel too much, quickly told Ruan to phone Mike to get the compressor going in order for us to inflate the tyre, my bad. Arrived in the service area, we all did our thing, if I remember correctly my father was still out spectating, but this time around one of the crew members of the team next to us came around with an air hose in hand, started pumping the tyre, damn this is some good service and sportsmanship. As we were getting ready to leave my brother informed me that the portable compressor were in the bakkie with my fiancée spectating, another big fail on my part, I need to add it to the packing list, the other thing we realised is that we need a quick way of communicating with the service crews.    Stage 4 - Hermanusheuwel Stage 4 - HermanusheuwelExact same stage as Antoinette, just in reverse. This stage went great, a little less nervous braking before crests and corners, better lines with the whole stage just feeling like it flowed better and started to form a picture of what the pace notes tried to describe. The rhythm was better, LOL, Mike you will understand.  Service 4 Service 4Everyone knew what they had to do, even though we decided to only do a visual check over of the suspension parts and bolts. Checked the engine bay, filled the fuel tank and placed some newer rubber on the front and moved the front rubber to the rear due to rubbing.   Stage 5 - Geskenk Stage 5 - GeskenkNo words to describe the mix of feelings and emotions, one thing is for sure, taking a blind crest flat foot without knowing what is on the other side is not easy, yet we still managed to brake before it.  Service 5 Service 5After the stage we decided to be as quick as possible in the service area to allow Mike some time to get out to the spectator point and at least see why he was slaving away in the service area, he could also see for himself that we are not trying to break the car. As we stopped before the TC, we got out, I started check the fluids under the bonnet, once done we relaxed. Again, would have been great to communicate with the service crew to inform them beforehand what we wanted done. Stopped in the service area, instructed Mike the engine bay is done, only a visual inspection, no fuel and leave as quick as possible to get to the spectator point, we will finish. After they left, we realised that the fender lost a bolt and that the door was hitting the fender as a spacer was lost on stage.    Stage 6 - Hermanusheuwel Stage 6 - HermanusheuwelThe rhythm was good, the confidence building but still severely lacking. The best part of the stage was the fact that I was confined to force myself to flat foot a crest as by this time I knew what was on the other side, nothing. As we approached the one crest, a long uphill section Ruan gave read the note as something like crest 380, I went for it, this one I'm going over flat foot, as we neared the top Ruan again read the note, this time he sounded different, but still I was on my way to flat foot this crest, no matter what is wrong with him. We approached and as determined as I were, I just had to lift partially, what a weird nauseas feeling linked with a very big amount of adrenalin, we will practise this one, apparently it takes years. After the stage Ruan told me he read the note and could see I was going for it and wondered for a second if it really is straight on the other side with enough road to be safe, this was the reason why he sounded strange.   Parc Ferme Parc FermeAs you can see, the car and us made it in one piece on our own steam into parc ferme. Video footage of Stage 4http://www.youtube.com/embed/HdkHcqYaiw8Sorry but I did not record any GPS data, next time hopefully the new logging system will take care of that. You will hear rear tyres hitting the arches, the bump stop rubbers I have in place is obviously not enough, there is more than the cars weight going through the rear wheels on compression. Something I was unable to simulate with only the cars weight on a jack and no spring on the shock.</span> Worst thing of it all, the main GoPro died after this stage, and I'm so sad I do not have footage of SS 5-6 as we really started rallying in those stages. I'm currently waiting on connectors and mounts and stuff to make this video system better as I want to input audio, power and trigger the camera from a logger, this way I can have one button to press before a stage to log ECU, GPS and video. Stage TimesSS1 Antoinette 9.9km: 8:07 SS2 Geskenk 13.4km: 10:31 SS3 Antoinette 9.9km: 7:31 SS4 Hermanusheuwel 9.9km (Antoinette in reverse): 7:20 SS5 Geskenk 13.4km: 9:53 SS6 Hermanusheuwel 9.9km (Antoinette in reverse): 7:06 As you can see the times came down as we grew the ability to shift enough brain cells aside to form a picture of what is ahead and the confidence build in the tyres etc. We identified a few issues, especially in the service area that will get immediate attention as we need to settle things a little there as time is very limited and I need the time to think about what happened and what could be done to improve. For us to finish without any time penalties and a car in one piece without the need if speedy repairs, is a major win, the speed will come with years of experience. We ended the day 12th out of 17 starters. Thanks to Selina Botes, Mike Mathee & Patrick Johnson for the photos, I find it a little hard to take stills and drive the car, without you this update would have been rather dull. Car Boat Truck Mechanical & Bodyworks for the work on the body and providing us with a trailer, luckily we did not cause to much work. Thanks to everyone behind the scenes organizing the event, the farmers, community, family and friends that made this possible, even the uncle at the prize giving that tried to drown me in wit blitz & local beer when (thanks brother) Mike told him it is my birthday and first rally. Thanks to everyone that encouraged Ruan and I to pursue this sport, just to name a few, Pierre vd Westhuizen, Patrick Vermaak and Johan Zulch.    Selina thanks for standing by me and for the very special cake. Selina thanks for standing by me and for the very special cake.
Posted on: 2014/4/15 14:00
|
|
|
|
|
Re: racetech's 1200 SR20VE Project |
|
Home away from home Joined:
2009/4/16 10:37
From Cape Town, South Africa
Group:
Registered Users
|
APRIL 2014 WBMK BREDASDORP RALLY   Let's start with the aftermath of the Klipdale Rally, on return home I had to get the car cleaned, especially since the inside was covered with dust. We did not have any dust issues on any one of the stages, just the open sections when opening the windows to allow some fresh air in, any way some time will have to be spend looking for some better solutions. I actually thought cleaning the car was fun, seeing that with each pass of the high pressure hose a clean patch of car emerged.  Before any work started on the car, I finished welding the container I had bend for the trailer to transport 3 spare tyres in, seeing that I always have 1 tyre in the car as a spare I only needed space for three in the container. Once this was done the trailer and container returned to Car Boat & Truck for some TLC. The whole trailer was given some love all round and fresh paint.  Some of the biggest things that we noticed at the Klipdale Rally as being issues was the refueling, rear suspension hitting threw the bump stop rubbers and bolts coming loose. I was quite determined to try my best to get these three fixed, since my father gave me 4 of these lovely red cans, they are very strong and stack able, but useless at throwing fluids without causing a mess, one was the perfect candidate for an experiment. Not just was the container a issue, the fact that one person had to hold two funnels while a second poured was just unnecessary. I solved this with a nice long 20mm hose fastened to the cap, seeing that the container now could move 20mm of fluid, I needed to allow 20mm of air moving inwards, which was solved with a decent breather. A couple of plugs to keep dust out while not in use further and the container was done and performing exceptionally fast. On the suspension front I added another bump stop rubber and swapped the 225 lbs/in spring for something a little harder in the form of 300lbs/in, these are 10" long units compared to the 12" that came out, but once I'm happy I'll order a set of 12" units.  Next on the list was the bolts that came loose, I have never thought that a heavy duty spring washer and nut would come lose until the rally. After talking to a few old hands and researching the net to bits, I dove in and bought literally a handful of each size flanged nuts, what makes these nuts special is their teeth that keeps it from coming loose. The other marvel that the net produced was a thing called a Nord-Lock washer, basically two washer on top of each other, the outsides having teeth like the flanged nuts and the insides having cams at a very specific angle, you read all about it at: http://www.nord-lock.com/nord-lock/we ... ing/washers/introduction/Here is a good video showing their performance: [url]https://www.youtube.com/watch?v=mgwmuZuJ02I[/url] These Nord-Lock washers aint cheap, but in my experience worth every cent, these can be sourced from the Bearing Man Group. We started with the rear suspension components that does not require frequent removal, on them the nylock nuts and washers were removed and replaced with a single flanged nut and 277 Loctite. Then on items like the CV bolts and front lower ball joints we immediately opted to use the Nord-Lock washers especially on the CV as they did not have a bolt & nut configuration.   While we were replacing the CV bolts ( we never re-use a Allen cap bolt on a CV that uses a 6mm Allen key or socket, if you do, be warned, it will bite one day.)and installing the Nord-locks we realised that the side shafts were sticky when rotating, well it did not take long to realise that we destroyed two inner CVs. We stopped replacing nuts and washers and I started stripping and cleaning CVs, I hate this type of work, everything you touch is full of grease. After having a nice and long look at the CVs, well the pieces it became quite apparent that I opted to use Spirex CVs on the inside due to the fact that I had to re-drill the holes from 8mm to 10mm and never replaced them with better quality units. The one you could actually see grinding marks on the inner cage suggesting that it is a recon unit and not a new unit as it is being sold, beware of these cheap pirate part manufacturers.   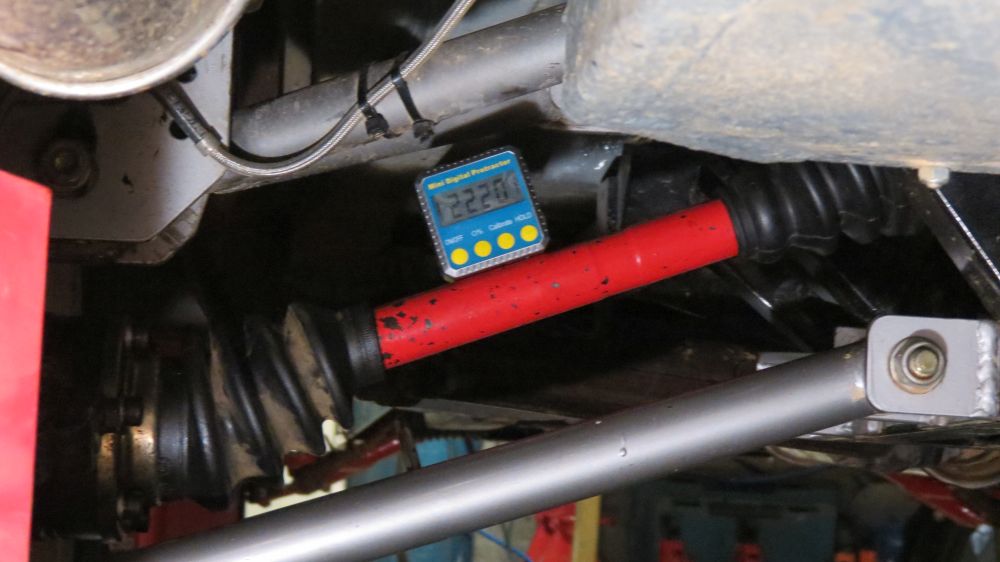 Before replacing them I first went threw a exercise of dry installing them and spacing the CV on the inner and outside to see if spacers would help, but at the end of the day, these normal off the shelf units are just not designed to be used with 22 degree shaft angle. The solution for now will be to use decent limiting straps as the cable broke on the rally and that is why the CV broke. After this we had to cancel our appointment at Dynotech for a few pulls to determine were the motor makes power. This being a huge thing currently as the motor is very unpredictable due to the fact that once the cams activate on loose gravel the rear steps out. The dyno runs will help in choosing away forward, either by removing the N1 cams and installing the stock units or activating the cams earlier in order to smooth the power delivery, thus could mean a few lost kilowatts, but for now 20 less kilowatts that is more predictable is worth all the lost ones. This will be continued. The Tuesday after Easter Weekend I collected the car and trailer from Car Boat & Truck that made sure everything was in perfect condition for the rally. Seeing that my bakkie were booked for a holiday with a friend attending the annual AfricaBurn, I collected the roof rack that I build from the galvanizers. Once back the big pack started, this time round it was not just rally equipment, but also the tools needed to install the roof rack and solar panel on the bakkie. We all know you cannot go without cold beer in the wicked Karoo sun. We arrived at our holiday destination in the wee hours of the morning and went straight to bed.    I only had a roof rack to install, mount a solar panel and do the last prep on the car, how long could it take, I had 3 days and even packed some magazines as I was sure I was going to become bored, boy was I in for a surprise. It turned out that time was against me, a 3 day holiday with a few hours of worked turned into a slave drive to get everything done. The end results was a finished roof rack, 85W solar panel charging the battery thru a MPPT charger which in turn makes sure the fridge in the back is keeping the beer cold. The car were fully prepared including replacing the nuts and washers on the front suspension with flanged nuts and Loctite or Nord-Lock washers. Newly made limiting straps and all the suspension bolts marked with a paint marker.   Our Terratrip Geotrip 303 GPS rally computer and helmet Hammock also arrived and needed fitment, the hammock went in quite easily, the ODO took a little longer seeing that a little wiring had to be done, luckily this unit uses a GPS to determine distance and speed struggling with speedo probes were not needed. Looking at the weather, some serious water fell in the area the week before the event and the forecasts suggested 1mm of water for the Saturday starting at 2am and stopping at 8am, at the coastal areas that is what we call mist, boy was we in for a surprise, as Ruan and I left Pearly Beach the heavens opened, the gravel roads to Bredasdorp was so wet that I had to tow the car at 60km/h otherwise it started floating around. While I was trying to keep the rig on the road it hit me that I forgot to pack the gazebo thru the mad rush to get out of the city. A very big fail on my part. Not only were we going to be wet, but we were going to be really wet without a gazebo and struggle with a pissed off service crew.  Luckily for us just after we arrived it started clearing up, dis helped a lot with the final preparations. We went thru the normal pre-race documentation and briefings, waited for our start time to arrive in order to strap ourselves in and leave parc ferme to travel to the first stage. As we drove along the country side roads we realised that this is going to be some very new as there were still a lot of standing water. Seeing that this rally is the fastest one for the year, speed and slippery mud does not mix, we didn't know what to expect, we just had to follow our game plan and that is to gather km in the seats and get the car thru the rally in piece. One thing in general that was different on this rally was the way the organizers Witzenberg Motor Club decided to run the rally, stage 1 & 2 directly after each other, service, stage 3 & 4 which is repeats of 1 & 2, lunch service, stage 5 & 6 at a new location, service and then repeating 5 & 6 again as stage 7 & 8. This setup were very spectator friendly and thought us a few new things about the game, the one nice thing about this was less waiting and more driving. Welcome to the 2014 Witzenberg Bredasdorp Rally 83km of stage distance, 122km road section Stage 1: We took it easy, just settling in and getting used to the notes. Ruan marked all the crest that we could take flat out beforehand which helped quite a bit to help settle in, never the less, it did cause the hair on my back to stand upright from time to time. The stage was quite wet but here and their started to dry. Wipers, never used them on the car besides roadworthy, after this stage I started making all sorts of plans to add a second wiper washer switch for Ruan and changing the wiper switch out in order to activate it via switches, one for Ruan and one for me in reach and not at the back of the steering wheel. [url]https://www.youtube.com/watch?v=d6rpTNHBQfs[/url] Stage 2:As we stopped at the time control we heard the front suspension making all sorts of squeaking sounds when turning the steering wheel. We looked at each other and he just said we made it here without steering issues we will be fine and we started the stage, at service we will ask the team to have a look. We need to look at some sort of way to communicate with the service crew without removing our helmets. One thing that worked much better was the camera remote location and just the sequence in which I started the ECU, GPS Loggers and finally the cameras. The new DL1 Sport GPS logger from Race-Technology arrived in the meantime that would make this process even easier seeing that I can start the logging on the ECU, GPS logger and camera by pressing one button. [url]https://www.youtube.com/watch?v=rLmhhPZSaj8[/url] Service 1: In the service park we had a gelled crew consisting of my father, brother, Jean van der Westhuizen and Andrea. It actually felt that Ruan and I were in the way, thus I started concentrating on relaxing. The car was dirty on the outside, but boy it was very dirty on the inside below the seats. The rear wheels used the wheel arches to pump the muddy water over the door seals and into the car, luckily we packed the elephant toilet paper which cleaned the mess. The squeaking noises turned out to be the muddy water all over the components, Mike came up with a brilliant idea just to spray the moving parts with some lubricating oil which fixed that one. Stage 3:  Stage 1 repeat, this is going to be nice, well the speed was better, understanding the pace notes and interpreting them better and then all of a sudden we entered a left 3, changed gear and between the time my hand moved from the gear lever to the steering wheel the back stepped out on a muddy patch, countered, countered and went farming, luckily we did not cause any damage or got stuck. This was supposed to be lesson one for the day when it comes to muddy patches. [url]https://www.youtube.com/watch?v=_zrkWpmxncU[/url] Stage 4:  Everything was getting dryer and just a lot more fun. Besides the fact that we had to show the spectators at the one spectating point that we can also do a 360 everything was fine and we were quite relaxed about the conditions and ready to tackle the rest of the stages. [url]https://www.youtube.com/watch?v=3SB9mDcVCSo[/url] Service 2:  Lunch time, charge cameras etc. Damn the car was dirty, less mud in the car, but that is due to the stages being dryer. Jean eventually mastered the refuelling rig and Ruan just had to show us how a pregnant man looks like. Stage 5 - The roller-coaster The stage started out dry, but as we started moving more to the mid-point it started raining again, at some stage some serious water was falling, we dropped into a valley and it were wet. We got a few warnings and all of a sudden we hit a very bad piece of mud, luckily the speed was low but still too high and we were flung from the one side to the other, all I can remember is fence, safe, fence, heart rate thru the roof, continue. Just after this we passed a two cars in a short period of time. We pushed on further and all of a sudden Ruan shouted and showed all sorts of gestures with his pace note book, we were about to hit trouble and then I saw it as I saw over the blind crest, sudden left 9, do not overshoot, these people were quite serious about this, managed to get rid of the unnecessary speed, overshoot slightly and made it. I think it is at this point that both of us tried figuring out if our pants are still clean and handed in our resignation. This sport is fun, but seriously dangerous if you only miss one pace note. [url]https://www.youtube.com/watch?v=xnN-zA6HSpY[/url] Stage 6: Luckily we did not now the roads in the area and the only directions we had was to the next stage. The surface still wet, but being a little higher meant less muddy spots and just more enjoyable. Probably the stage with the highest speeds, we managed at the one point to get up to 150km/h, if it wasn't for the big ditch before the turn leading to the long straight stretch of road higher speeds was on the cards. A very enjoyable stage, just what we needed after the previous one. [url]https://www.youtube.com/watch?v=43IcU-PM-x8[/url] Service 3:  Since everything was still intact, no way to check if the bolts moved seeing that everything was covered in mud, dirt and stones, the crew checked everything over, filled us with fuel and set of for the spectator point at stage 8. Stage 7: The repeat of the roller-coaster, given Ruan clear instructions to warn, shout, swear at me if it seems to him that I'm not slowing down at our two heart attack zones, this time around no rain and it turned out to be a very enjoyable stage. Who would have thought what difference a few millimetres of rain can make. [url]https://www.youtube.com/watch?v=qtqXfauCDxY[/url] Stage 8:Were we going to see dust on this stage, well at some points it could have been possible. As we moved thru the spectator point I decided to go over the ditch on the left hand side this time around as I had a picture in my head that it would be better, well just before we hit it, I saw it is very deep on our line and changes my line, a big no in the rally world, we hit it very hard, as the car settled after the knock I immediately noticed the car feeling strange and the steering wheel moved, we had a case of bad alignment at least, all the strange thoughts started creeping around in my head as we continued on the high speed straight. Just as we approached the braking zone we noticed a drunk spectator on the route, somehow he must have entered the route, luckily he was travelling in the same direction as us, which is a start, secondly he was competing in his own rally and trying to out run us. Even though we were limping home with a car with some suspension issues, speed was good enough that we lost time behind this future star, Ruan instructed me not to pass as we do not know what the oke was going to do. Luckily the other spectators managed to wave the star down and we could pass, maybe it was a good thing that this happened as it forced me to take it easy and the car back home. Ruan on the other hand went quiet, no pace notes just mumbling and all of a sudden I see him pulling out his phone, dialling, attaching the phone to his helmet (the new Iphone mount) and waiting for the other party to pick up, no answer I thought, maybe I'm going to get some notes, no, he redialled, this man is pissed off. I was driving on what I saw, until we got to a right 8 I almost did not see that I instructed him to navigate. We managed to get to the end, instruct the marshals of the future star and rove back home to parc ferme. From their everything went smoothly on the road back and made it to our second rally finish. [url]https://www.youtube.com/watch?v=_ZEzPpeNuaI[/url]  We have some work to do before the next one, fix the front suspension, think of a better wiper/washer system, install the new data logger and maybe mount a decent hands free kit for Ruan, that way he can atleast keep his hands on the pace notes. Thanks to the farmers and community for allowing us to use their area, Pierre van der Westhuizen from Witzenberg Motor Club for organizing this brilliant rally. A special thanks to my team (Pieter & Mike Mathee, Ruan Reynders, Jean van der Westhuizen, Selina Botes and Andrea) and friends that attended.
Posted on: 2014/5/19 12:52
Edited by racetech on 2015/2/10 8:39:59
|
|
|
|
|
Re: racetech's 1200 SR20VE Project |
|
Home away from home Joined:
2009/4/16 10:37
From Cape Town, South Africa
Group:
Registered Users
|
May 2014 WBMK Ceres RallyTwo rallies completed, both we were able to finish, on paper all seemed to go well and as planned. A few big lessons learned like wipers is more important than a spare wheel, muddy water is transparent as it can magically appear under the seats and the interior of a rally car gets very hot after a hour in a race suit and 35+ degrees of nice Overberg sunshine. Well we were about to learn our biggest lesson and drop a pot of ink on that paper stating that everything went as planned.     Fixing the damage Fixing the damageSeeing that we bend both front lower control, arms going thru the furrow on Stage 8 of the Bredasdorp Rally, we had to build new ones and improve them a little as time was limited and a total redesign was out of the question. The bend parts were removed, did I mention it took quite a bit of tricky maneuvering of various cutting tools to get rid of them. Once this was all done I could TIG weld in the new bits, seeing that I learned quite a few tricks from the last roll cage that we build, I managed to get in with the TIG torch in positions previously impossible. Another piece were added to strengthen the part that bend without affecting the position of the ball joint. This time round I painted them seeing that I could be working on them in the near future again.   Wiring WiringNext on the list were the addition of a brand new <a href=" http://www.race-technology.com/dl1_sport_2_28.html" target="_blank">Race-Technology DL1 Sport</a> GPS data logger. The fancy part to this logger is its ability to log everything the AX22 were able to log + the data send from the ECU. Swopping the two loggers were the easy part, adding a switch on the steering wheel to activate the windshield washer pump turned out to be a little more complex than originally planned as all of a sudden relays had to be added seeing that the current draw of the pump would have been too high for the wiring to the steering wheel.   The GoPro mountings were also changed for frame mounts which would allow the 12V-MicroUSB power supplies to be connected to the cameras for a continues supply of power to them, another thing removed from the service list during the lunch break, no more charging cameras before or during an event. Something small, but you would be surprised at the amount of thing that should be remembered/done before an event. These new frame mounts would also facilitate the use of the rear 30 pin bus connector on the cameras for the newly planned witchery the team are busy with, this being adding external audio to the units, power, start/stop recording via the GPS Logger, etc. Interesting things to come, and as always, we will share all the info, just to upset some out there that wants to make money from every little thing. Wiper WashersAdditional washer piping were added directly to the wiper arms to help with water directly in front of the arms, the idea behind these are that if I can get enough water on the wind-shield the use of the wipers could be forfeited in some instances, but these will also help clear muddy water if used in conjunction with the blades. Seeing that time were limited I fastened the pipe to the blades and made small holes in them, not ideal but a start. Since then I learned that I need drain back valves on these and that I need to find a better way to direct water in the correct positions on the screen.   Bits & Bobs that did not help Bits & Bobs that did not helpCar Cover, my mother being a genius at operating a sewing machine were called upon for some help, food and board was exchanged as a means of payment and she managed to make a custom fit to my specification cover for the car, this thing will help keep the stones away from the car especially to events, as added feature I asked for some reflective tape to be added to add some colour and make the car more visible in the dark when towing it.   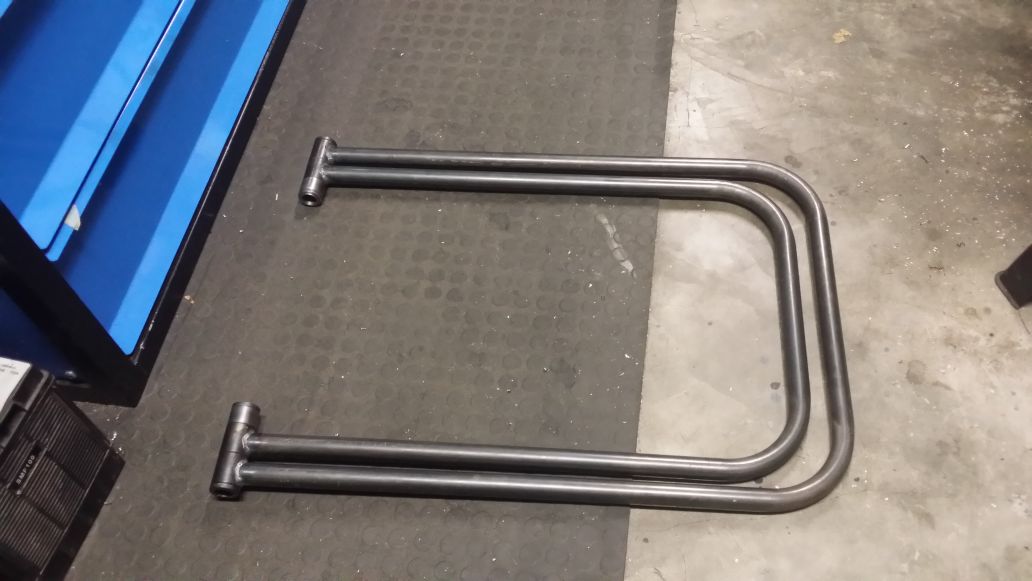 Paper Towel Stand (Elephant Toilet Paper), Paying R400 bucks for a paper towel stand just seemed way to expensive for my liking, thus I decided to build my own, way over engineered, but why not, at least this one folds away flat. On the management side we lowered the first activation point by 200rpm and increase the gap between the cams to 600rpm, hopefully this will help.    As the prep work were done we had to do the alignment, during this we had to adjust the steering wheel to be straight again, luckily I did all the adjusting of the steering wheel, more about this later. We had to remove the rear part of the exhaust to adjust the rear ride, seeing that the exhaust rubs the tyre on full compression I deemed it a very good idea to keep it removed and fit a bend to direct the gasses to the ground, only down side to this was the fact that the pipe excited at the bottom of the car. Hopefully the car sounds a little more like a rally car seeing that the car now only had one box left. I must admit, packing for a rally is becoming easier and easier every time I'm doing it, this is probably due to the fact that my packing list is adjusted every time and I have a dedicated set of boxes only for rally spares, fluids, etc. The majority of these boxes is just placed in storage until the next event. The weather for the event looked bad, a lot of water came down the week leading up to the event, travelling towards Ceres the morning, the mist was quiet thick and a few heavy showers fell, as we approached the mountains surrounding the Ceres the skies cleared and it seems that the weather were going to turn out to be in our favour. The start of the event were at Ceres Toyota, we off loaded the car and the team made quick work of completing the final prep work and getting the car thru scrutinering and into parc ferme, as we drove the car I felt something out of place on the steering, but just could not put my hand on it. Seeing that the rally started quite late , we had a lot of time standing around chatting, all the time I could not figure out why the steering felt so disconnected. We started the rally and as we drove out to the first stage I realised that the steering wheel flange was coming loose as I only nipped the two little 5mm Button Heads when we did the alignment, I knew for a fact that this is going to rattle loose and cause some sort of head ache in the stage. Once we stopped at the stage, we quickly jumped out, Ruan adjusted the tire pressures while I tried to fasten the only 2 out of 8 button heads, with the column switches in the way I was unable to fasten them with Allen keys as the set in the car did not have ball ends, lesson learned. I ended up using a pair of pliers as it was the only thing able to fit in the tight space, the fact that the button heads were stainless did not help for grip, well I managed to get it fastened enough that I felt at easy about the whole situation, the rough 25km stage that laid in front of us on the other hand did not help. Stage 1Due to the start of the stage being delayed, our steering fixed and the sun starting to come out we had time to test our new hydration system which worked a treat.  The first section of the stage were quite tight, made a little mistake on a right hander and then it opened up as we travelled next to the main road on the wheat fields. The one thing that were quite obvious were the fact that once the cams activated the exhaust note were loud as hell in the car, luckily Ruan anticipated this and adjusted the intercom volume on our way to the stage. I must admit I like the sound of the exhaust, but it will have to move to the rear of the car as it should be, exiting under the car makes it way to loud on the interior. 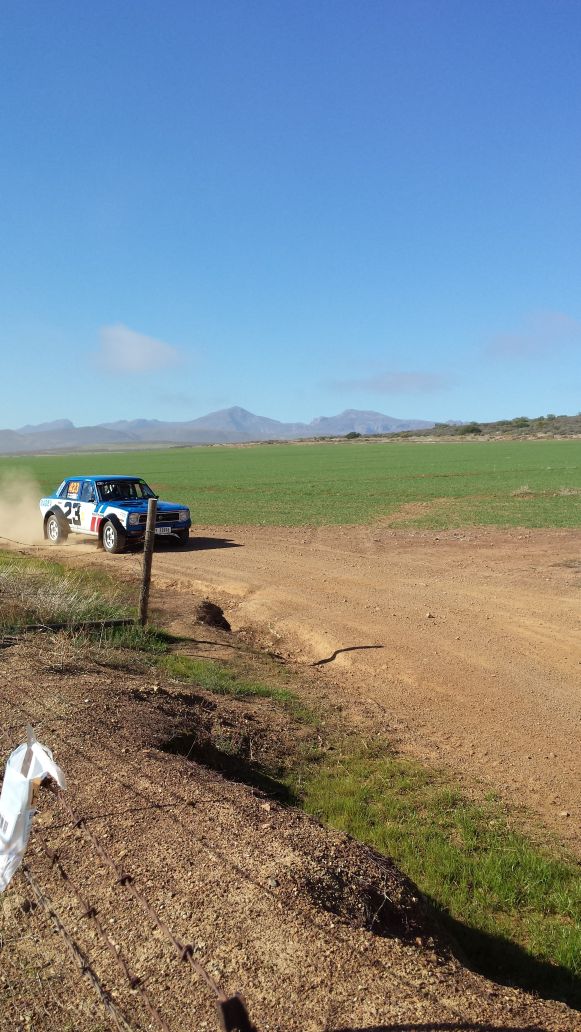  The first part of the stage the notes were very good, as the stage got rougher and Ruan started having small issues, luckily for him and unlucky for us the steering started coming loose after only about 8km, this put me of as I had no confidence, after this the driving were bad as I had to concentrate on keeping pressure on the steering wheel to add tension on the bolts, I knew if even only one came undone we had some serious issues on our hands. I decided just to take it easy, get thru the stage and fix the damn steering, my singe biggest mistake of the whole season. Lesson learned, if you start with something, finish it before moving on to the next item, if that is impossible, make a note on the To-do list.   Concentrating on keeping pressure on the steering got to a point that I concentrated more at it than the road and we hit a furrow quite hard and bend the left lower control arm, Yes again. This broke my mood for the stage completely, the "rhythm", "feeling" and the will completely went out the window. I went into survival mode and basically coasted thru the stage, while figuring out in my head how to fasten the 8 bolts on the steering without stripping the complete dash. As my plan was made, the stage opened up, what a relief, about 5-7km to go on easy ground would be a bonus to nurse the car to the end as the service park were basically next to the stage end.   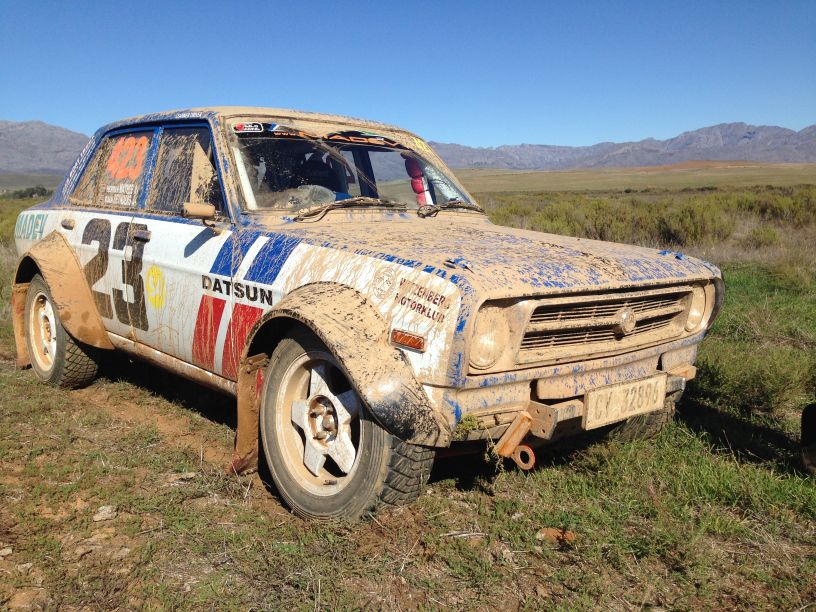     And....... it went south, we went through a slight ditch, nothing mayor compared to what we went through previously, we just heard a rubbing sound coming from the right front, my initial thoughts were that horror strut through the bonnet picture, we pulled off the stage onto an opening, switched the car off and immediately got the "OK" board out, assessed the damage and saw the stub axle broke, snapping one of the caliper mounting bolts in the process, this were the end to our rally. Madev Datsun 1200 - Ceres Rally 2014 - Stage 1Luckily for us the Clark of the Course allowed our service crew into the stage to recover the car seeing that the stage would be repeated. The team made small work of loading the three legged car onto the trailer, even though it took us the better part of a hour or two, later we learned that the stage were delayed due to a huge accident. Once back at the Service Park the relevant documentation were handed in, service area packed up and Selina and I left for home with my tail between my legs, seeing that the rest of the crew Cape Town were in a faster car they could at least watch a stage. Once back home it was the same ordeal just in reverse to get the car of the trailer and back in the garage, luckily we had enough lights, man power and girl power that fed us coffee.       Needless to say the rest of the evening were used to consume vast amounts of mixed beverages trying to figure out the best way forward as clearly we had an issue on our hands.
Posted on: 2014/7/3 12:46
Edited by racetech on 2015/2/10 8:49:05
|
|
|
|
|
Re: racetech's 1200 SR20VE Project |
|
|
Guest_
|
Posted on: 2014/7/9 14:11
|
|
|
|
|
Re: racetech's 1200 SR20VE Project |
|
No life (a.k.a. DattoMaster) 
Joined:
2002/6/14 7:24
From Sydney
Group:
Registered Users
|
Has it been determined that moving the loading on the stub axles further away from the base of the stub axle, via the use of the custom hub assemblies has contributed to the stub axle failure? i.e. more leverage applied to the stub axle.
Would be interesting to know the analysis of the axle failure. Look at the failure under a microscope to determine if it started as a hair line crack that grew until finally snapping etc. Would be worth checking out the other strut for signs of metal fatigue and cracks.
Posted on: 2014/7/10 4:47
|
_________________
 ----------------------------------------- 1971 B110 Sedan GX Spec 1970 KB110 Coupe Track Car 1970 KB10 Coupe ----------------------------------------- S13 caliper b...
|
|
|
Re: racetech's 1200 SR20VE Project |
|
Home away from home Joined:
2009/4/16 10:37
From Cape Town, South Africa
Group:
Registered Users
|
January 2015 New Front SuspensionHallo Everyone, it is 2015 and I'm still very frustrated, why you ask, well more than 8 months without being able to compete. Thanks to Tiaan for taking me for a spin in his MK1 Rally Golf, what an eye opener and at least I have more memories to keep me going until Datto is back in action, if you want to refresh your memory, have a look at our terrible luck here: <a href=" http://www.madev.co.za/projects/datsu ... 14-wbmk-ceres-rally" target="_blank">2014 WBMK Ceres Rally</a> , maybe it is harsh to say terrible luck, seeing that I do not want to get on the wrong side of lady luck before a new season, let's rather look at it as a lesson in patience and a learning curve that just started. Seeing that we are learning, a lot happened while we were offline, early development started on a control panel for non-essentials, heavy parts were designed and in the final stages of production, relocated to a new house, etc etc. While we are busy reflecting on 2014, 2015 can only be better, let me show you the last of 2014 and the current 2015.    A few things had to change in the car, the first of these items being the whole steering column/steering wheel setup, buttons on steering wheel had to be re-thinked, fuel filler neck had be clear to help the service crew, integrate intercom audio with one of the cameras to prove that I do not really swear when driving but actually squeak when I scare myself #OOPS#less and finally improve camera picture with the use of UV Filters (Yes I know when using spot mode, focus the spot on the front windscreen and not the dash). New tool holders were also build and I must admit, these are serving quite helpful not only in the garage around the car but anywhere we need to carry n bunch of tools.  First things first, strip the front right corner to have a good look at the damage, it seems that we got away with only minor damage that can all be fixed, especially the calliper. While all of this was going on it was decided to design and build a WRC type setup used on the MKII Ford Escorts of the 80s, but more of this later.    After spending a few days rethinking a few things around the steering wheel it was decided to build a switch/button panel for the DASH display controls, this would free space on the steering wheel for the future wiper controls. This panel will now reside where the rear-view mirror used to be, it would communicate with a Arduino micro-controller controlling all cameras, wipers and providing vital status feedback via the lights, all being in touching distance but also out of view. Luckily I'm a big Le Mans fan and it provided almost 24 hours to build the wiring harnesses. Connectors can be bought here: http://www.chargeconverter.com/store/sandisk?product_id=150The Arduino will be used to power and communicate with the cameras, while the Peltor FMT 120 Intercom audio will be send to one of the cameras via the above connector and seeing that I'm a Radio HAM I just need to install a 2way radio in the car to communicate with the service team. In the diagram provided, you will see how to communicate between helmet via the intercom and radio. This would also enable us to use a cell phone via the intercom and use normal earphone/mic that comes with cell phones these days for open sections.    Another item that took some time designing was wheel dollys, these are used extensively in the States to easily move vehicles around. You basically get two types the expensive ones comes with jacks to lift the wheel from the ground and the ones that you need to jack the vehicle up and place the dolly below the wheel. My design uses the latter seeing that I had two major requirements, one, the top had to be without any extrusions like bolts etc. as I want to use them to cmove heavy items around like engines etc., the other one was to hold my centre stands, this way I have the best of both worlds, a car on centre stands without wheels and moveable, brilliant hey. What you see here is just a mock-up dolly, the final items will be made from 8mm thick aluminium to make them as versatile as possible.     Steering Steering, while it looked very need, it was as in practical as can be. Whenever I had to work around it, it turned into a swearing contest, 30 things to remove to get to the price, then there was the little issue of the hub coming lose. Before you all jump on my head I know it was causes by incompetence by not securing every bolt, that being said it was decided to eliminate the complexity around the whole setup and remove the wiper/lights stalks and replace them by switches on the dash as they are not needed when fastened in the harnesses. Next remove all the bulky components like the quick release, spacer and flange adaptor, then mount a steering quickner, use only components with splines, build an extended shaft incorporating these items in order to not use a spacer. The quickner is a brilliant piece of kit, almost as if they thought of rallying when designing it as it uses planetary gears to make it more robust, the thing is actually filled with Redline Shockproof oil, you just got to love the Yanks. You will notice a bearing on the steering shaft, this is in fact a flange bearing normally used to support a steering shaft going thru a firewall, I'll be using it to support the steering wheel in order to remove all stresses from the quickner bearings and the display will be mounted to the bracket holding the bearing. All this have a few advantages, seeing that the bearing can be mounted at an angle it would help with alignment, all bolts on the new steering components will be M8, making life a lot easier. If any road side work needs to be done, everything will be accessible with only one spanner and one Allen key.   You will also notice I opted for a Joes Racing quick release, these have a good reputation in the States and is a very small item compared to the old one. The one little trick I stole while watching some ERC rallying was the use of slots on the adaptor between steering wheel and quick release, this enables the team to quickly align the steering wheels, in the case I forgot to tighten the bolts I can just do it while driving to a stage as everything is accessible while sitting.  Then we have the little front suspension issue, how could I forgot this little pain in my arse, maybe I'm still in denial, but let me share with you a few little things before I show you why we designed our own. You can buy a complete kit for the MKII Escorts at a mere 2100 pounds here <a href=" http://www.motorsport-tools.com/escor ... n-hub-assembly.html" target="_blank">Escort-mk1-mk2-rix-engineering-special-wrc-type-front-suspension-hub-assembly</a> once you convert that little amount to South African Rand you quickly realise why we opted to design and build our own, R 36.5k without freight and customs, not something I would add to my cart and checkout in the near future. Again if you go this route and not use it in a MKII you have to rework a lot of the little items to make it work on another car, thus the designing started, a big thanks to my brother as he is the AutoCAD wizard and did the design with a little input from my side. One of the biggest advantages to this design is the modular approach, as you have a lot of small universal items that can be used left or right, making spares a lot easier. If you break/bend something you just replace the affected items and off you go again. No need to import crap expensive items from our friends with the Pound currency, by the way Zuma you are killing me, stop marrying kids and put together plans to strengthen our Rand it is currently almost as weak as your presidency. Enough of our Rand ruining president, back to parts. After we recovered the car on the Ceres rally we returned to the service area, this is where an older gentleman approached me and asked me if I have considered the spacers to be the culprit why the stub axle broke and immediately after he said it, I knew he was on the money with the suggestion. Thanks.  During the design phase the first items that were selected was the bearings, seeing that the stub broke on the face the inner bearing located, we wanted to enlarge this, but it came at a price, if we chose the bearing s we wanted we needed new hubs as the old ones just did not have enough meat to house them, taking slightly larger ones we could have used the same hubs, but would then miss out on all the nice features new ones could offer like, direct fitment of the brake rotor, incorporated spigot for the heavy rims etc. Guess what, we opted for the biggest bearings we could source locally and fit in a reasonable size hub. As an example, the new bearings inner diameter went from 28mm to 40mm. Look at the picture, from left to right: Standard Escort Bearings, Uprated Imported Strut Bearings, New Suspension.      Spindles / Stub Axles Spindles / Stub AxlesOn this, what is the correct name, Spindles as it is a complete separate item or Stub axles? First off all, the old stubs were machined from cast steel, we decided that it was time to spend the money and learn to work with the good stuff EN24 or better known as 4340, being much more expensive than normal shafting but still actually relative affordable for the man on the street. Using 4340 also enabled us to have it tempered and hardened (44 Rockwell to be specific), hopefully they will bend around any obstacle rather than break. It was the first time in my life I worked with such big pieces of metal and took me a few tries and moments of depression to get a decent finish. The toughest part was getting thru the outer course of the metal, only then the real machining could start. These things took like a million years to make, well at least the roughing up to 2mm from size, once the basic shape was done it went to Cape Steel & Heat Treatment for stress relieving, came back and machining was done to 0.2mm from finish, but this time the threads were also cut. Again Kobus at Cape Steel & Heat Treatment was used to temper and heat treat the spindles, once they came back the final 0.2mm were removed and the bearing faces cut, probably the most stressful time of my life, how I did not start to smoke again, I still do not know. I'm very happy with the finish product and all work entirely my own. Will I do it again, NO, more about this later. Words of advice, 4340 is quite dangerous in the lathe, the cuttings is very strong and flexible, I did all work with gloves to prevent cuts, still I suffered a few. During this whole ordeal I learned another valuable lesson, never trust a digital vernier, as I lost a R400 piece of material due to the vernier losing 5mm.     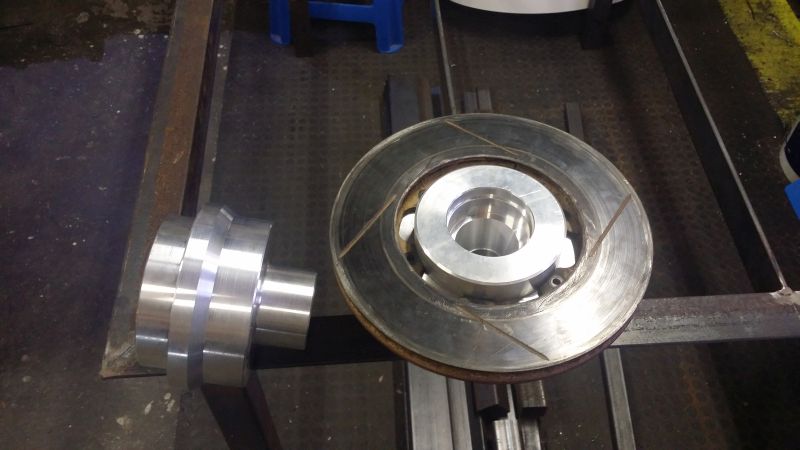 Hubs HubsSeeing that we decided to design and make new hubs I had to go out and buy a 4 jaw chuck to machine the bearing faces as the work piece had to be clocked up once turned around. The good and the bad about this is, I never needed it which is good, but the money could have been used for something else. While the spindles was in and out at the heat treaters, I bought to large chunks of aluminium and started doing the rough cutting on them, again until 2mm from size, seeing that it was just a rough cut, I still took the time to experiment with finishes and was quite happy with what I achieved. At the beginning of December I took the 2 hubs to TJ Engineering in Worcester as we know him from their staring days, Tiaan the owner was more than willing to spend the time to put together a program to machine the hubs on his CNC lathe. Seeing that I was a little late, his shop closes like all the rest over the festive season and had to wait until mid-January, I'm very pleased with the outcome, now I just need to drill all the holes, tap the threads and press the bearing cups and wheel studs in. Almost forgot, before I can do this I need to make some grease caps. Tiaan also advised me that I do not need to do the rough cutting on the hubs as his program needs to run from the rough sizes to the final product, what a relieve that will be when I start on the spares, I do believe he will also be making the spare spindles. Fuel money to Worcester is nothing compared to the time needed for manual machining.         Odd Suspension Components Odd Suspension ComponentsWhile I was waiting for the hubs, I finished the machining on a few bits without names, the first being the pin that will press in from the bottom on the blocks housing the shocks, spindles, calliper, steering arm and lower control arm. These will house the steering arm and be kept in place by the cone shaped disc. The cone will slide over the pin, once fastened to the block it will keep the steering arm in place. The bottom part of the pin will house the lower control arm in the form of a spherical bearing contained in a housing with a circle, in turn the housing will be welded to the lower control arms. What a mouth full, let me read it again before anybody imagine a space ship with the above explanation. All in all, look at the pictures as it worth a thousand words.        Seeing that it is a lot easier getting in tight places with a MIG welding gun than a grinding disc, I opted to just cut the shock tubes off the stub axles rather than swear them out after countless cutting disc. I actually bought 10 cutting discs, 1 grinding disc and two flapper wheels for it. Seeing that I cut them off they were to short and this had to be fixed. At this point 99% of normal sane people would have seen the extra work as a burden, I jumped at the opportunity as I could fix GAZ Shocks f*^kup. They properly gave my shocks to their (just left high school, not mechanical, no pride in his work, the only tool he played with for more than 2 minutes being his third leg (if a lady, well then one of those vibrating ones)) apprentice to tap the threads on the bottom of the tubes securing the shock, as I was never able to remove the shock to add more bump stop rubbers. As you can see, I opted for some sleeves over the original tubes (severely lightened) for the length, a welded disc at the bottom to secure the threaded disc on the shock. Damn, now I'm confused, let me explain. Assembly 1 on 1: Insert shock thru tube Add a set amount of bump stop rubbers Screw disc on shock and fasten with lock nut Fasten disc on shock to tube via 3 M6 Allen caps Bolt to block and try not to break them at the next event. As you can see from the components that is finished the new front suspension will be completely modular and would be able to work either on the left or right hand side, if I'm successful even the lower control arms would be lefty/righty items, only time will tell. All of this would make replacing an item a breeze, making spares easier, all in all a much better front suspension. The next steps obviously is reworking the rear suspension to use the same shocks and tubes as the front, if you then have 1 spare on a rally you need to break 2 units on any corner before putting the car on the trailer, wouldn't that be nice. P.S. thanks to Ruan and his superb planning, he managed to pick the first rally date as his wedding date, meaning I have more time to finish more work.
Posted on: 2015/2/10 8:50
|
|
|
You can view topic.
You cannot start a new topic.
You cannot reply to posts.
You cannot edit your posts.
You cannot delete your posts.
You cannot add new polls.
You cannot vote in polls.
You cannot attach files to posts.
You cannot post without approval.
|


;)
;)
;)
;)
;)
;)
;)
;)
;)
;)
;)
;)
;)
;)
 Transfer

;)
;)
;)
;)
;)
;)
;)
;)
;)
;)
;)
;)
;)
;)
;)
;)
;)
;)
;)
;)
;)
;)
;)
;)
;)
;)
;)
;)
;)
;)
;)
;)
;)
;)
;)
;)
;)
;)
;)
;)
;)
;)
;)
;)
;)
;)
;)
;)
;)
;)
;)
;)
;)
;)
;)
;)
;)
;)
;)
;)
;)
;)
;)
;)
;)
;)
;)
;)
;)
;)
;)
;)
;)
;)
;)
;)
;)
;)
;)
;)
;)
;)
;)
;)
;)
;)
;)
;)
;)
;)
;)
;)
;)
;)
;)
;)
;)
 great read and all good karma to you.
;)
;)
;)
;)
;)
;)
;)
;)
;)
;)
;)
;)
;)
;)
;)
;)
;)
;)
;)
;)
;)
;)
;)
;)
;)
;)
;)
;)
;)
;)
;)
;)
;)
;)
;)
;)
;)
;)
;)
;)
;)
;)
;)
