![[Datsun 1200 encyclopedia]](/wiki/upload/wiki.png)
| Revision as of 06:27, 28 December 2007 Ddgonzal (Talk | contribs) <- Previous diff |
Revision as of 06:48, 16 May 2009 ddgonzal (Talk | contribs) (->Relay) Next diff -> |
||
| Line 82: | Line 82: | ||
| [http://datsun1200.com/modules/myalbum/photo.php?lid=14978 http://ddgonzal.members.winisp.net/getThumb.aspx?width=220&uri=http://datsun1200.com/modules/myalbum/photos/14978.jpg] | [http://datsun1200.com/modules/myalbum/photo.php?lid=14978 http://ddgonzal.members.winisp.net/getThumb.aspx?width=220&uri=http://datsun1200.com/modules/myalbum/photos/14978.jpg] | ||
| + | |||
| + | [http://datsun1200.com/modules/newbb/viewtopic.php?topic_id=40186&forum=1&post_id=254634#forumpost254634 Discussion] | ||
| + | |||
| + | == Harness Kit == | ||
| + | If you have more money than time, an Relay wiring kit is really easy: | ||
| + | |||
| + | Take the new harness: | ||
| + | 1. Connect HOT wire | ||
| + | 2. Ground/earth the relays | ||
| + | 3. Plug into existing headlight connector | ||
| + | 4. Plug harness into headlights | ||
| + | Your'e Done! Only $129 USD | ||
| + | |||
| + | [http://store.summitracing.com/partdetail.asp?autofilter=1&part=PRF%2D30815&N=700+400012+304711+115&autoview=sku Painless Wiring Headlight Harness with relays] | ||
| + | |||
| [[Category:Body Electrical System]] | [[Category:Body Electrical System]] | ||
Revision as of 06:48, 16 May 2009
Datsun B110 headlights are fused through the fuse box. No relays are used. Original Specs for headlights are 50/40 watt (standard large round headlights). From the fuse box "Battery" side (always hot, not dependent on ignition key position), through a 15-amp fuse the circuit goes to the Light Switch. From the Light Switch it goes to the Dimmer switch on the column. From here -- depending on the position of the Dimmer lever position -- it goes to either the low (DIM) beam of the headlights or the high (MAIN) beam of the headlights.
Also see: Headlight Specifications
Earthing
The headlights are grounded via the main wiring harness
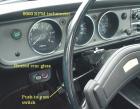
Completing the headlight features is the "High Beam" light in the instrument panel. This is connected to the high-beam circuit to light up a visual indicator on the dash when the high beams are on.
So the headlight circuit has these components:
- Two identical headlights
- (Standard 12V "large round" type used by all makes of older vehicles)
- 15A Fuse in fuse box
- Light Switch
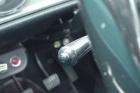
- Dimmer switch (T/S & Light Switch on steering column)
- High-beam indicator lamp in instrument panel
- Wiring and connectors
- Relays are NOT used
Contents |
Pinouts
Light Switch connector
| R | Headlight hot feed
| R | Headlight circuit hot Output
<li>To RY wire of Dimmer Switch | n/a | no connection | n/a | no connection | GL | parking lights hot feed
<li>from GL wire of fuse box ('PT' terminal) | GL | parking lights circuit output
| <li>to GL wire of headlights <li>to GL wire of running (parking) lights<li>to GL wire of Instrument panel  light switch wiring diagram
Position Connections light switch wiring diagram
Position Connections
|