![[Datsun 1200 encyclopedia]](/wiki/upload/wiki.png)
The alternator should output 13.5v to 15v at 1200 RPM. A voltmeter is the only tool needed for testing. Further, he charge lamp on the instrument panel should come on before the engine starts, and go off while the engine is running. If it is not working correctly, then follow the testing procedures to find the cause.
Contents |
Requirements for Testing
The battery must be fully charged. A run-down battery can cause the altnernator and voltage regulator to not work correctly.
Charge the existing battery (or swap in a fully-charged battery) before continuing.
First Test
Turn key to On/Run. Engine not running. Look at dash gauges. Is the IGN/CHG lamp lit up?
- Yes: proceed to further tests
- No: test the bulb before continuing. Remove the wiring connector from the Voltage Regulator and ground (earth) the WR wire with a small jumper wire. Repeat the test. If the lamp still does not light up, replace the burned-out dash bulb and perform this test again.
Basic Testing
The alternator has four terminals:
- A - alternator connects to Battery cable + 12V via large white/red wire.
- E - earth/ground. Connected to case of alternator, hence though bracket to the engine. Engine is grounded by black cable (part of the two-cable negative battery cable)
- F - the Field. This needs 12V to get the alternator working. The Voltage regulator turns this on/off (12V) rapidly to achieve an average of 13.5-15.0 volts
- N - Nuetral point. This is connected to the dash Lamp. This is NOT optional, the alternator in a 1200 car will not function with this disconnected. (Some later Datsuns have a parallel resistor in the dash, so it will charge even if the light is broken).
Test Procedures
- With engine off, check voltage at battery terminals. If it is less than 12.0 volts, stop. Charge the battery before continuing. A low battery can prevent a good alternator from putting out correct voltage.
- With engine running at 1100 rpm, measure Voltage across battery cable. If it reads between 13.5-15.0 volts, everything is fine (or over 12.5 volts headlights on main beams)
- Measure Ohms between F & E terminals. It should be approxmiately 5 ohms (with ohmmeter on lowest range). If higher or lower, remove alternator and inspect.
- Perform Regulator Bypass Test
- Be sure to test at A & E terminals, to bypass external wiring problems
- Disconnect T-shaped connector (F+N) at alternator, to bypass the regulator wiring
- Jump the F terminal to Battery +
- Test with headlight main beams on
-

- Output at 1100 RPM should be 12.5 volts or higher with headlights on
CAUTION
Do not exceed 1100 RPM when in test configuration
Voltage Output
For a lead-acid battery, the proper charging voltage depends on the temperature. For the charging system in normal operation, the following chart shows the expected readings at the Battery for the stock voltage regulator.
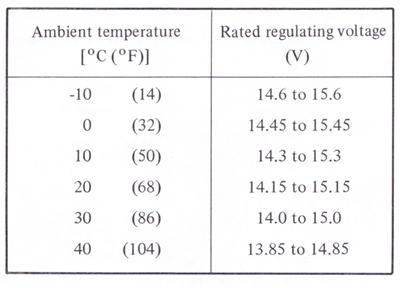
20C/68F: 14.1 to 15.2 volts
In no case should be it be lower than 13.85 or higher than 15.6 (with headlights off, engine at 1200 RPM or higher). Check for clean wiring connections if that occurs.
If voltage is outside this range, check and clean all the wiring connections involved. Then repeat the test. If it is still outside the specified voltages, replace the voltage regulator.
Charge Light Dimly Glows
The charge lamp is wired so it has 12 volts from the battery applied to one side of the light, and the alternator F terminal grounds the other side. So with key ON, engine OFF, the lamp will light up.
When the alternator starts to charge, the F terminal applies voltage to the the light. Since both sides of the lamp are at postive voltage, the light goes out.
With the headlights on, under some situations it may be OK that the light glows dimly. Test as follows:
Engine speed 1,500 rpm, Headlights ON: Dimly glowing charge light -> Engine idling (Measure the voltage across B and L terminals:
- more than 0.5v -> fault alternator (not regulator)
- Less than 0.5v -> OK
Engine speed 1,500 rpm, Headlights OFF:
- More than 15.5v -> faulty voltage regulator
- 13v to 15v -> Let engine idle, Lighting switch ON:
- Charge light on -> faulty alternator (not regulator)
- Charge light off: OK
(it's OK for charge light to be glowing dimly while idling with headlights ON ... IF the two voltage tests checks out OK)
Brushes
Worn brushes can cause flickering dash lamp, or intermittent charging.
Very easy to check -- these just unbolt from the rear of the alternator. Replace if worn down to the line.
Brush comparo:
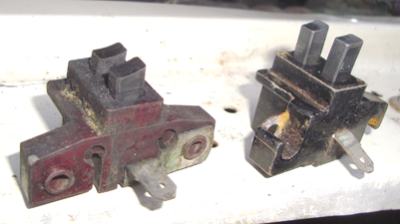
- Left: worn down to the limit line
- right: New