User Login    
 + Register
  • Main navigation
Login
Username:

Password:


Lost Password?

Register now!
Fast Search
Slow Search
Google Ad


Main : Members : anb008 120Y Custom Boot Progress

[<   Previous  13  14  15  16  17  18  19  Next   >]

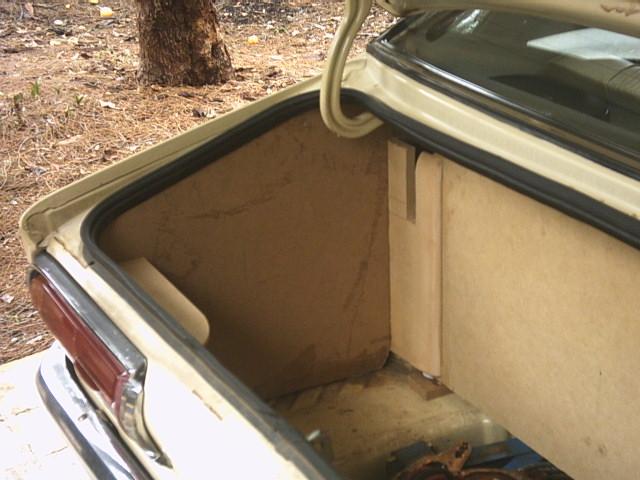
120Y Custom Boot Progress
120Y Custom Boot ProgressPopular
Submitteranb008More Photos from anb008   Last Update2004/6/9 0:28    Tell a friendTell a friend
Hits2370  Comments7    0.00 (0 votes)0.00 (0 votes)
I've started repanelling the boot in my 78 sedan with custom panels. Installation will include false floor and retention of the jack handle in the factory location

[<   Previous  13  14  15  16  17  18  19  Next   >]

The comments are owned by the poster. We aren't responsible for their content.

Poster Thread
jaimecidpedro
Posted: 2004/6/9 6:49  Updated: 2004/6/9 6:49
No life (a.k.a. DattoMaster)
Joined: 2001/8/2
From:
Posts: 1354
 Re: 120Y Custom Boot Progress
Good job. Check your rubber seal(trunk), a bad seal will allow water to sip in, creating rust in the spare tire area.
Late.______________

Poster Thread
anb008
Posted: 2004/6/9 7:56  Updated: 2004/6/9 7:56
Home away from home
Joined: 2002/11/7
From: Perth, Australia
Posts: 184
 Re: 120Y Custom Boot Progress
That was one of the first things I looked for when I got the car, knowing that the panelling would be going in at some point. There was a small amoutn of wter getting past the tail lights as they weren't done up very tight, but all is good now. Will send more pics through as work progresses.

Poster Thread
jaimecidpedro
Posted: 2004/6/10 2:25  Updated: 2004/6/10 2:25
No life (a.k.a. DattoMaster)
Joined: 2001/8/2
From:
Posts: 1354
 Re: 120Y Custom Boot Progress
Hy . You mentioned your tail lights, yes, there is a rubber seal between each tail light assembly and the body of the car, Make sure it is in one piece. If not, you can make new ones with rubber material, even inner tubes( car tires) ...work good(if not able to find the original seals or a piece of rubber big enough to cut a new seal )..., and make sure when tightening those small nuts, to do it in a cross pattern, as in bolting in lug nuts in a wheel, to make sure no water comes in.
About those bat cables, get a bean bag or something else and put the bat cables in it, those cables free flying around the trunk will chip off paint, you would be surprised to see how rust starts from those little nicks and scratches,add humidity(hot summer/wet winter)... rust is not welcome in a Datto.
Later____________________________

Poster Thread
anb008
Posted: 2004/6/10 5:45  Updated: 2004/6/10 5:45
Home away from home
Joined: 2002/11/7
From: Perth, Australia
Posts: 184
 Re: 120Y Custom Boot Progress
Once the false floor is in place, everything will have its own small compartment to fit into. Jack, toolkit, Jumper Cables, etc will all be safely secured, including the spare 5 litres of water I always carry around !!
I'll keep everyone posted with updated pics of the boot and doors as time progresses.

Poster Thread
dazzasute
Posted: 2004/6/9 8:03  Updated: 2004/6/9 8:03
No life (a.k.a. DattoMaster)
Joined: 2004/3/15
From: Perth Western Australia
Posts: 1018
 Re: 120Y Custom Boot Progress
just out of interest, how much extra weight is going in doing this?

Poster Thread
anb008
Posted: 2004/6/9 15:37  Updated: 2004/6/9 15:37
Home away from home
Joined: 2002/11/7
From: Perth, Australia
Posts: 184
 Re: 120Y Custom Boot Progress
Once completed, the total extra weight will be about 8kg, 10kg at the absolute maximum in the boot. The custom panels that are being made to the doors will add (not including the speakers themselves) will add perhaps another 3-5kg. so 15 at the absolute total outside.

Poster Thread
Regulator
Posted: 2004/6/10 0:43  Updated: 2004/6/10 0:43
Home away from home
Joined: 2004/5/19
From: CHristchurch, New Zealand
Posts: 216
 Re: 120Y Custom Boot Progress
NIce work man. Must say...Is there any 120y out there without jumper leads in the boot? A must have aye. NOw I can see the difference in tail lights...check out mine.