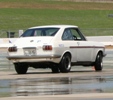
I thought i would do a write up on the a15 conversion i did on my 1200 3 door Van as there arent so many around.
As some of you might know, the a15 i put into the datto isnt the run of the mill engine.
Because of this i had to modify a few things here and there to get it fitting and working.
ok well heres the specs of the engine:
44mm Solex sidedrafts (N44PHH nissan race option)
arias forged flattop pistons (287-SS)
Nismo twin gear oil pump
Reg Cook race head (1981-1982) including
-heavily ported head and match ported manifold
-titanium valves - from a ford x flow (according to marsh)
-40mm inlet valves
-33mm exhaust valves
-double valve springs
-decked head
-race push rods (possibly chromolly)
-solid rocker spacers
electronic ignition (86 c22 vannete)
lightened and balanced flywheel (a12)
Unknown brand tuned length extractors (4 into 1)
new Bosch alternator
Red-line fuel pressure regulator
oil cooler (not running on street)
baffled sump and modified pickup
Marsh Cam (mms 649)
Small crank pulley to prevent water pump cavitation
electronic fuel pump (fuel Flo)
Bosch GT40RT transformer coil with 1.8 ohm ballast resistor
new rpm clutch setup
H165 Ute diff
60a 5 speed box
n14 pulsar radiator with twin elect fans
Theres more but i cant think of it right now.
OK first off here's the never say die 1200 as it stood

Start pulling bits

Then since we didn't have an engine crane handy, a mate and i just leant in and picked her out.


Then pull the box off it

Pulled the 1200 cross member and bolted in the Ute one, no problems what so ever.
comparison of the Ute x member versus standard 1200 one

I'm running the alternator on the factory early a12 1200 side (left) because it would foul on the nismo oil pump. So we modified the adjustment arm.


I used the standard 1200 alternator bracket to the block but slotted out the holes to fit the a15. They are fitted to what i am told are for air con??
anyway, she fits sweet and i had to find a belt that would fit. no prob just a trip to repco.
With that done, i went to fit the flywheel.
Bummer, i thought that the a12 flywheel bolts were the same as a15... well if they are then my crank has been modified to run larger bolts which i wouldn't be surprised. Off to the local engineering store to get high tensile bolts that fit. come back, sh*t they don't fit, back again with the engine in the back of the car to make sure this time. got some, solid.
Get home and lock tight the flywheel on.
Give the surface a clean with brake cleaner as well as the clutch. Use the aligner and bolt it on.
Fitted the thrust bearing carrier to 60a box that i thought would work (standard a12-56 box) but more on this later. Fitted box to engine.

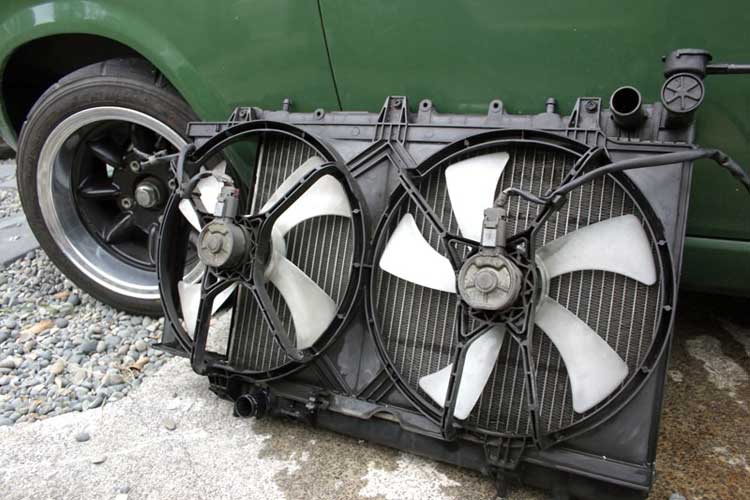
Before fitting a15, got to fit radiator and so forth. I'm using a radiator from a N14 Pulsar. It comes with twin electric fans and cost me a total of $68 from pik-a-part.
I made sure to get the metal and rubber mounts with radiator. For the top, the originals where modified, welded and drilled to hold a bolt and nut. The bottom mounts i didn't however get from pik-a-part as they were welded to car. So i got a piece of pipe the same dia as the rubber and welded to chassis. Fits sweet all round and should do more than a good job at cooling.
As far as hoses go, i used the standard bottom hoses and instead of trying to modify the top hose i found (thanks supercheap) one from a *cringe* Honda 4wd/SUV thing that fits puuuurrrrfectly as if it was factory. I still need to fit temp sender to top hose.
In she goes

That picture is actually before i repainted the rocker box and after i ran a few fuel lines.
I used the a15 engine mounts, no problems, here's pictures


Fortunately for me, the 60 series box i got was previously fitted to a 1200 so it came with the required mount. so no fab work there.
Went to bolt the box up and realised that i didn't have any long enough bolts, back to the engineers store to get some.
Fit up drive shaft. drive-line is complete.
I am running the standard h145 at the moment. i intended to run the h165 from the Ute but at the moment i want to get her in and running. not going to be thrashing her just yet anyhow so that's all good.
At this point i am using the standard 1200 clutch fork, cable and release bearing carrier. I go to feel for pressure on the fork annnnnnnnndd, nothing. SHHHH*T. well after a little bit of annoyance and wondering what i can do. i troll the forums for previous experiences and with some inspiration from Dattodevil, i take my carrier (short one) to a family friend and machinist.
I got him to lengthen it 7mm (same as Dattodevil) as hes using the same primary setup).
Pic

Standard 1200 a12/56 carrier and fork

As well as this, i spaced out the pivot ball for the clutch fork for piece of mind and so i didn't have to pull box again lol. doing it yourself under the car is quite fun but also very tiring

So pulled box, spaced pivot, fitted carrier, bearing, box, drive-shaft. Trick for fitting bearing.
Instead of hitting with hammer and almost certainly damaging bearing. Get a can and put bearing into bottom, full with oil till its just over top. heat for 5 minutes or until hot.
Using a leather glove, rag or other place bearing over carrier and should just fall over it as the metal has expanded.
So all that is done. sweet i have clutch pressure.
I'm using the standard 1200 clutch cable, adjusted to max efficiency.
Fuel pump, Overkill supplied me with this unit and it pumps well. Plumbing was the easy part, fitting it close to the tank with a filter before it. Used many a hose clamp and chopped the lines up to suit.
Note to self: drain tank before attempting to plumb fuel lines


The hardest part was wiring as i had only a slim idea. Thankfully, Dattodevil is using the same pump so he supplied me with a VERY helpful wiring diagram which was easy as pie to follow and i wired her up. Basically it comprises of a relay running off the key switch and has a isolation switch from relay to ground which i fitted somewhere in the cabin

The extractors i am using are an unknown brand but fit well. I heat wrapped the tops of them as to not put so much heat into the carbs.
I cut the flange off the ends of em that came attached and proceeded to build exhaust with help from a mate.
Originally i was going to run a 2 1/4 inch system but since this engine is so high rev orientated i chose to run a 2" system to help keep some low end torque.
The system has a resonator and muffler sourced from a friend s13. I run the resonator with fear of that ANNNOYYing as all hell exhaust tang that so many n/a Honda's and fxgt's get being n/a 4 cylinders.
I hope it sounds good. The muffler is fitted in the original 1200 position and we cut and turned the pipe over the diff instead of a bend.
It looks good and i heat wrapped that as well to try keep some heat away from the diff.
The tips were inspired by the bosozuku clans of Japan and i like them. They are tame compared to the ones they run but I'm happy with them.
I wont post a picture of them as i cant bare to deal with peoples opinions, they are my style.


Wiring the Dizzy/coil was easy as well. I was told that its just pos to pos on the coil and neg to neg so some wiring and its sorted. damn i love a series engines.
I'm using the Bosch GT40RT could which i was told is OK to use with the electronic distributor i have from a 86 c22 vannete, as long as i used a 1.5 - 1.8ohm ballast resistor.
Thanks Benny for the VERY useful info on my distributor.
Soooo the wiring is done, the engine and drive-train is in, i need exhaust and fuel.
By countless fitting and removing of the extractors and side-drafts i run the fuel lines to the red-line regulator and to the carbs.
Now, that's done. What else. Sealing.
As the porting on the head is sooooooo damned extreme. I couldn't get a gasket to fit so with some advice from the experts i sealed the inlet and exhaust with some good quality gasket sealant.
Let hope she holds for at-least a while.

I guess that's where i am at the moment. Tomorrow i am going to pick up Genuine Nissan dizzy cap and rotor for my distributor as the orig ones were farked. I couldn't get them from the local places as the dizzy is not known well around here and couldn't find anything to work.
$98 for the cap and $18 for the rotor. a bit on the pricey side but its for the cause so i guess that's ohk.
Again i thank Benny for the part numbers he gave me as it helped so much.
Aswell as that i need to connect the accelerator cable to the linkages. hook up the alternator and finish and fit the catch can i made for it.
With the high compression, the standard 1200 starter motor has some trouble turning her over so i will look for something more suited.
I haven't started her yet. But i cant wait. every day i just stare at her. I'm sure a lot of you know the feeling. I have turned her over a few strokes to keep her lubed and to hear that deep induction suck
Here is some pictures of the engine in parts


Lastly i would like to thank everyone that has helped, weather it be information, parts, labour, advice.
You know who you are. Also thanks to the guys from CDI. Yea boy.
Its not finished and im sure there is bound to be something i missed and more money spent but its getting there.
Video of her ripping sh*t up to come when shes running and tuned.
Cheater


;)
;)
;)
;)
;)
;)
;)
;)
;)
;)
;)
;)
;)
;)
;)
;)
;)
;)
;)
;)
;)

 Transfer