User Login    
 + Register
  • Main navigation
Login
Username:

Password:


Lost Password?

Register now!
Fast Search
Slow Search
Google Ad


Browsing this Thread:   1 Anonymous Users


« 1 2 3 (4) 5 6 7 »


Re: Putting together a Nizmo gearbox. # No Synchro's allowed #
No life (a.k.a. DattoMaster)
Joined:
2008/3/15 3:30
From Melbourne
Group:
Registered Users
Posts: 2742
Offline
And this brings us roughly to our pornography shot. Unfortunately I didn't take pics of each individual bearings going on but as this gearbox came in with an alledged problem of slipping out of 5th we had to do a few tests to see if we could replicate it and we could not, so the box was pulled down again and locked up and then final assembly commenced. The reverse idler was fitted, mainshaft nut removed, all cleaned and primed and loktited with 263. New circlips for the bearings where applicable, bearings installed and layshaft nut also loktited and peened.

Heres a tip for installing ball bearings. In most cases they have a light interference fit of approximately 0.001", to avoid risking damaging the bearing by installing it with a hammer, get an old electric frying pan, set the temp to approx 160 deg C and warm the bearing up for 5 minutes then it will slip on and you will not have to touch a hammer.

Open in new window


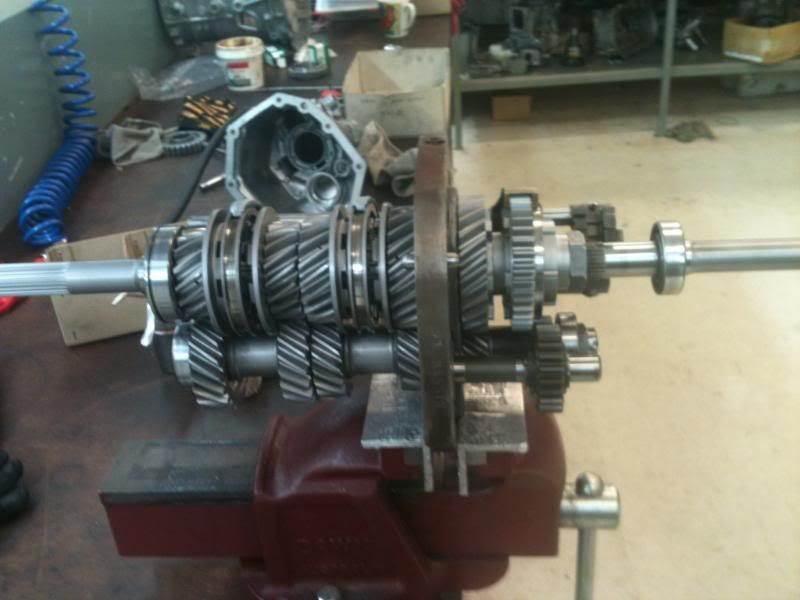
At this stage I have also checked the selector rod and hub positions on all gears and tested the endfloat of all the gears to make sure that the mainshaft is in the correct position. The thrust washer on the back of 1st dog gear is also a shim which can be altered to get the averege position of the selector hubs set correctly.

Posted on: 2011/3/16 11:43
_________________
My daughter Myshka raised over $6000 for the 2013 Worlds Greatest Shave. Thank you to all who donated big and small. Without your help she could have not reached her goal.
Transfer the post to other applications Transfer


Re: Putting together a Nizmo gearbox. # No Synchro's allowed #
No life (a.k.a. DattoMaster)
Joined:
2008/3/15 3:30
From Melbourne
Group:
Registered Users
Posts: 2742
Offline
Here's a better pic of the back half. Lock nuts all done up. When nuts are designed to be lock nuts they will have a heavy champher on one side, the other side will be almost flat with only minimal champhering. Fitted the wrong way around they will provide minimal tension and come undone easier.

Open in new window

Posted on: 2011/3/17 9:33
_________________
My daughter Myshka raised over $6000 for the 2013 Worlds Greatest Shave. Thank you to all who donated big and small. Without your help she could have not reached her goal.
Transfer the post to other applications Transfer


Re: Putting together a Nizmo gearbox. # No Synchro's allowed #
No life (a.k.a. DattoMaster)
Joined:
2008/3/15 3:30
From Melbourne
Group:
Registered Users
Posts: 2742
Offline
One very overlooked part of a rebuild of any kind is the surface preperation. While many are content to take to an alloy or even steel surface, this is a practice that I don't condone. On any housing I will check for burrs and clean them off accordingly. Emery cloth is o.k but not used aggressively and always with a mild solvent. For large burrs a file can be used but not like you would expect. By using folded paper on the undamaged surface you can draw file the affected area, unfolding the paper to decrease the clearance and not risking damage to the face of the housing. This is rare that I have to do this but I always use a stone to prepare the surface for mild burrs.

Open in new window


Using a couple of blocks of wood will keep the input shaft from hitting the bench during assembly.

Open in new window


On this gearbox I used Loktite 515 master gasket to seal it. Very good stuff.

Open in new window


Now I use some setup bolts to secure the sandwich plate to the front case and allow the sealant to cure. It is better than risking it going off while buggering around with the rear housing. This way I get the freedom to take my time for the rest of the assembly.

Open in new window

Posted on: 2011/3/17 9:46
_________________
My daughter Myshka raised over $6000 for the 2013 Worlds Greatest Shave. Thank you to all who donated big and small. Without your help she could have not reached her goal.
Transfer the post to other applications Transfer


Re: Putting together a Nizmo gearbox. # No Synchro's allowed #
No life (a.k.a. DattoMaster)
Joined:
2008/1/20 11:52
From Perth WA AUS
Group:
Registered Users
Posts: 9631
Offline
Is Don is good :)

Posted on: 2011/3/17 11:36
_________________
Datsun 1200 2Dr sedan.
Transfer the post to other applications Transfer


Re: Putting together a Nizmo gearbox. # No Synchro's allowed #
No life (a.k.a. DattoMaster)
Joined:
2008/3/15 3:30
From Melbourne
Group:
Registered Users
Posts: 2742
Offline
Quote:

levey wrote:
Is Don is good :)


I can neither confirm or deny these allegations...

So the rear housing is set to go on. I had already replaced the quadrant seal before I took the photo but once you remove the selector finger by removing the cotterpin you can tap the selector rod through the shifter quadrants welsh plug and access the seal. I couldn't get an origional size for it of 14x20x4 but I managed to get a 14x20x3 which will do the job equally as well. The quadrant O ring was fine so it was left alone.

Open in new window


While the photo is not clear, the selector finger has some slots ground into it. These are to make gearshifts faster. Sometimes they burr up, so I took the time to dress the finger up with a stone to make sure it will be all a.o.k.

Open in new window

Posted on: 2011/3/18 7:42
_________________
My daughter Myshka raised over $6000 for the 2013 Worlds Greatest Shave. Thank you to all who donated big and small. Without your help she could have not reached her goal.
Transfer the post to other applications Transfer


Re: Putting together a Nizmo gearbox. # No Synchro's allowed #
No life (a.k.a. DattoMaster)
Joined:
2008/3/15 3:30
From Melbourne
Group:
Registered Users
Posts: 2742
Offline
So the rear case can go on. Again, sealing the face with 515 and cleaning the faces to near perfection I can drop the rear case on.

Open in new window


It is a bit hard to take a pic while doing this part but you basically have to allign the selector finger in the gate made by the rod ends. It's a bit tricky but obviously possible. The fact that this box has the 2 lock nuts that fall right on the location of the rod ends is a total bastard. It was a combination of alligning it against one nut while rotating the shaft to get the second nut to drop the finger in. You don't have this problem with a single nut.

Open in new window


What you do next is fit the selector quadrant's cross pin which is what stops the finger coming out of the gate and then the quadrant detent and spring get fitted. Normally there is a E clip fitted to the pin, this one was missing, not to be deterred I lockwired the thing in so it won't go anywhere. Back half is now finished. Now to shim the front.

Posted on: 2011/3/18 9:49
_________________
My daughter Myshka raised over $6000 for the 2013 Worlds Greatest Shave. Thank you to all who donated big and small. Without your help she could have not reached her goal.
Transfer the post to other applications Transfer


Re: Putting together a Nizmo gearbox. # No Synchro's allowed #
No life (a.k.a. DattoMaster)
Joined:
2008/3/15 3:30
From Melbourne
Group:
Registered Users
Posts: 2742
Offline
Shimming the front is easy if you have the right tools. You can use a vernia, but it's not acurate enough for me. Close enough isn't good enough. So I use a depth micrometer. First I measure the depth of the case.

Open in new window


Then I measure the bearing on the layshaft. I am measuring how far the bearing is sticking out from the case. THen I can measure the gasket to figure out what shim I need. What I want is zero preload or endfloat. This is called a neutral setting. Roller bearings do not like to be preloaded. It can result in premature failure. They are already going to be loaded as a result of the sliding action of the helical gears.

Open in new window


THen the nose can be bolted on. THe keen eye will notice a modification that has been done to the nosecone and something is missing. The odd bolts may give something away.

Open in new window

Posted on: 2011/3/18 9:59
_________________
My daughter Myshka raised over $6000 for the 2013 Worlds Greatest Shave. Thank you to all who donated big and small. Without your help she could have not reached her goal.
Transfer the post to other applications Transfer


Re: Putting together a Nizmo gearbox. # No Synchro's allowed #
No life (a.k.a. DattoMaster)
Joined:
2008/3/15 3:30
From Melbourne
Group:
Registered Users
Posts: 2742
Offline
On with the quick shifter to test the setup and make sure that everything is honky dory.

Open in new window


Open in new window

Posted on: 2011/3/18 10:05
_________________
My daughter Myshka raised over $6000 for the 2013 Worlds Greatest Shave. Thank you to all who donated big and small. Without your help she could have not reached her goal.
Transfer the post to other applications Transfer


Re: Putting together a Nizmo gearbox. # No Synchro's allowed #
Moderator
Joined:
2001/5/3 7:04
From Kent, WA
Group:
Registered Users
Contentmaster
Usermaster
Posts: 31727
Offline
Hi Don, is this bell housing for FJ-series engines? The L-series has the starter at 9pm, and this appears to have it at 10pm.
Quote:
option 1 gearbox's by Nissan Motorsport...[from] Group A DR30 Skyline...it is a 71 series box


It's missing the clutch release arm pivot ball:
Open in new window

Looks like you used bolts with lower profile heads than the originals.

Posted on: 2011/3/18 20:07
Transfer the post to other applications Transfer


Re: Putting together a Nizmo gearbox. # No Synchro's allowed #
No life (a.k.a. DattoMaster)
Joined:
2008/3/15 3:30
From Melbourne
Group:
Registered Users
Posts: 2742
Offline
Yes DD. As mentioned earlier, this box is from a famous Australian Group A touring car. The #30 DR30 Skyline driven by George Fury. It ran a FJ20DET.

The pivot ball is the easy spot. I replaced the bolts with standard black bolts as something else is going in place of the 2 gold bolts.

Also the snout has been machined.

Posted on: 2011/3/19 0:02
_________________
My daughter Myshka raised over $6000 for the 2013 Worlds Greatest Shave. Thank you to all who donated big and small. Without your help she could have not reached her goal.
Transfer the post to other applications Transfer


« 1 2 3 (4) 5 6 7 »


You can view topic.
You cannot start a new topic.
You cannot reply to posts.
You cannot edit your posts.
You cannot delete your posts.
You cannot add new polls.
You cannot vote in polls.
You cannot attach files to posts.
You cannot post without approval.

[Advanced Search]