| Revision as of 06:14, 10 May 2012 ddgonzal (Talk | contribs) (->Older Alternator in Newer Datsun) <- Previous diff |
Revision as of 06:23, 10 May 2012 ddgonzal (Talk | contribs) (->Older Alternator in Newer Datsun) Next diff -> |
||
| Line 64: | Line 64: | ||
| == Older Alternator in Newer Datsun == | == Older Alternator in Newer Datsun == | ||
| - | For Datsuns originally fitted with internally-regulated alternators, it is not recommended to adapt an older alternator, as the IR alternators are generally less expensive and more reliable. | + | For Datsuns originally fitted with internally-regulated alternators, it is not recommended to adapt an older alternator, as the newer alternators are generally less expensive, more readily available and more reliable. |
| - | SYMPTOM: Alternator overcharges big-time! | + | === 4-pin Alternator in FN Datsun === |
| - | Battery liquid boils out and makes fumes. | + | This requires for jumper wires in the 4-pin rectangular connector: |
| + | 1 B wire - jumper to alternator E terminal | ||
| + | 2 W wire - jumper to alternator A/BAT terminal | ||
| + | 3 WB wire - jumper to T-connector stem | ||
| + | 4 Y wire - jumper to T-connect head | ||
| + | |||
| + | Question: Is the newer regulator compatible? | ||
| + | |||
| + | NOTE: Do not substitute a 25A unit where a 35A unit belongs. | ||
| + | |||
| + | === FN Alternator in LS Datsun === | ||
| + | <blockquote><hr> SYMPTOM: Alternator overcharges big-time! | ||
| + | Battery liquid boils out and makes fumes.<hr></blockquote> | ||
| If your Datsun came with I/R alternator, and you simply replace it with an externally regulated alternator, it will be stuck ON and overcharge. | If your Datsun came with I/R alternator, and you simply replace it with an externally regulated alternator, it will be stuck ON and overcharge. | ||
Revision as of 06:23, 10 May 2012
There are three basic type of Datsun alternator, each with their own wiring system.
- 1960s Datsun Alternator (4-pin rectangular connector)
- 1970s Datsun Alternator (2-pin T-connector with external Regulator)
- 1980s Datsun Alternator (2-pin T-connector with Internal Regulator)
Contents |
1960s Alternator
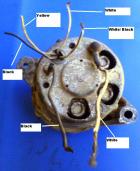
From the introduction of the Datsun with alternator (circa 1966), it used a Hitachi type with a 4-spade rectangular connector. As usual with Datsun there equivalent Mitsubishi-sourced versions too. This type was used by Datsun 1000, Datsun 411 and early Datsun 510, among others.
Large Wires
* A to Fusible Link on positive battery cable (White wire)
* E to earthing point (Black wire to engine block)

Four-spade rectangular connector
(Datsun 1000 colors)
WB - to Regulator WB (12V always)
W - to Regulator W 12V IGN
Y - to Regulator Y (nuetral wire for lamp relay)
B - to Regulator B (earth/ground)
1970s Alternator
From about 1970-1978 (in USA market), Hitachi type LT alternators were used. There were also equivalent Mitsubishi units which are interchangeable. These feature the famous 2-pin T-connector with external Regulator.
These use FN wiring. They have F and N cast into the back cover. An external Voltage regulator is required.
See main article: Alternator Wiring

NOTE: LT135 35A units have black plastic bits. The larger LT150 50A and LT160 60A units have no plastic parts
These are marked FN on the back. However, it is common with rebuilt units to have their cases sand-blasted, in which case the letters are often unreadable.
1980s Alternator
From about 1979 (in USA market), Hitachi type LR alternators were used. There were also equivalent Mitsubishi units which are interchangeable. These feature the famous 2-pin T-connector BUT use no external Regulator. They are internally regulated, which makes them more reliable as they use an IC (solid state) regulator.
These use LS wiring. Some has L and S cast into the back cover, but some are unmarked.
See main article: Hitachi_LR_Alternator#Wiring
Mixing and Matching
It is possible to use a different type alternator in your Datsun than what it was designed for. But you need to make slight modification to the wiring.
IR Alternator In Older Datsun
This is very do-able. Hitachi IR alternators are more reliable and sometimes less expensive.
Datsun With FN Harness
Fitting an internally-regulated alternator to a Datsun originally equipped with FN wiring is quite simple. It only requires two jumper wires.
For detailed information, see Hitachi_LR_Alternator#Wiring
Datsun With 4-pin Harness
Fitting an internally-regulated alternator to a Datsun originally equipped with FN wiring is quite simple. It only requires two jumper wires.
TBD
Older Alternator in Newer Datsun
For Datsuns originally fitted with internally-regulated alternators, it is not recommended to adapt an older alternator, as the newer alternators are generally less expensive, more readily available and more reliable.
4-pin Alternator in FN Datsun
This requires for jumper wires in the 4-pin rectangular connector:
1 B wire - jumper to alternator E terminal
2 W wire - jumper to alternator A/BAT terminal
3 WB wire - jumper to T-connector stem
4 Y wire - jumper to T-connect head
Question: Is the newer regulator compatible?
NOTE: Do not substitute a 25A unit where a 35A unit belongs.
FN Alternator in LS Datsun
SYMPTOM: Alternator overcharges big-time! Battery liquid boils out and makes fumes.
If your Datsun came with I/R alternator, and you simply replace it with an externally regulated alternator, it will be stuck ON and overcharge.
To make this work, you will need to create a sub-harness with wiring for an external voltage regulator. New Voltage Regulators in USA generally cost more than an internally-regulated Alternator!
TBD - request a writeup

![[Datsun 1200 encyclopedia]](/wiki/upload/wiki.png)


