hey guys. as requested i started this to try help those that have never been showed anything with photoshop.
I do not use photoshop for a job or anything just picked it up from graphic designer mother

.This will hopefully help and could be some fun

This part of the tutorial is to show how to change the colour of a car.
Firstly, choose the picture of the car you want to chop carefully. if its too small it becomes really hard and use a picture with good colour and a good angle.
--Open into photoshop by clicking file, open and find image.
--Go to the layers box and right click the main bodywork layer. Then hit "Duplicate layer"

--Then press CTRL+SHIFT+U this removes colour from the picture, (or desaturates)
--Then at the top of the screen, go to Image > Adjust > Variations and pick what colour/shade you want by clicking on the colour/shade buttons.
--TIP: do not add excessive colour or it'll just look dum, pick a colour thats not to dark or it might ruin picture. There are ways to get around thing tho.
At this stage the hole picture will be the colour you want the car to be.
-TIP: if you lower the opacity a little bit, say to 90% then the reflections in the picture might better shine through the colour.
-- Grab the lasso tool (L)....

--You want the polygonal lasso tool though so hold left click on that button another little window will come up and click polygonal.
--Use this tool to select parts of the car that you DONT want to be coloured, like the background, windows, door handles etc etc and press the delete key.
( this will delete that part of the duplicated layer so the original layer will show through at the original colour )
-- continue selecting and deleting parts so that you only have the body work showing in the new colour.
-- once you have deleted all the excess.... WAM BAM THANK YOU MA'AM you have a photochopped car. Save and your done.
There are obviously a lot more things to do like lowering etc and i'll show that soon enough.
Hope this was of help and you arnt confused. Will do lowering soon and mags changes etc.
Lowering......... the beauty of it is that you can do ANYTHING lol just like so..
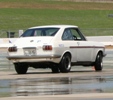
before:

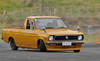
after:

--Open car picture in photoshop
--Grab the faithful Lasso tool (L) and begin to draw around the car like in the pic, as well as going all the way around the top of the picture.

--When you are going around the wheel arches with the lasso tool, it is best to make a series of nice small clicks to a smoother selection, rather than a few lazy big long selections.
--pres ctrl + c then ctrl + v to copy and paste. This will put body and everything above onto new layer. Next hold ctrl then hit the down arrow until the doby lowers to desired height. WAMOO shes lowered.
--you can hit ctrl + shift + E which will flatten all the layers into one layer.
--almost there.. select the crop tool (the one under the lasso tool) and crop out the duplicate part in the top of the picture.

just like so ^^
--press enter and woo hoo. shes draging on the floor....sweeeet


;)
;)
;)
;)
;)
;)

 Transfer