User Login    
 + Register
  • Main navigation
Login
Username:

Password:


Lost Password?

Register now!
Fast Search
Slow Search
Google Ad


Browsing this Thread:   1 Anonymous Users


Turbo EFI A12 for under $1200. Build thread (pls dont post)
No life (a.k.a. DattoMaster)
Joined:
2006/6/4 1:57
From Ballarat Victoria
Group:
Registered Users
Posts: 1309
Offline
Here is the Build thread that goes with the discussion thread. It might be best not to post in this one, to keep it easy for others to read.

The discussion thread http://datsun1200.com/modules/newbb/v ... e=&topic_id=64613&forum=1

I thought some of you might be interested in how to build a cost effective EFI turbo setup that is upgradeable in the future.
I'll endevour to stay out of the machine shop and away from the TIG.
Most of it will be done with hand tools to keep it acheivable.

You will still need acess to a few tools:
-Mig welder
-Angle grinder with thin cutting wheels and flap discs.
-Drill and drill press
-Compressor and die grinder( or lots of patience and a file!!)
-Vice and vise grips/clamps
-Marking pen and masking tape(aluminium tape is even better)

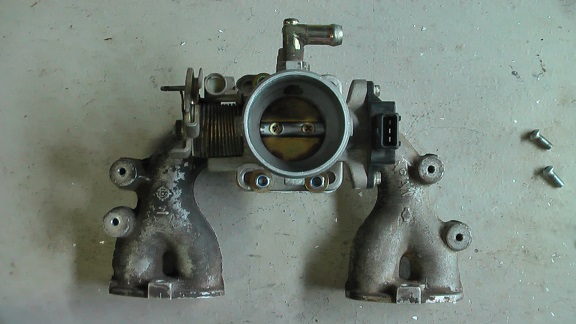
The basic initial setup uses the standard A12 inlet manifold fitted with a single Throttle body and 1 injector. The ECU is a Microsquirt V3. This allows for adding multiple coils and injectors later if required as well as boost control. Turbo is a single turbo from a twin turbo Nissan Skyline(there are plenty of Upgrade options if you want more power later on).

You will these bits for the inlet manifold:

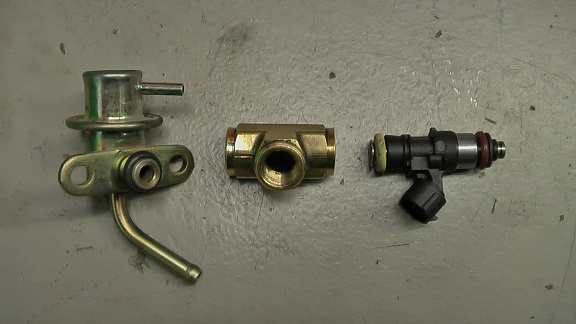
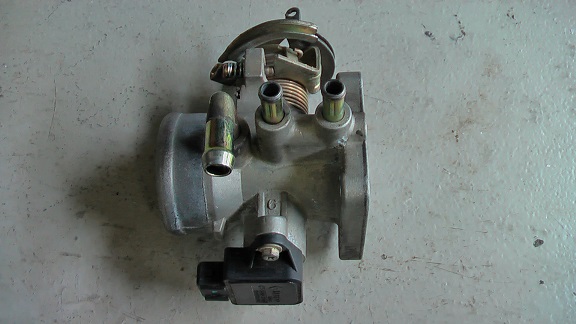
-Throttle body from a X3 SOHC Hyundai Exel
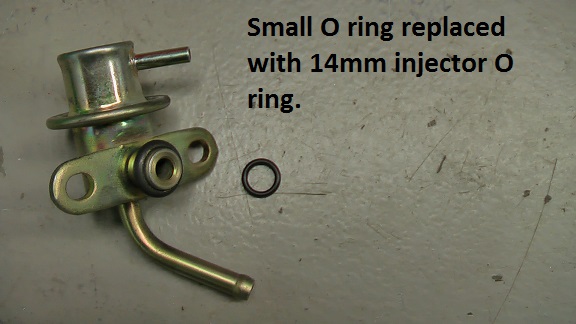
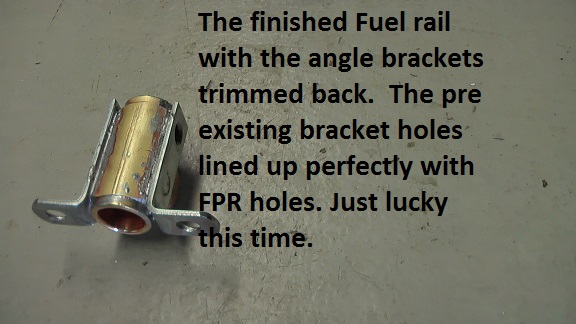
-Fuel Pressure reg. from a 1997ish Misubishi Lancer or Toyota Corolla
-3-5MM ally plate for the adaptor.
-1x Fuel injector(1000cc for petrol 1300+cc for E85)

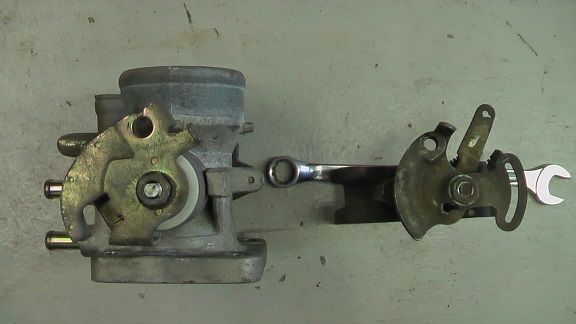
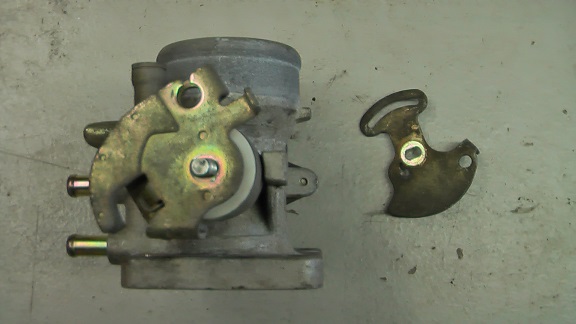
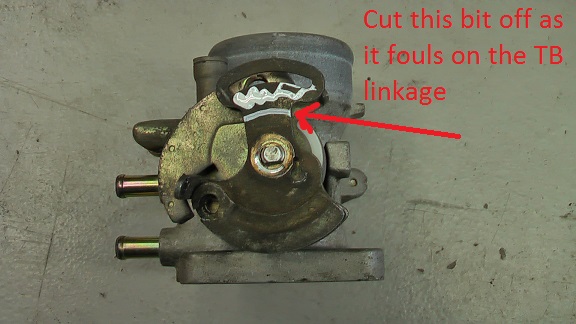
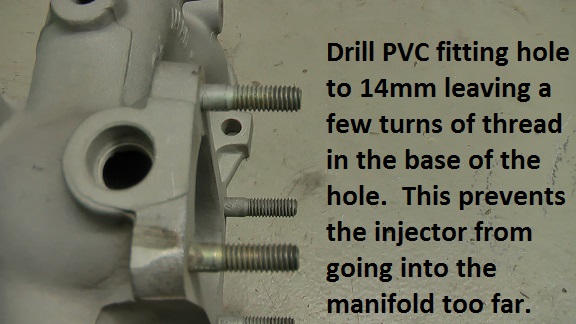
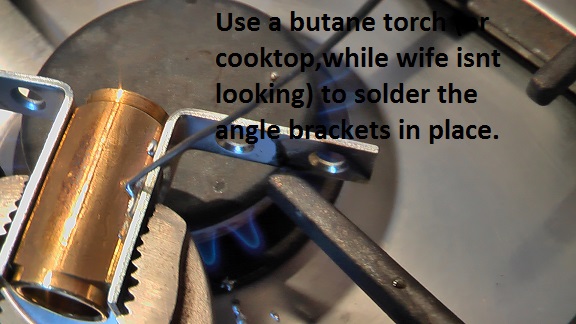
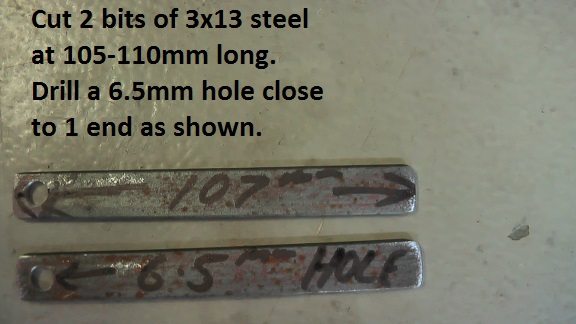
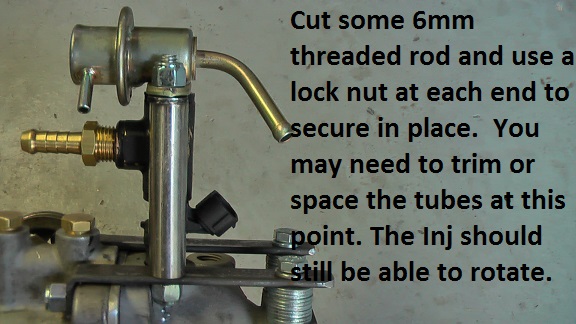
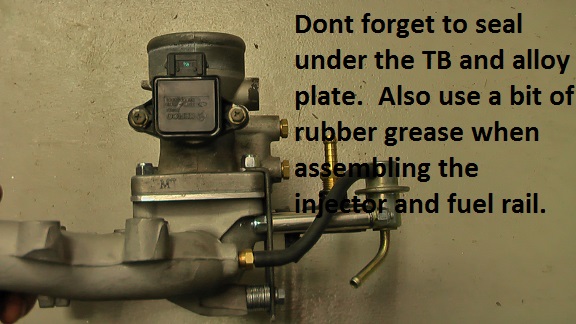
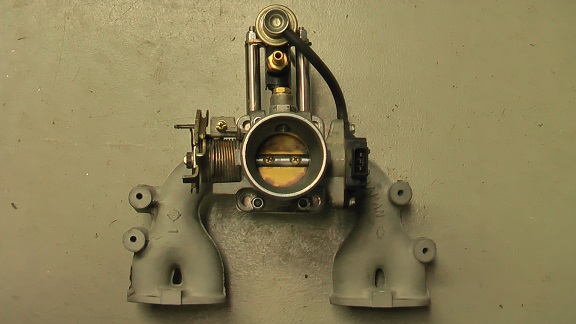
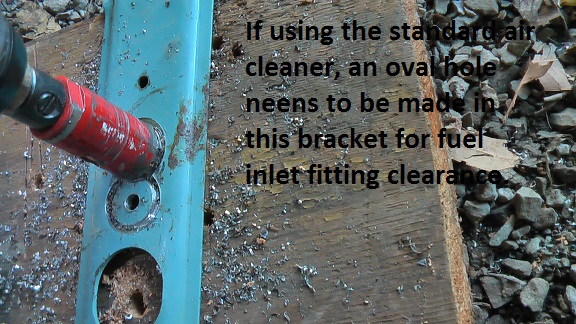
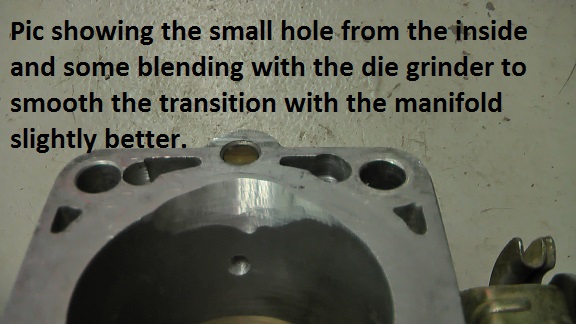
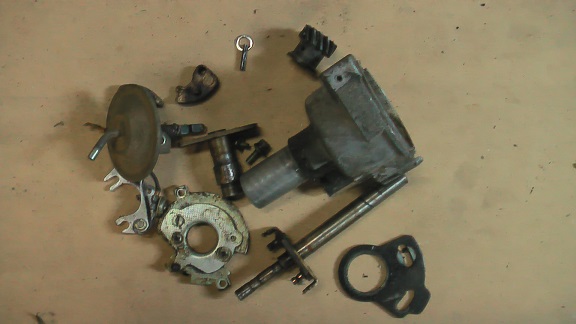
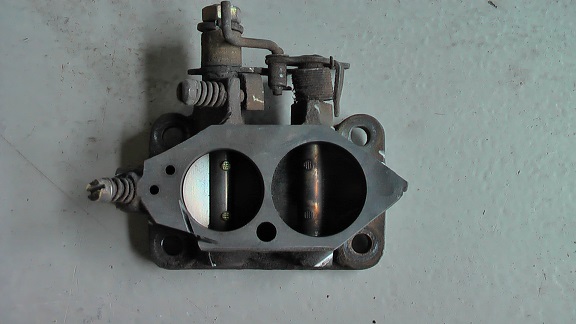
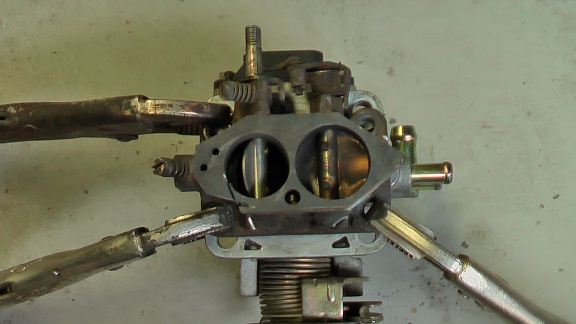
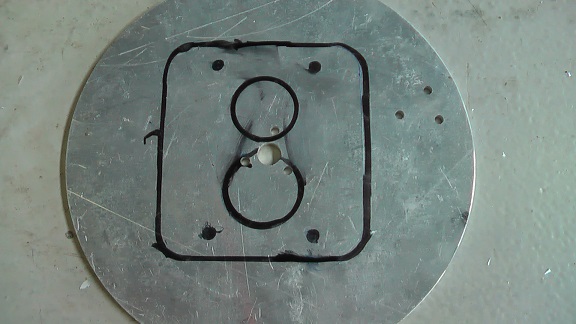
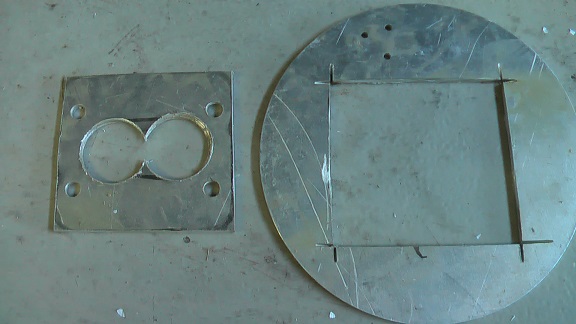
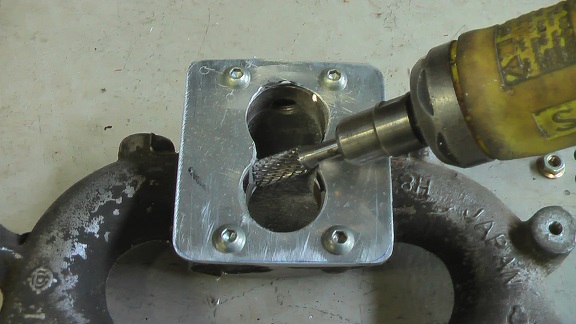
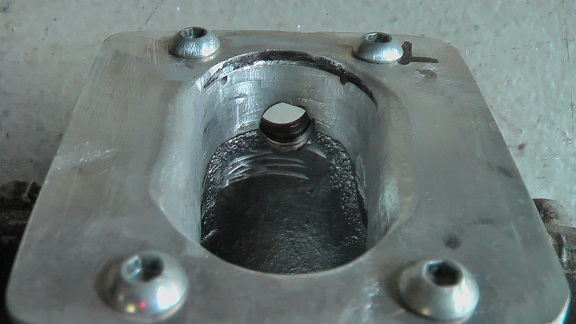
This first series of pics shows how to adapt the throttle body to the standard manifold.

Attach file:


jpg  IMGA0046 Resize.jpg (97.86 KB)
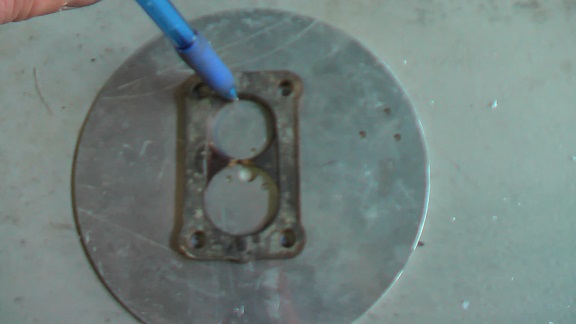
6746_5507ac473a6f5.jpg 576X324 px

jpg  IMGA0054 resize.jpg (63.43 KB)
6746_5507acd79d5d3.jpg 576X324 px

jpg  IMGA0013 resize.jpg (55.36 KB)
6746_5507ad2484ec7.jpg 576X324 px

jpg  IMGA0016 resize.jpg (56.80 KB)
6746_5507ad4bdab82.jpg 576X324 px

jpg  IMGA0018 resize.jpg (36.91 KB)
6746_5507ad73e7dee.jpg 576X324 px

jpg  IMGA0019 resize.jpg (62.83 KB)
6746_5507ad98a2808.jpg 576X324 px

jpg  IMGA0022 resize.jpg (55.87 KB)
6746_5507adbbaf7a3.jpg 576X324 px

jpg  IMGA0023 resize.jpg (66.72 KB)
6746_5507adf11e016.jpg 576X324 px

jpg  IMGA0028 resize.jpg (68.93 KB)
6746_5507ae166ba19.jpg 576X324 px

jpg  IMGA0032 resize.jpg (57.49 KB)
6746_5507ae40672e5.jpg 576X324 px

jpg  IMGA0035 resize.jpg (64.46 KB)
6746_5507ae76319f2.jpg 576X324 px

Posted on: 2015/3/17 4:20

Edited by sikyne on 2015/3/17 5:25:53
Edited by sikyne on 2015/3/17 22:23:48
Edited by sikyne on 2015/3/27 3:04:46
_________________
VIC DYNO HIRE
Transfer the post to other applications Transfer


Re: Turbo EFI A12 for under $1200. Build thread
No life (a.k.a. DattoMaster)
Joined:
2006/6/4 1:57
From Ballarat Victoria
Group:
Registered Users
Posts: 1309
Offline
Pic 1: The project car

Pic 2: showing what the Hyundai TB looks like

Pic 4: Use the modified(corners cut off with a thin cutting disc) standard carb base plate as a drilling template/jig to drill new hole in the throttle body. Use a 7mm or 1/4" bit and 3 sets of vice grips or good clamps to hold the carb base in place. Otherwise the dill will want to walk all over the place as is not drilling into a flat surface.

Pic 5-6-7: Showing the alloy plate adaptor required to make the TB seal onto the manifold.

Pic 8: Better shows why the alloy plate is required.

Pc 9: Bolt the alloy plate to the manifold so it can be cleaned up with the die grider at the same time as the manifold.

Pic 10: Shows the finished clean up with a slight radius leading into the manifold.

Pic 11: The manifold complete with TB!! The alloy plate just seals the TB gap where it meets the manifold. The standard manifold studs and nuts can be used to hold the finished product together. Gaskets will have to be cut to seal either side of the alloy plate before final assembly. A GOOD sealant might be ok.


Next I'll show you how to modify the throttle linkage to be able to use the Original Datsun throttle cable.

Attach file:


jpg  IMGA0055 resize.jpg (56.45 KB)
6746_5507e6d2b926c.jpg 576X324 px

jpg  IMGA0056 resize.jpg (50.10 KB)
6746_5507e700d8441.jpg 576X324 px

jpg  IMGA0063 resize.jpg (67.80 KB)
6746_5507e72b2f844.jpg 576X324 px

jpg  IMGA0064 resize.jpg (74.17 KB)
6746_5507e751613e3.jpg 576X324 px

Posted on: 2015/3/17 4:51

Edited by sikyne on 2015/3/17 8:21:06
Edited by sikyne on 2015/3/17 8:33:31
Edited by sikyne on 2015/3/17 8:34:13
Edited by sikyne on 2015/3/17 8:34:57
Edited by sikyne on 2015/3/17 8:35:36
Edited by sikyne on 2015/3/17 8:51:47
_________________
VIC DYNO HIRE
Transfer the post to other applications Transfer


Re: Turbo EFI A12 for under $1200. Build thread
No life (a.k.a. DattoMaster)
Joined:
2006/6/4 1:57
From Ballarat Victoria
Group:
Registered Users
Posts: 1309
Offline
Now onto the mounting the injector, fuel rail and fuel pressure regulator.

I've shown two ways of holding it onto the manifold. One is using bent steel straps and the other is using drilled and tapped steel rod if the standard air cleaner assembly is going to be retained.

When drilling the brass "T" and the manifold PCV hole, use a drill press and vise to help to drill squarely, and the right depths. If you have concerns about drilling to far into the PCV hole, use a tube socket or bit of tube cut to length over the drill bit as a depth gauge/stop.

The holes in the brass "T" and manifold must be smooth and the correct size so the "O" rings can seal properly. If you have concerns about doing this. drill the holes slightly under size and then linish to the final size using emery cloth or sandpaper in a slotted wooden dowel in a drill.

Attach file:


jpg  IMGA0071 resize.jpg (60.25 KB)
6746_5514bb8b3741f.jpg 576X324 px

jpg  IMGA0072 resize.jpg (60.27 KB)
6746_5514bba4cd026.jpg 576X324 px

jpg  IMGA0073 resize.jpg (72.14 KB)
6746_5514bbb6bef80.jpg 576X324 px

jpg  IMGA0075 resize.jpg (72.11 KB)
6746_5514bbcb3692e.jpg 576X324 px

jpg  IMGA0083 resize.jpg (58.86 KB)
6746_5514bbe0868b7.jpg 576X324 px

jpg  IMGA0086 resize.jpg (68.23 KB)
6746_5514bbf858560.jpg 576X324 px

jpg  IMGA0087 resize.jpg (77.34 KB)
6746_5514bc107c927.jpg 576X324 px

jpg  IMGA0091 resize.jpg (70.97 KB)
6746_5514bc27924b3.jpg 576X324 px

jpg  IMGA0094 resize.jpg (53.59 KB)
6746_5514bc43661f9.jpg 576X324 px

jpg  IMGA0107 resize.jpg (61.95 KB)
6746_551608f42b13a.jpg 576X324 px

jpg  IMGA0108 resize.jpg (60.79 KB)
6746_551609094c9f9.jpg 576X324 px

jpg  IMGA0109 resize.jpg (50.87 KB)
6746_55160919d3dd9.jpg 576X324 px

jpg  IMGA0110 resize.jpg (47.05 KB)
6746_5516092de88e4.jpg 576X324 px

jpg  IMGA0112 resize.jpg (73.77 KB)
6746_55160941cb8b4.jpg 576X324 px

jpg  IMGA0114 resize.jpg (69.94 KB)
6746_551623ee705ec.jpg 576X324 px

jpg  IMGA0115 resize.jpg (86.31 KB)
6746_55162409abfd5.jpg 576X324 px

jpg  IMGA0116 resize.jpg (84.76 KB)
6746_55162418b7c0c.jpg 576X324 px

jpg  IMGA0121 resize.jpg (78.43 KB)
6746_55162430a256e.jpg 576X324 px

jpg  IMGA0120 resize.jpg (57.46 KB)
6746_551625dbea3e4.jpg 576X324 px

Posted on: 2015/3/27 2:12

Edited by sikyne on 2015/3/27 2:48:07
Edited by sikyne on 2015/3/28 1:49:50
Edited by sikyne on 2015/3/28 1:53:18
Edited by sikyne on 2015/3/28 3:45:09
Edited by sikyne on 2015/3/28 3:47:03
Edited by sikyne on 2015/3/28 3:54:08
_________________
VIC DYNO HIRE
Transfer the post to other applications Transfer


Re: Turbo EFI A12 for under $1200. Build thread
No life (a.k.a. DattoMaster)
Joined:
2006/6/4 1:57
From Ballarat Victoria
Group:
Registered Users
Posts: 1309
Offline
This is another way to mount the injector etc, when using the standard air cleaner assembly.

Attach file:


jpg  IMGA0080 resize.jpg (126.72 KB)
6746_5514bd44d8c1e.jpg 576X324 px

jpg  IMGA0076 resize.jpg (78.95 KB)
6746_5514bd5e0e93c.jpg 576X324 px

jpg  IMGA0103 resize.jpg (82.40 KB)
6746_5514bd7e3dca7.jpg 576X324 px

jpg  IMGA0104 resize.jpg (56.14 KB)
6746_5514bd8e9557d.jpg 576X324 px

jpg  IMGA0105 resize.jpg (49.81 KB)
6746_5514bd9947552.jpg 576X324 px

Posted on: 2015/3/27 2:17
_________________
VIC DYNO HIRE
Transfer the post to other applications Transfer


Re: Turbo EFI A12 for under $1200. Build thread (pls dont post)
No life (a.k.a. DattoMaster)
Joined:
2006/6/4 1:57
From Ballarat Victoria
Group:
Registered Users
Posts: 1309
Offline
This series of photo's shows an option of where to mount the air temp sensor. If you buy the Microquirt V3 in a kit with sensors, it will probably come with a Delco(GM) air temp sensor like the one shown. These also come in different threads, one with a smaller thread would be easier to mount here as there isn't much alloy left either side of the sensor. Drilling accuracy is very important if using the 3/8 NPT sensor or the TB may be damaged and become unusable.
If you have any concerns doing this, either get a machine shop to do it, use a smaller threaded sensor or mount the sensor on the turbo plumbing later in the project.

I have also shown where I drilled through the bottom small fitting to get a couple of extra ports for a boost gauge and for the waste gate signal. These can be left untouched, but a "T" fitting will have to be used to get enough ports.

Attach file:


jpg  IMGA0129 resize.jpg (70.61 KB)
6746_5521ed75b1fcb.jpg 576X324 px

jpg  IMGA0128 resize.jpg (87.67 KB)
6746_5521ed8e9e0b7.jpg 576X324 px

jpg  IMGA0130 resize.jpg (89.32 KB)
6746_5521edaad9e6b.jpg 576X324 px

jpg  IMGA0125 resize.jpg (85.89 KB)
6746_5521edc77e6fe.jpg 576X324 px

jpg  IMGA0126 resize.jpg (57.22 KB)
6746_5521eea268265.jpg 576X324 px

Posted on: 2015/4/6 3:22
_________________
VIC DYNO HIRE
Transfer the post to other applications Transfer


Re: Turbo EFI A12 for under $1200. Build thread (pls dont post)
No life (a.k.a. DattoMaster)
Joined:
2006/6/4 1:57
From Ballarat Victoria
Group:
Registered Users
Posts: 1309
Offline
Next step is converting a points distributor to a hall input trigger for the Microsquirt.

You will need:

- A points distributor.
- Hyundai excel (1995-99)cam sensor.
- 12 tooth motorbike sprocket, remove one tooth.
- 50mm of 6mm allthread.
- Two 6mm nyloc nuts and one plain nut.
- Two 6mm washers.
- A flat file
- 5mm drill bit
- 6mm Tap.
- 17mm drill bit(or smaller and use a die grinder to finish size).
- Pin punch(to remove distributor gear)
- Angle grinder and drill.
- Welder(or lathe to make a press fit bush)

Attach file:


jpg  IMGA0156 resize.jpg (49.99 KB)
6746_553097ef367ba.jpg 576X324 px

jpg  IMGA0138 resize.jpg (63.02 KB)
6746_55309809bcb4d.jpg 576X324 px

jpg  IMGA0139 resize.jpg (69.84 KB)
6746_5530982034384.jpg 576X324 px

jpg  IMGA0159 resize.jpg (81.26 KB)
6746_55309851f2159.jpg 576X324 px

jpg  IMGA0131 resize.JPG (90.41 KB)
6746_55309b37dcc0a.jpg 576X324 px

jpg  IMGA0148 resize.jpg (77.66 KB)
6746_55309b4e66f70.jpg 576X324 px

jpg  IMGA0150 resize.jpg (65.37 KB)
6746_55309b624f9b8.jpg 576X324 px

jpg  IMGA0151 resize.jpg (77.70 KB)
6746_55309b735bf76.jpg 576X324 px

jpg  IMGA0160 resize.jpg (82.83 KB)
6746_55309b8fea12c.jpg 576X324 px

jpg  IMGA0161 resize.jpg (69.82 KB)
6746_55309ba00c7d3.jpg 576X324 px

jpg  IMGA0162 resize.jpg (52.18 KB)
6746_55309bb9c9a89.jpg 576X324 px

jpg  IMGA0167 resize.jpg (56.48 KB)
6746_55309bc8ec89e.jpg 576X324 px

Posted on: 2015/4/17 6:26
_________________
VIC DYNO HIRE
Transfer the post to other applications Transfer


You can view topic.
You cannot start a new topic.
You cannot reply to posts.
You cannot edit your posts.
You cannot delete your posts.
You cannot add new polls.
You cannot vote in polls.
You cannot attach files to posts.
You cannot post without approval.

[Advanced Search]