26 February 2012 Interior Panels & Assembly X


On arrival Friday afternoon, the first order of business was to get some fresh coffee in my blood stream and then to tackle the rocker cover, seeing that the only thing keeping dust out of the internal workings of the engine was a couple of clean rags. Just a word of caution, this VHT Wrinkle paint sure as hell like taking it's sweet time drying, especially if youre not curing it in a big ass oven. My father placed it in the sun every day of the week, we are talking 35-40degrees Celsius here, and still on Friday you could feel on some of the places that the paint is still soft where it was sprayed very thick. The complete cover was masked up, besides the lettering to protect the rest of the fresh paint, started up the trusty 3M orbital sander with some 80 grid paper and went to work on it, a few minutes later the final product emerged. Cleaned all the surfaces and gaskets and reassembled everything, the results is just stunning. Decided not to re install the VVL badge, I think it looks much more stylish without it, and then I do not need to advertise to all onlookers that it is running a VE, those with knowledge will see that it has solenoids. Can't wait to finish the rest of the engine bay.

Saturday morning while sipping away on the first cuppa, I had this feeling of I'm not going to like what was about to happen, and this is making the templates for the front kick plates and rear boot covers. Making templates is not my favourite activity, but the one thing this build has taught me, was that templates saves a lot of time and frustration, not to mention material. So after the first cup of coffee was done, we set to work ont he front kick plates, seeing that I borrowed one of my brothers 1200 kick plates, the basis was easier, but still it proved to me a marathon walking up and down. Once we were happy with the left and right side, we started cutting these from 2mm Aluminium, smoothed the edges and after some final trimmings, seeing that aluminium plate is stiffer than carton boxes, the holes were drilled and installed. Once the left side one was installed, I quickly assembled the modular fuse/relay box and made some studs for it. Took a breather from templates and sanded it down and sprayed it with clear lacquer to keep it from showing dirty marks. Virgin aluminium likes showing finger prints, not even to mention scratches.


While we were busy in the car, we installed the pedal box, this time as complete as it will ever be, masters, brake bias adjuster, clevis pins with retaining nuts, the whole shebang. We hit a slight hiccup with the left master clevis pin hitting the mounting bracket, took the pedal box out again, grind the culprit away, paint and assembled the lot again. Once this all was done, we continued with the rest of the interior, assembled the handbrake and installed the centre console and it hit us, we were unable to install the console without disconnecting the brake lines, something I was not willing to accept. Well out it came and after a few up and down walks this was sorted and everything installed. Just as we got comfortable, I installed the gear-lever, @*^%..... and just like Murphy would want it, it hit the console if changing to 5th, out again, removed another 8mm and installed again, this time round it was much better, but if you would shift hard into 5th it would hit and seeing that I still needed another 2mm for a gear-lever boot, my short temper kicked in and sparks was about to fly. If Nissans, gear-lever was not going to work in this car, I will just make my own version, the idea behind this was to get it even shorter for a more natural body feel when shifting and to get rid of the wide body of the lever. Sparks flew in all sort of direction before we got to the inner working of the lever, which was the actual part we needed. After digging around in the Stainless bin, I found a nice thick wall pipe which is a snug fit around the inners, I'll use this to extend it to the desired height and a piece of rod at the top with thread. When I have time I'll turn down a piece of Aluminium bar to make my own nob.

After this all, my temper was running on he red side and knew the next set of templates are going to be the end of my good mood. Started off with one piece of carton on the boot covers, once we had this one which only covered part of the hole, we started with a second one to fit the rest. After completion we joined them together to form a complete template. This actually went better than expected. But my downfall was downing on my. Once the covers was cut, it became very apparent that getting these babies in place was not meant for me, left it up to my father while I concentrated on finishing my back of smokes. Once they were trimmed down for easier fitment it was my queue to mark, drill holes and enter the self-tappers. Damm I hate this stuff, but self-tappers just looks better than rivets. Rivets always seems like a lazy persons answer for fixing something. Rivets is the second item in my list of stuff I hate seeing on a car, just below checkered plate, don't get me started on the use of this on a car. I'm still looking for a better alternative to checkered plate for my false floor on the drivers side. Prepped these with the sander and a few coats of clear lacquer further we were done for the day, well so I thought.

After coming back from test driving my fathers newly acquired 2nd hand Toyota Hilux, which I will use to tow the car back to Cape Town, I just could not help myself to pour some brake fluid in the reservoirs. It must have been the aircon cooling me down to have this sort of courage at night, as it is always a crap idea to start with bleeding brakes on a completely new brake pipe system late at night, as the possibility to run around trying to get flares to seal is almost unavoidable. I just had to, started with the clutch, used regular DOT 4 brake fluid on it as I was scared that 1 litre of ATE Super Blue will not be enough for the clutch to, filled the container, hooked up flex pipe on the slave and opened it, after a few pumps with the bleed nipple open and closed, I managed to get the master and slave free of air and Datto had clutch, happiness. The bloody fool I am, just had to see how the Super Blue looks in the reservoirs and the &^$# hit the fan, just as I knew could be the case, 4 of the new flares was leaking, cleaning, tightening, releasing, tightening again did the trick on 3 of them. But the one got the better of me. Just before whipping out the vice grip to fasten it, seeing that the freak in 10mm nut was by now stuffed, it seemed that it stopped.
The next morning the first thing I went to check on was the bloody flare, as luck would have it and Murphy in the mood to spoil my first cuppa, it was leaking, well not in the mood for a flare to wreak havoc on my temper, I decided it was time for the bigger bader tools, whipped out the vice grip and fastened it decently, mental note to self, buy a set of brake nut spanners. After this whole ordeal, I can vouch for AN/JIC style fittings, not a single leak, but then again what do you expect from two machined surfaces. After all this fun and games my father helped me bleeding the brakes, once this was done we realised that we will have to reinforce the metal below the hydraulic handbrake as it flex too much for comfort and that I will need to design a stop on the lever as I'm afraid of forcing the circlip out retaining the piston.


Proceeded in installing the plates seeing that the paint dried, but once I got to the table with all my bolt and nuts, and yes I can literally start a business selling all the spare bolt and nuts, flipped from struggling to find some M5 fender washers and decided to first get rid of all the bags that the bolts come in before proceeding. I'll rather struggle to find a bolt off a specific size in a container than struggling to find its location beneath a heap of bags with some sort of fastener in. My motto when buying fasteners is, if you need 6 buy 10 or if you need 12 buy 20 as it is out of the question to waste time to go to the nearest town which is 30km away for a freak in bolt, but doing it this way, you end up with a crap load of extras. Installed the kick plates and bolted the fuse/relay box in. Afterwards moved to the rear and installed the boot covers. Once they were in place I could replace the rear lights which had to be removed to get these in and fastened my wiring loom again. I'm very happy with the outcome. It looks must neater now and as a bonus I know have a location to stick all my stickers, this way I can decide who see them and who don't, I'm not a big fan of a car full of stickers with the part brands used.
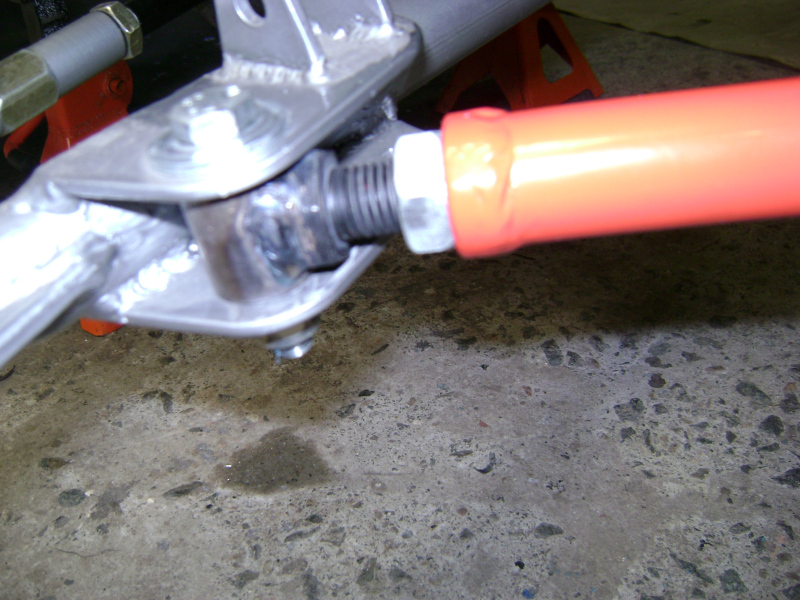

I had a slight suspicion that my front suspension was not 100% from the day I assembled it, as the lower control arm twisted when turning due to the lower ball joint sitting at a 25degree angle going into the knuckle, the reason for this was the track rod had rod ends on both sides and not resisting this force. I bought to M16 x 75 bolts for a quick experiment, I just had to try this as the Nissan S13's track rods mounts on rubber bushes on the front and at the back solid on the LCA. Quickly turned up a set of bushes and welded the bolts to it, once cold replaced the RH thread rod ends with them and bang, my one suspension issue was sorted, no more twisting, what a relieve, now I just need to design some sort of steering angle stoppers to limit the movement of the wheels, as it turns to far and locks, something that is only very bad if the wheels is in the air, if we push the vehicle around on its wheels it is not that bad, but something that will be sorted before I drive this car.
The rest of the afternoon was used to adjust the diff angle, measure the prop shaft and making a final list of things to do before the car can be towed back to Cape Town, I have one item outstanding to get the car dust proof, well the other holes will be sorted with some duct tape.


 Transfer


;)
;)
;)
;)
;)
;)
;)
;)
;)
;)
;)
;)
;)
;)
;)
;)
;)
;)
;)
