| Revision as of 11:25, 22 November 2016 ddgonzal (Talk | contribs) (->Choosing A Short Shock Insert) <- Previous diff |
Current revision ddgonzal (Talk | contribs) |
||
| Line 3: | Line 3: | ||
| = Overview = | = Overview = | ||
| Strut before and after shortening | Strut before and after shortening | ||
| - | <br>[http://datsun1200.com/modules/myalbum/photo.php?lid=9799 http://datsun1200.com/modules/myalbum/photos/9799.jpg] | + | <br>{{Album|9799}} |
| - | <br>Also, the stock spring seat has been replaced with an adjustable version | + | <br>Also, the stock spring seat has been replaced with an adjustable seat |
| # Cut tube in section. Don't cut towards the top as you need to preserve the internal tube threads for the strut gland nut | # Cut tube in section. Don't cut towards the top as you need to preserve the internal tube threads for the strut gland nut | ||
| Line 17: | Line 17: | ||
| # place the spring perch where you want it and fasten securely. You can have it re-welded or use a commercial-grade shaft collar. | # place the spring perch where you want it and fasten securely. You can have it re-welded or use a commercial-grade shaft collar. | ||
| - | + | Cut strut tube | |
| - | Cut strut tube: | + | <br>{{Album|257}} |
| - | <br>[http://datsun1200.com/modules/myalbum/photo.php?lid=257 http://datsun1200.com/modules/myalbum/photos/thumbs/257.jpg] | + | |
| One method is this: cut the strut tube into three sections: | One method is this: cut the strut tube into three sections: | ||
| Line 40: | Line 39: | ||
| Select a shorter insert (such as the Pulsar unit or Golf unit). It can be very short - a spacer can be used in the tube - but care should be taken to use one with a similar long extended length. Also keep the stiffness in mind - stiff shocks may "feel" fast but actually results in slower race times. A great shock will let the suspension dig in for maximum tyre grip. The shock should damp oscillations from bump and rebound, but should not make the ride "stiff". | Select a shorter insert (such as the Pulsar unit or Golf unit). It can be very short - a spacer can be used in the tube - but care should be taken to use one with a similar long extended length. Also keep the stiffness in mind - stiff shocks may "feel" fast but actually results in slower race times. A great shock will let the suspension dig in for maximum tyre grip. The shock should damp oscillations from bump and rebound, but should not make the ride "stiff". | ||
| + | |||
| + | The following is for 45mm (small) struts. If using a large 2" strut, see [[2-inch_Strut_Inserts#Lowering]]. | ||
| 1981 Pulsar inserts are the same external size as Datsun 1200 but shorter by 82 mm (3-1/4 in) so if you haved lowering the car and don't want the suspension to bottom on the spring mounts this is a easy way to go. The Pulsar inserts are only 10mm (3/8) shorter in the stroke, so they allow almost full suspension travel. | 1981 Pulsar inserts are the same external size as Datsun 1200 but shorter by 82 mm (3-1/4 in) so if you haved lowering the car and don't want the suspension to bottom on the spring mounts this is a easy way to go. The Pulsar inserts are only 10mm (3/8) shorter in the stroke, so they allow almost full suspension travel. | ||
| Line 77: | Line 78: | ||
| Cut a section out below the threaded portion (top portion) of the tube, then weld tube back together. | Cut a section out below the threaded portion (top portion) of the tube, then weld tube back together. | ||
| - | <br>[http://datsun1200.com/modules/myalbum/photo.php?lid=10741 http://i297.photobucket.com/albums/mm219/ddgonzal/Datsun%201200/wiki/10741.jpg] | + | <br>{{PhotoAlbum|10741.jpg|10741}} |
| Cut down, spring perch welds ground off | Cut down, spring perch welds ground off | ||
| - | <br><img size=256>http://i297.photobucket.com/albums/mm219/ddgonzal/Datsun%201200/wiki/BEE5E4DA-orig.jpg</img> [http://i933.photobucket.com/albums/ad177/Shoota_77/Snapbucket/BEE5E4DA-orig.jpg full] | + | <br>{{Photo|BEE5E4DA-orig.jpg}} |
| Ready to prime (use weld through primer to seal under where the spring seat will go) | Ready to prime (use weld through primer to seal under where the spring seat will go) | ||
| - | <br><img size=256>http://i297.photobucket.com/albums/mm219/ddgonzal/Datsun%201200/wiki/4DB087D6-orig.jpg</img> [http://i933.photobucket.com/albums/ad177/Shoota_77/Snapbucket/4DB087D6-orig.jpg full] | + | <br>{{Photo|4DB087D6-orig.jpg}} |
| After welding | After welding | ||
| - | <br><img size=256>http://datsun1200.com/uploads/photos/10221.jpg</img> [http://datsun1200.com/modules/myalbum/photo.php?lid=10221 album] | + | <br>{{Album|10221}} |
| Re-primed, now ready for fastening the spring seat | Re-primed, now ready for fastening the spring seat | ||
| - | <br><img size=256>http://i297.photobucket.com/albums/mm219/ddgonzal/Datsun%201200/wiki/D8A3DC68-orig.jpg</img> [http://i933.photobucket.com/albums/ad177/Shoota_77/Snapbucket/D8A3DC68-orig.jpg full] | + | <br>{{Photo|D8A3DC68-orig.jpg}} |
| = Fasten Lower Spring Seat = | = Fasten Lower Spring Seat = | ||
| Line 97: | Line 98: | ||
| [[Category:Suspension Modifications]] | [[Category:Suspension Modifications]] | ||
| - | [[Category:Lowering]] | + | [[Category:Lowering]]{{End}} |
Current revision
If you lower your car more than 2 inches, the strut will start bottoming out. To mitigate this, shorten the strut. It's easy.
Contents |
Overview
Strut before and after shortening

Also, the stock spring seat has been replaced with an adjustable seat
- Cut tube in section. Don't cut towards the top as you need to preserve the internal tube threads for the strut gland nut
- using your chosen short insert, shorten the tube to suit
- leaving old inserts in the strut (covered in a smear of oil) stitch weld the tube back and grind back to the diameter. don't let it get too hot or you'll have an oil fire.
Additionally, you may choose to re-position the lower spring seat (or coilover adjustable sleeve) in a way that the leaves enough clearance for tyres.
- Remove the strut/spring/brake assembly, then remove the spring and the strut shaft/insert.
- Grind the lower spring perch free from the strut tube.
- Cut the strut to the length you want. For a three-inch lowering job, cut the strut three inches. Have a machinist cut new internal threads for the large gland nut
- place the spring perch where you want it and fasten securely. You can have it re-welded or use a commercial-grade shaft collar.
One method is this: cut the strut tube into three sections:
The strut needs to be reduced in length about 50mm, it is best to cut the strut about 40mm below the thread of the insert/canister cap. Simply cut out a 50mm of tube and then re-weld it together.
Doing it this way gets around the problem of having to use a lathe to recut the thread or cutting from the bottom which changes the ride.
In other words:
- Section at top with threads
- Cut out a middle section of 50 mm and discard
- bottom section
Then re-weld the top and bottom sections together.
Choosing A Short Shock Insert
Since the stock 1200 strut inserts fill the whole length of the strut tube, after shortening the tube, a shorter-than-stock insert will be needed.
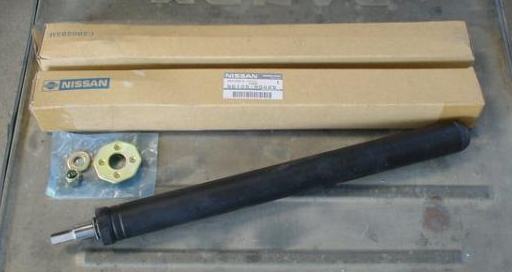
Stock Shock Absorber Cartridges for Datsun 1200 struts are quite long

Select a shorter insert (such as the Pulsar unit or Golf unit). It can be very short - a spacer can be used in the tube - but care should be taken to use one with a similar long extended length. Also keep the stiffness in mind - stiff shocks may "feel" fast but actually results in slower race times. A great shock will let the suspension dig in for maximum tyre grip. The shock should damp oscillations from bump and rebound, but should not make the ride "stiff".
The following is for 45mm (small) struts. If using a large 2" strut, see 2-inch_Strut_Inserts#Lowering.
1981 Pulsar inserts are the same external size as Datsun 1200 but shorter by 82 mm (3-1/4 in) so if you haved lowering the car and don't want the suspension to bottom on the spring mounts this is a easy way to go. The Pulsar inserts are only 10mm (3/8) shorter in the stroke, so they allow almost full suspension travel.
RockAuto $33
1978-1983 Nissan N10
* 1981-1983 Datsun Pulsar (Australia)
* 1978-1982 Datsun 310 (Canada & USA)
Monroe GT Reflex part number 25-3436
* replaces WGC-3436 touring gas cartridge
* Body length:      334  mm
* Length Extended:  525  mm
* Length Compressed:334  mm
* Body Diameter:    36.9 mm
* Rod nut 110-039-052
* Locking Ring 137-A61-023
* remove 75 mm (or less) from the tube, to allow for the locking ring nut to fit
Stock 1200 inserts (for comparison)
* Body Length:      418 mm
* Length Extended:  631 mm
* Length Collapsed: 462 mm
* Stroke: 169mm (6.7 in)
For more alternatives, see Strut Insert Part Numbers.
Remove Spring Perch
Use a handheld grinder or a bench grinder. Be careful not to cut through the stut tube.
Cutting Strut Tube
Can a cheap tube cutter do the job? A pipe cutter might work but they're actually quite thick walled tubing so it might take a bit!
A good old drop saw (chop saw) does the trick on the tubes. It will hold the tube perfectly square and just cut it through (after removing the strut piston/insert of course).
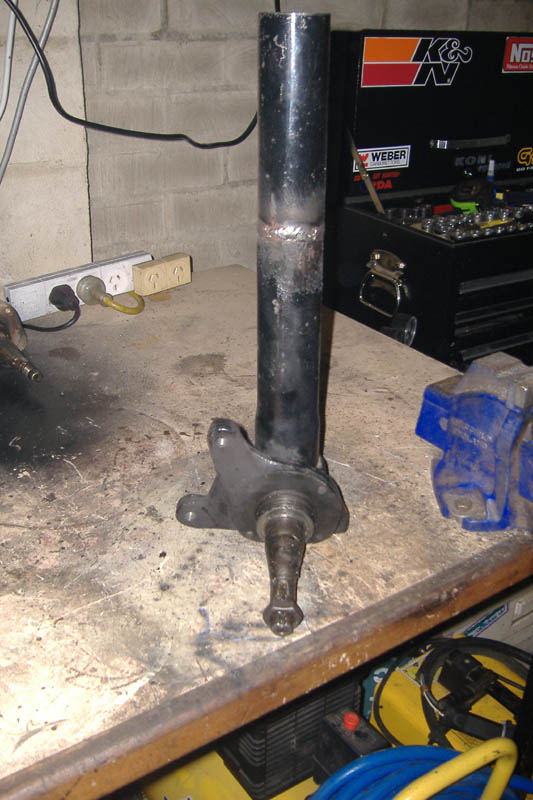
Cut a section out below the threaded portion (top portion) of the tube, then weld tube back together.

Cut down, spring perch welds ground off

Ready to prime (use weld through primer to seal under where the spring seat will go)

Re-primed, now ready for fastening the spring seat

Fasten Lower Spring Seat
You can place the spring perch where you want it and fasten securely. You can have it re-welded or use a commercial-grade shaft collar.
See main article: Fastening Spring Seats

![[Datsun 1200 encyclopedia]](/wiki/upload/wiki.png)


