![[Datsun 1200 encyclopedia]](/wiki/upload/wiki.png)
| Revision as of 23:54, 4 November 2012 ddgonzal (Talk | contribs) (->1200 Assembly) <- Previous diff |
Revision as of 23:58, 4 November 2012 ddgonzal (Talk | contribs) Next diff -> |
||
| Line 18: | Line 18: | ||
| = Wreckers = | = Wreckers = | ||
| - | Going price is about $100 in 2010. | + | Going price was about $100 in 2010. |
| Take a veneer caliper to the wreckers and check that you have at least 10mm of meat on the disc. 9.5mm is still legal but new discs are expensive ($160 AU each side) | Take a veneer caliper to the wreckers and check that you have at least 10mm of meat on the disc. 9.5mm is still legal but new discs are expensive ($160 AU each side) | ||
| Line 71: | Line 71: | ||
| You can leave the 1200 diff in the vehicle or [[Rear Axle#Rear Axle Removal|remove]] it. | You can leave the 1200 diff in the vehicle or [[Rear Axle#Rear Axle Removal|remove]] it. | ||
| - | Remove the individual axles from the main body/housing. See [[Rear Axle#Axle Shaft Removal|Axle Shaft Removal]]. | + | # Remove the individual axles from the main body/housing. See [[Rear Axle#Axle Shaft Removal|Axle Shaft Removal]]. |
| - | + | # [[Rear Axle#Axle Bearing Removal|Remove Axle bearings]] | |
| - | + | ||
| - | + | ||
| # Slide the brake backing plate off the old axle | # Slide the brake backing plate off the old axle | ||
| # Recommended: Pry the old axle seal out of the end of the housing. Always use a new seal. | # Recommended: Pry the old axle seal out of the end of the housing. Always use a new seal. | ||
Revision as of 23:58, 4 November 2012
"Disc Over Drum" -- easy conversion for H165 or H190 diffs! Fits over 14" wheels. Rotor approximately 280mm.
Contents |
Overview
Find an Australia-built Bluebird with rear discs and swap the brakes over to the H165.

They use the drum shoes as the emergency/parking brake.


Remove the wheel bearing with a press so that you can change the backing plate, then install a new wheel bearing.
Sources
These come from Australia-built Bluebirds with live axle (non-IRS).
Version 1 of these rear disk brakes were used on all Nissan 910 Bluebird Series 1 TRX sedan & LX sedan except for the first few weeks of LX production.
Version 2 of these brakes were used on all 910 Bluebird Series 2 & Bluebird Series 3 TRX sedans & LX models [sedans & wagons].
Wreckers
Going price was about $100 in 2010.
Take a veneer caliper to the wreckers and check that you have at least 10mm of meat on the disc. 9.5mm is still legal but new discs are expensive ($160 AU each side)
Buy the whole axle, diff and all. It will probably cost less than buying the bits.
Prep
Remove calipers, put them aside for a cleanup or a recondition as you see fit
Remove discs, give them a quick cleanup
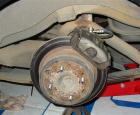
Remove the dust shields (splash plates) large thin plates that protect the discs from mud, etc.
Take photos to document which way the shoes and the retaining springs go (they will only go one way but at least you know for sure).
Dismantle the brake shoes, inspect and replace shoes if required
Remove the handbrake cable by taking out the pins at the ends
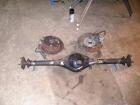
Axle Removal
The two axles right and left, dont mix up the backing plates they only go one way
Remove the individual axles using the same process as with other Datsun diffs. See Rear Axle Removal.
Remove Backing Plates
Remove the axle bearings from the Bluebird axles, so the the backing plate/caliper adapters will come off the axles.
Use the normal process, chisel off the bearing retainer and bearing (or using a long bearing puller). Dont worry about damaging the Bluebird axle as you wont use it on the 1200. Neither of these items (collar or bearing) can be reused so just use brute force to break them apart
CAUTION: Dont use the backing plate (caliper adapter) for any leverage it is cast and can break
After the collar and bearing are removed there will also be a thin washer to remove, it should just slide off and then the backing plate is right to come off
Make sure you mark right from left and keep the small bits from the bluebird diff
Parts Check
Backing plates
Brake assemblies, both handbrake assemblies and disc brake assemblies.
Flexible brake lines for the disc calipers
All bolts, nuts, washers, clips mostly so you have spares
IMPORTANT keep the fittings that hook up the fixed brake lines to the flexible lines. The 1200 does not have these on the diff and you will need to weld them onto the 1200 diff
Also keep or sell the Bluebird diff centre- it will be a H165 and can be used in a 1200 ute diff.
Give everything a nice cleanup
1200 Disassembly
You can leave the 1200 diff in the vehicle or remove it.
- Remove the individual axles from the main body/housing. See Axle Shaft Removal.
- Remove Axle bearings
- Slide the brake backing plate off the old axle
- Recommended: Pry the old axle seal out of the end of the housing. Always use a new seal.
1200 Prep
We need to weld on the 'tabs' that will hold the flexible brake lines to the main body.

- Find the tabs from the Bluebird main body they were bolted on to the axle but we do not have anywhere to bolt it on to the 1200 so you may weld them
- Weld on to the main body approx 6 inches from the edge you need to clear the bump stop and just get inside the little tabs that hold the metal brake lines
- You may also want to shorten the metal brake lines as they no longer need to go all the way to the backing plates
1200 Assembly
Obtain two bearing kits (one for each side) including new bearing, collar and seal.
So here is where we put the stuff we need off the Bluebird on to the 1200 diff housing.
- Reinstall the axles. See Axle Installation
- Lift the axle assembly into the vehicle onto the leafs.
- Attach spring plate and bump stops with the U-bolts
- Connect the handbrake cables
- Fit the discs and calipers (do this step after the diff is back into the car as there may not be room to fit the discs between the spring and the underneath of the car).
- Connect up the hydraulic brake lines
- Adjust the handbrake shoes