![[Datsun 1200 encyclopedia]](/wiki/upload/wiki.png)
Using the B310 electronic distributor in other A-series engines s a very simple swap, with only one minor modification needed to put it in an older 1971-1973 A-type engine. This distributor is factory stock on 1979-1982 Datsun 210 (North American version of the B310).
The 1980 Mitsubishi distributor on 1972 A12 engine. Note how it looks very similar to the 1971-1973 Hitachi or Mitsubishi distributor.
NOTE: This is not the same as the Hitachi electronic distributor as can be found in some New Zealand Sunnys and earlier North American B-210s. The one we are talking about here has a small 'black box' bolted on the side of the distributor.
Contents |
Advantages
- stealth. Looks very much like a factory 1200 point setup
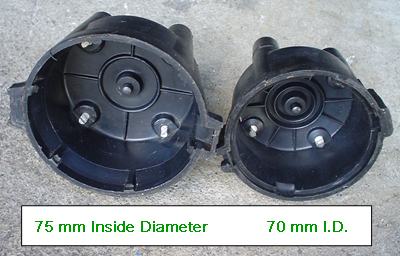
- Larger cap -- less chance to crossfire (important in humid climates)
- High-energy spark -- uses full 12V coil (no ballast resistor)
- No points to wear out, no dwell to adjust
</ul>
Inspection
So when looking at the wreckers, to ensure you obtain a good unit:
- make sure the 'teeth' line up evenly
- bad:
- bad:
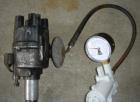
- Check vacuum advance -- most are bad! -- bring a gun with you:
-
- Wiggle the shaft from side to side. It should have no or a tiny bit of play. If it has enough to allow the teeth to hit the relucator, that's way too much.
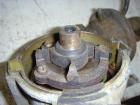
About the teeth alignment: Most of the distributors I got have this problem. In the photo, note the mis-alignment of the reluctor. It is caused by a bad "breaker plate" assembly -- what i would call the vacuum-advance plate, which you cannot see without disassembly the distributor. In some of the distributors you can see ball bearings loose in the housing. In the others I couldn't see, but they are all broken. That's the problem, the BBs are held in by a plastic race, which is broken on every distributor I have, save one which used a different design.
For a photo guide of inside parts, see:
Atlantic Z distributor rebuild
Nissan have new breaker plates, but they are a $72 part.
If the alignment is good, chances are the breaker-plate bearings are OK.
You can disassemble it for inspection like this, it only takes a few minutes:- Remove cap and rotor
- Unbolt the black box from the side of the distibutor
- Remove the red and green wires from the black box
- Remove toothed ring (3 screws) and carefully pry the ring & magnet assembly straight up and out
- Remove Vacuum Advance diaphragm
- Screw on outside
- Screw on inside
- Remove the two assembly retaining screws, deep inside in the "box" sections 180 degrees around the edge
- Pop the rubber plug out of the shaft (where the rotor pushes on
- Unscrew the screw inside the shaft
- Pull out the assembly
- Assembly is reverse of these instructions
Mechanical
1. If you are working with an old-style A-series engine (1966-1973), modify the distributor hold-down bracket to fit old-style block. The mounting bracket on newer distributors needs a slot cut with a hacksaw. For details, see Using Newer Distributor.
2. Remove old distributor, Insert new distributor. And of course, set initial timing. For details, see the Ignition Timing article.
Wiring
Ah, this is the easy part, especially if you get a cut of the wiring harness when you purchase your distributor. But if you don't, it's still easy to hook up the wires.
[
 [1]
[1]
Connect wiring as shown here.
- The small black square on right side of schematic is the condensor
- As you can see, the two wires on the distributor go to the two coil wires.
The two wires on the distributor go to
+ and - terminals of the coil
-
<li>Remove the standard low-energy coil and ballast resistor, then bolt the 12V coil in its place</li>
<li>I believe the condensor is optional, it is to reduce radio interference. I bolted the condensor to the distributor mounting screw. Keep it away from the vibration and heat of the engine (mount it to the body panel). One end of the condensor can go to the ground spade-connector on the distributor body</li>
<li>One side of the ballast resistor has a 12V IGN feed, so connect the Black/white wire to this original wire (Black/white)</li>
On the distributor's black box module, the T-connector wiring is:- Head of T: Blue or White wire (coil negative)
- Sstem of T: B/W wire (coil positive)
Part Numbers
NOTE: For coil, cap and rotor interchange, see part number section of B-210 Electronic Distributor Swap
-
<li>Breaker plate assy: Nissan 22136-H9501 (formerly 22136-Q1700) $72
<li>Coil: 12V non-resistor: Nissan 22433-H7280, Bosch 00200, Beck/Arnley 1800039, AC Delco E525 or C502 (replaces F519 #12321584), Standard Motor Products UF-4/UF-4T</li>
<li>Cap (same as points ignition): Standard Motor Products JH-63X/JH-63T/JH-63
<li>Rotor (same as points ignition): Standard Motor Products JR-79X/JR-79/JR-79T
<li>Reluctor (rotating part): Standard Motor Products LX-528
- Pickup: Standard Motor Products LX-502
Make Model</TD> Year </TR>NISSAN 210 82-79 310 81-79 </TABLE>
- Ignitor: Standard Motor Products LX-516, F2045-18322 at drivewire.com ($126)
Make Model</TD> Year </TR>NISSAN 200 SERIES 81-80 210 82-79 310 81-79 510 80 </TABLE>
- make sure the 'teeth' line up evenly