|
|
Browsing this Thread:
1 Anonymous Users
|
|
Re: racetech's 1200 SR20VE Project |
|
Home away from home  
Joined:
2009/4/16 10:37
From Cape Town, South Africa
Group:
Registered Users
|
Unfimilia, I do not have dimension, but will take some for you later today and slap a quick Acad drawing together for you.
Will that do????
Posted on: 2012/2/10 11:33
|
|
|
|
|
Re: racetech's 1200 SR20VE Project |
|
|
Guest_
|
That would be great- even hand drawn with crayons would be great
Posted on: 2012/2/10 11:43
|
|
|
|
|
Re: racetech's 1200 SR20VE Project |
|
Home away from home Joined:
2009/4/16 10:37
From Cape Town, South Africa
Group:
Registered Users
|
Quote: even hand drawn with crayons would be great That seems too advanced for me to even consider trying and way to much effort to search for crayons, Acad is just faster, easier and better understandable.
Posted on: 2012/2/10 12:00
|
|
|
|
|
Re: racetech's 1200 SR20VE Project |
|
Home away from home Joined:
2009/4/16 10:37
From Cape Town, South Africa
Group:
Registered Users
|
11 February 2012 - Assembly VIII  Since the last update I received a box in the post containing a variety of Teflon/PTFE braided pipe and AN fittings, also included was silicone vacuum pipe, exhaust wrap and Stainless Steel cable ties. I have only seen these pipes but never worked with it before, seeing this was my change, a few YouTube movies further and I was on my way, but the one thing they forgot to mention was that it take some time to work with this stuff without destroying your fingers in the process. During the week I also took the widened wheels and new rubber in for fitment, I must say I really like the look of the 205 rubber on the 8J wheels. I also took the tappet cover in for some Aluminium welding, added a AN10 socket for the breather and closed the old hole were the PCV valve used to be.       Friday arriving at my parents home, I immediately started sanding the tappet cover. After a few minutes of sanding I quickly realised that I will have to get the thing sand blasted to remove all old paint as it was impossible to reach everywhere with the sander and there is no way I will even attempt sanding this thing with the hand. During the course of the evening I tested my newest idea for a anti roll bar, this came in the form of a torsion bar with splines on both sides and also the brackets. It didn't take long after a mock assembly to realise that this plan will work 100%, I must admit, not a lot of things came easy with this car, but the anti-roll bar may just be the easiest of them all. We made some Aluminium panels for the rear a week ago, I decided to cover them a coat of clear lacquer to keep the dirt away. The final work for the evening was the breather pipe from tappet cover to breather bottle and the bleeder pipe from the output on the head into the radiator expansion bottle. Both done with those shinny blue/red AN fittings.    Saturday morning started with a bang, fitted the cover plates that was sprayed the evening before. The idea for the weekend was fitting the windows and doors, well that is just what we started doing, first the rear window, not being experts at this sort of thing, but previous encounters taught us the basics. The bottom part of the window went easy until we got to the first corner; all off a sudden the nightmare struck, pirate window rubber is just not worth it, the next time I will import the genuine stuff, we struggled for almost 30mins with the second corner, the mould was completely wrong, well we got it in and proceeded upwards, once we had the two sides in, we realised that the glass was too high and was unable to move it downwards, a quick call to my uncle Anton Botha the owner off JA Kontreidienste (023 355 1850) for some advice, seeing that this sort of thing was a daily occurrence in his previous employment. He assured me that we should just hit it and it will move. We decided to leave the rear one for now and see if the front one will go easier, well the same thing, but at least the corners went easier as we cut the inner lip to look like the OEM rubber. But this only helped with the corners, but the window again was too high, I just had to get my uncle closer to help with this. To be continued......waiting on the uncle, 50km is far, considering the gravel roads.    While we waited for some much needed help, we started with the front fenders, due to the increase size of the wheel which will be used, the wheels were pulled forward to clear the rear and the fenders needed some serious TLC to clear the front. The fact that the road tyres is about 80mm higher than the racing slicks, does not help, well we started marking it out and the cutting was done with a jigsaw. Just before me uncle arrived we had the one 100% done, will finish the last cut on the remaining one on the next visit. I must admit, not a lot is left of the front part of the fender.    On arrival, my uncle didn't waste a lot of time hanging around, he immediately got his hands dirty struggling with the window, the same thing happened with the front window, to high, but he had some good moves in getting it to sit lower, but just not enough, seeing that we didn't have the correct equipment to sand the window down, we opted for the porta pack to press on the roof which did the trick. The rear window was no easy task, but at least we could leave the jack on the floor. Moral of the story, if you can't get the original rubbers, import them, if you can't import them, pay someone else to do it for you. We retired for the day to have a nice braai, seeing that I couldn't sent the hero away with an empty stomach.    Later the evening when all departed, I added the final touches to the pipe coming out of the steering rack. The clutch position and brake light switch kept me busy for the rest of the evening, at least I can position the clutch switch now just as I would like.     Sunday morning was used to wire up the radiator fan and to get the lights installed. I made new retaining brackets the previous weekend and had them plated, this was mounted followed by the lights and seeing that I did not have the original springs for the head lights, this had to be made. At least the car is starting to look like something with just the windows and head lights.        The afternoon we started mounting an adjusting the rear doors, seeing that the previous owner had new sills installed on the car which was out, we had to make spacers for the left door, almost the exact problem was faced on the front right door. Fitting doors on a car with a full roll cage is no fun, as you have to wrap your body in the most awkward of positions. Afterwards we fitted the front bumper. I could not contain myself and just had to put the fenders on the car to get an overall picture.
Posted on: 2012/2/15 11:52
Edited by racetech on 2013/12/23 12:11:03
|
|
|
|
|
Re: racetech's 1200 SR20VE Project |
|
Home away from home Joined:
2009/4/16 10:37
From Cape Town, South Africa
Group:
Registered Users
|
unfamilia, pm me a email addy for the detail pics and drawing
Posted on: 2012/2/15 11:53
|
|
|
|
|
Re: racetech's 1200 SR20VE Project |
|
|
Guest_
|
Wow wow wow. You have any pics of mods to the rear wheel arches? I'm tempted of a LSD diff thats 3" wider than stock, so flares and guard mods would be required
Posted on: 2012/2/15 23:07
|
|
|
|
|
Re: racetech's 1200 SR20VE Project |
|
Just can't stay away  
Joined:
2011/11/20 7:19
From A.C.T
Group:
Registered Users
|
This Car is amazeing its on a whole other level, love this build its awsome seeing all this progress it helps motivate me to get mine sorted. good job
Posted on: 2012/2/16 7:16
|
|
|
|
|
Re: racetech's 1200 SR20VE Project |
|
Home away from home Joined:
2009/4/16 10:37
From Cape Town, South Africa
Group:
Registered Users
|
unfamilia, check your mail.
Posted on: 2012/2/16 12:36
|
|
|
|
|
Re: racetech's 1200 SR20VE Project |
|
|
Guest_
|
Thanks heaps..... Very big help.
Posted on: 2012/2/16 13:57
|
|
|
|
|
Re: racetech's 1200 SR20VE Project |
|
Home away from home Joined:
2009/4/16 10:37
From Cape Town, South Africa
Group:
Registered Users
|
18 February 2012 Anti-Roll Bar & Assembly IXSitting here 4 days after returning home from the car, I cannot remember what I did during last week, I'm pretty sure it wasn't nothing. I can remember doing a few test with the VHT Wrinkle Plus paint. On the topic, if anyone can tell me why we, South Africans, must always struggle to get their hands on the non-day to day stuff, drop me a mail. I had to ship these two cans of VHT paint down from Johannesburg, no one in Cape Town know the product. Anyways, after a few test runs on cans with different thickness coats, degrees of heat and baking duration, I was quite nerves about the upcoming events as my test runs was not consistent, neither did it produce the results I had in mind. 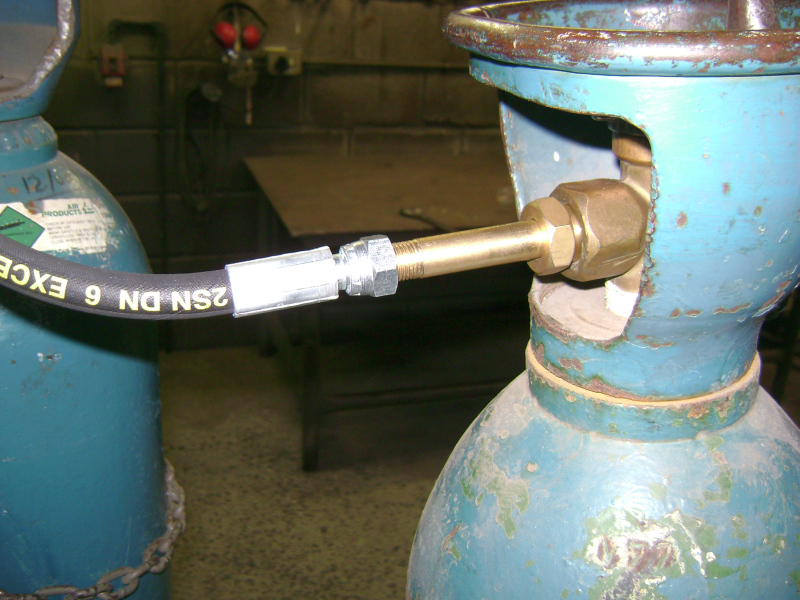     After arrival Friday at home, the first order of business was a little mischief, seeing that we are "af die plaas" things are seen in a different light than normal folk, let me get to the point. But wait, maybe I should first say, We do not take any responsibility what so ever for any damage or injuries that may result from the below actions". Since I started with this build "Argon" gas has been a issue as the refill depots do not want to fill my fathers privately bought Argon bottle, no illegal stuff here, invoices from one of Cape Town biggest welding suppliers. So a week or two back, I bought a full Argon bottle and immediately I decided to use the big bottle to fill smaller ones. I bought two regulator fittings and had them machined to accept normal Hi pressure fittings, I just didn't want to take any changes with this. Once that was done, I had a hi pressure hose made up with a 400bar operating pressure. We lifted the smaller bottle with the overhead crane, attached the pipe, first opened the smaller bottle then the larger one slowly, one smoke later, the pressure in the two neutralized, we ended with +-115bar in each bottle. Do not attempt this if youre not a total nutcase or know exactly what you are doing, as the empty bottle gets quiet hot during the gas transfer.    Back to Datto; Friday was used to finish the oil pipes, after that I was spent.       Saturday morning we started off with cutting the last part of the left fender, well that was the idea, we ended up cutting both to get them 100% the same, this involved cutting template after template. Then I moved onto the anti-roll bar, in my case a torsion bar, first order of business was to drill and tap the holes in the aluminium mountings I had milled, this took way to long, but seeing that I first drilled one hole tapped it and then marked drilled and tapped the second one, this is understandable. Then I made myself some polypropylene bushes, I just hope they last, but then again, If I have to redo them every year I'll be quite happy, as the material is about R90 for 500mm, I only used about 150mm.     Then I moved onto "Project rocker cover TLC" I really did not want to make a big cockup of this as it would be the first thing anyone will see if the bonnet is left open by mistake. The previous night I washed this thing endlessly to make sure there is no sand deposits left due to the sand blasting and had it drying thru the night. First I cleaned it again with a thinners cloth and laid it down on a carton, on top of a reasonable stand for my short ass. Let me just sketch the scenario, I was very scared as this point and sweating like a pig in heat, but I just decided if I stuff this up, I can just get it sand blasted again and either spray it with the wrinkle paint or with some more known paint. After both my arms was done from shacking the damn can I started with the first coat horizontal across the length of the cover, laid the paint down quite thick, waited the 5 minutes between the next coat as the can explained. Started with the vertical coat, this time even thicker as the first coat was quite tacky by now. Waited 5 minutes again and started with the last coat in a sideways movement, this time around I did not spare any paint. Seeing that the rocker cover does not fit my parents oven, the only other option was a heat gun. Started spreading the heat in the same way you would spray a big part, first the corners and then the rest in layers almost. After about 7 minutes still nice and shiny paint and then all of a sudden, it appeared on the far corner while I was busy on the other side, Wrinkles. The one thing I realised was that the wrinkles does not appear due to the result of direct heat, but from overall temperature increase of the object. I just continued with what I was doing and all over the show the wrinkles appeared, this continued for another 8 minutes until the complete cover was covered with an even layer of wrinkles, not one place with burned or an inconsistency, besides the small hair that fell on the back while spraying. Just around the edges where more of the paint accumulated it was a thicker wrinkle. All in all, this is easier doing it on a big object than on small metal containers. I'm very happy with the outcome.     Sunday morning I started assembling the intake manifold and routing the vacuum pipes. The pipe I imported is thicker than standard and I had to remove some material from the one end to enter the LINK map sensor. As you would have noticed, the last few weekends was used to get the car dust proof as I'm planning to bring the car back to the mother city for some serious wiring, flares, branch, exhaust and prop shaft. After the intake I moved to the back of the vehicle installing the Number plate light, this is still one of my biggest headaches, seeing that i don not like the big pimple winking at me. It will be sprayed blue to help hide it, but in the future I'll device some sort of plan with LEDs and alu plate to get it flatter. Sunday actually started quite early for me and my girlfriend, while I was busy with the above se cleaned the interior of the car, this took her more or less from 07:30 - 14:00. During this whole process we managed to re install the seats, handbrake lever and wiper arms.  During the week I managed to assemble the dash, just forgot to pack the steering column switches, will bring that home and finish the assemble on it, just need to make a hole for the 12pin socket I bought for the steering wheel switches. The car is coming together nicely and the possibility to bring it back in 3 weeks is a reasonable thought, since I only want to make the new kick plates and covers in the boot to round it off. Once back in the Cape, the next big struggle will begin with the flares. Anyone with solid experience in doing something like this from scratch, please feel free to share.
Posted on: 2012/2/23 20:59
Edited by racetech on 2013/12/23 12:10:37
|
|
|
You can view topic.
You cannot start a new topic.
You cannot reply to posts.
You cannot edit your posts.
You cannot delete your posts.
You cannot add new polls.
You cannot vote in polls.
You cannot attach files to posts.
You cannot post without approval.
|


 Transfer

;)
;)
;)
;)
;)
;)
;)
;)
;)
;)
;)
;)
;)
;)
;)
;)
;)
;)
;)
;)
;)
;)
;)
;)
;)
;)
;)
;)
;)
;)
;)
;)
;)
;)
;)
;)
;)
;)
;)
;)
;)
;)
;)
;)
;)
;)
;)
;)
;)
;)
;)
;)
;)
;)
