![[Datsun 1200 encyclopedia]](/wiki/upload/wiki.png)
| Revision as of 19:26, 14 November 2007 Ddgonzal (Talk | contribs) <- Previous diff |
Current revision ddgonzal (Talk | contribs) (->Overview) |
||
| Line 1: | Line 1: | ||
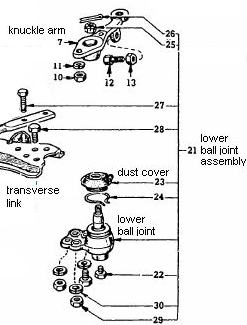
| - | The '''balljoint''' (aka "ball joint" or "ball-joint") permits the front axle to swivel and the wheels to turn left-right. It bolts to the bottom of the [[Lower control arm]], and the moving taper parts fits into the steering [[Knuckle arm]]. Then this assembly is bolted to the [[Strut]]. | + | The '''balljoint''' (aka "ball joint" or "ball-joint") permits the front axle to swivel and the wheels to turn left-right. It bolts to the bottom of the [[Lower control arm]], and the moving taper parts fits into the steering [[Knuckle Arm]]. Then this assembly is bolted to the [[Strut]]. |
| + | = Overview = | ||
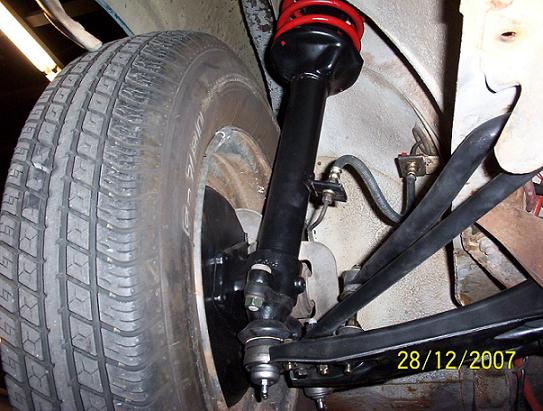
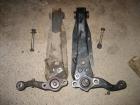
| + | The '''ball joint''' bolts to the end of the '''lower control arm''', and the '''steering knuckle''' fits over it. | ||
| - | [http://datsun1200.com/modules/myalbum/photo.php?lid=14637 http://datsun1200.com/modules/myalbum/photos/14637.jpg] | + | {{Album|14637}} {{Album|15173}} |
| - | Also See: | + | Also See: [[Front Axle]] |
| - | * [[Front Axle]] | + | |
| - | * [[Suspension]] | + | |
| - | + | = Maintenance = | |
| - | = Maintainence = | + | |
| The balljoint requires periodic '''lube'''. At every oil change, pump a little '''chassis grease''' into it. Pump just enough till you see the dust cover (grease seal) move. | The balljoint requires periodic '''lube'''. At every oil change, pump a little '''chassis grease''' into it. Pump just enough till you see the dust cover (grease seal) move. | ||
| - | |||
| = Removal = | = Removal = | ||
| - | A. Unbolt the steering knuckle from the strut | + | # Unbolt the steering knuckle from the strut |
| - | + | # Remove the castellated nut | |
| - | B. Remove the castellated nut | + | # Separate the Balljoint from the knuckle using a method below |
| - | + | # Unbolt the Balljoint from the Tranverse Link (lower control arm) | |
| - | C. Separate the Balljoint from the knuckle using a method below | + | |
| - | + | ||
| - | D. Unbolt the Balljoint from the Tranverse Link (lower control arm) | + | |
| - | + | ||
| == Separation Methods == | == Separation Methods == | ||
| Line 37: | Line 31: | ||
| 3. | 3. | ||
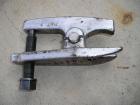
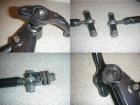
| - | The puller (breaker) is the best way. | + | The puller (breaker) is perhaps the best way for novices. |
| [http://datsun1200.com/modules/myalbum/photo.php?lid=5599 http://datsun1200.com/modules/myalbum/photos/thumbs/5599.jpg] or [http://www.partsamerica.com/ProductDetail.aspx?MfrCode=PBI&MfrPartNumber=648692&CategoryCode=3492 http://www.partsamerica.com/product_images/img/thumbs/pbi/tn_648692.jpg] http://www.partsamerica.com/product_images/aap/apo/thumbs/thmb_apo_t75517.gif | [http://datsun1200.com/modules/myalbum/photo.php?lid=5599 http://datsun1200.com/modules/myalbum/photos/thumbs/5599.jpg] or [http://www.partsamerica.com/ProductDetail.aspx?MfrCode=PBI&MfrPartNumber=648692&CategoryCode=3492 http://www.partsamerica.com/product_images/img/thumbs/pbi/tn_648692.jpg] http://www.partsamerica.com/product_images/aap/apo/thumbs/thmb_apo_t75517.gif | ||
| Line 44: | Line 38: | ||
| [http://datsun1200.com/modules/myalbum/photo.php?lid=4921 http://datsun1200.com/modules/myalbum/photos/thumbs/4921.jpg] [http://datsun1200.com/modules/myalbum/photo.php?lid=8532 http://datsun1200.com/modules/myalbum/photos/thumbs/8532.jpg] [http://datsun1200.com/modules/myalbum/photo.php?lid=10917 http://datsun1200.com/modules/myalbum/photos/thumbs/10917.jpg] [http://datsun1200.com/modules/myalbum/photo.php?lid=7978 http://datsun1200.com/modules/myalbum/photos/thumbs/7978.jpg] [http://datsun1200.com/modules/myalbum/photo.php?lid=3200 http://datsun1200.com/modules/myalbum/photos/thumbs/3200.jpg] | [http://datsun1200.com/modules/myalbum/photo.php?lid=4921 http://datsun1200.com/modules/myalbum/photos/thumbs/4921.jpg] [http://datsun1200.com/modules/myalbum/photo.php?lid=8532 http://datsun1200.com/modules/myalbum/photos/thumbs/8532.jpg] [http://datsun1200.com/modules/myalbum/photo.php?lid=10917 http://datsun1200.com/modules/myalbum/photos/thumbs/10917.jpg] [http://datsun1200.com/modules/myalbum/photo.php?lid=7978 http://datsun1200.com/modules/myalbum/photos/thumbs/7978.jpg] [http://datsun1200.com/modules/myalbum/photo.php?lid=3200 http://datsun1200.com/modules/myalbum/photos/thumbs/3200.jpg] | ||
| + | = Part Numbers = | ||
| + | http://www.rockauto.com/catalog/x,carcode,1208483,parttype,10070 | ||
| + | * ACDelco 45D2044 or 88911542 $22 | ||
| + | * Raybestos 5051044 | ||
| [[Category:Front Axle And Front Suspension]] | [[Category:Front Axle And Front Suspension]] | ||
Current revision
The balljoint (aka "ball joint" or "ball-joint") permits the front axle to swivel and the wheels to turn left-right. It bolts to the bottom of the Lower control arm, and the moving taper parts fits into the steering Knuckle Arm. Then this assembly is bolted to the Strut.
Contents |
Overview
The ball joint bolts to the end of the lower control arm, and the steering knuckle fits over it.
Also See: Front Axle
Maintenance
The balljoint requires periodic lube. At every oil change, pump a little chassis grease into it. Pump just enough till you see the dust cover (grease seal) move.
Removal
- Unbolt the steering knuckle from the strut
- Remove the castellated nut
- Separate the Balljoint from the knuckle using a method below
- Unbolt the Balljoint from the Tranverse Link (lower control arm)
Separation Methods
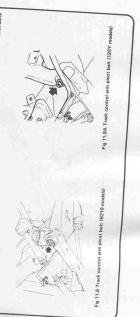
1. With the hammer method, you don't hit the ball joint, you hit the knuckle arm the it fits into! This is the preferred way for many experienced mechanics. But for regular blokes, there is too much danger of damaging a nearby component.
 Representative (Nissan Silvia pictured)
2. The pickle fork tool is easy, but usually ruins the rubber seal. No big deal, as you can buy the seals separately.

Place between balljoint and steering knuckle and give it a sharp blow with a hammer.
3. The puller (breaker) is perhaps the best way for novices.
 or
or 

Pics

Part Numbers
http://www.rockauto.com/catalog/x,carcode,1208483,parttype,10070
- ACDelco 45D2044 or 88911542 $22
- Raybestos 5051044