|
|
Browsing this Thread:
1 Anonymous Users
|
|
Re: racetech's 1200 SR20VE Project |
|
Home away from home  
Joined:
2009/4/16 10:37
From Cape Town, South Africa
Group:
Registered Users
|
14 May 2011 Bodywork Not a lot has happened that I can show you, but we started with the bodywork, the idea is to get this done as the first priority. You would also see that the front suspension has not been build, the idea around this is that if we get bad weather on a day we can work on the mechanical side of things. This is a win win situation for me as I now have more time to gather parts.      It seems that we are finish with all the welding on the body and started to get this cleaned up with some body filler. Some of you that knows the 1200 very good would notice that I removed the rear bumper indents as I'm not going to use any bumpers on the car. The previous owner also sprayed half the rear end of the car with stone chip, I removed this, as I want the back to be smooth, this is going to be a lot of work but I'll get there. The rear of the car currently looks like a chameleon.   I was lucky enough to source a set of Nissan 200SX S13 front knuckles, this will form the basis of the front suspension, this is a win for me as I already have 2 30mm wide alu spacers that converts 4/114 - 4/100 pcd. On the braking front the S13 Calipers will not be replaced with the S14 units I bought previously, but with a set of Wilwoods. Lower Control Arms will be completely new custom build units so to the Track rods. I'll be taking the car to the police clearance department within the next month to get a Reference number stamped as I'm going to remove the current number, this will allow me to replace the current top plate on the shock towers with a plate that will form the top plate of my Pillow Ball Mounting that will be Camber/Caster adjustable. Hopefully this weekend we will finish with all the body filler work and start getting the interior of the car ready for some paint. I still have to form some sort of plan to get the interior sprayed, the roll cage is not going to make this a easy task.
Posted on: 2011/5/19 13:24
Edited by racetech on 2013/12/23 12:38:17
|
|
|
|
|
Re: racetech's 1200 SR20VE Project |
|
Home away from home 
Joined:
2004/8/30 11:04
From Christchurch
Group:
Registered Users
|
Wow, what flares are you going to be running? Big ones by the look of it!!
Posted on: 2011/5/20 7:23
|
|
|
|
|
Re: racetech's 1200 SR20VE Project |
|
Home away from home Joined:
2009/4/16 10:37
From Cape Town, South Africa
Group:
Registered Users
|
Ha, you just mentioned the swear word.
My brothers 1200 is almost as wide as mine front and back. He installed a BMW E30 rear sub frame into his and I changed his track rods and LCA to longer adjustable units to match the rear, in total his car is 150mm wider than stock, we are busy putting together plans to make some flares, currently the biggest thing I'm worried about, give me a few pieces of metal and I can do wonders with it, but round curves etc, I'm lost.
Posted on: 2011/5/20 7:42
|
|
|
|
|
Re: racetech's 1200 SR20VE Project |
|
Home away from home 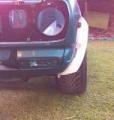
Joined:
2007/12/9 9:17
From windsor, sydney
Group:
Registered Users
|
dont want to cause waves but that cage is nowhere near FIA spec! The bend radius is way to tight and look at the deformation in the bend. it looks like it was done in a exhaust bender. it may be allright for domestic club racing ,but not FIA sanctioned events. sorry but had to clear that up. Brian.
Posted on: 2011/5/20 8:27
|
|
_________________
WARDMAN ENGINEERING
CNC machining
Race Car Fabrication
Suspension, Brake, Drivetrain modification
TIG welding of all metals
0413 595 627
|
|
|
Re: racetech's 1200 SR20VE Project |
|
Home away from home Joined:
2009/4/16 10:37
From Cape Town, South Africa
Group:
Registered Users
|
Hi wards, thanks for clearing that up, yes I'm aware of the facts that you stated, what I did, took the FIA specs and added the majority of all the pieces they mentioned as I could not get any real concise answers to what I would need for All Tar Rally's, Hillclimbs in the country, particularly because in RSA there isn't enough of these sorts of events and no rules exists. Apparently we have different sets of rules when it comes to regional races, also the age of the vehicles play role.
Posted on: 2011/5/20 8:39
|
|
|
|
|
Re: racetech's 1200 SR20VE Project |
|
Home away from home Joined:
2007/12/9 9:17
From windsor, sydney
Group:
Registered Users
|
i would love to build cars with the RSA rule book it sounds like you can have some fun with the rules, its a long process building a circuit car from scratch so dont slow down now ,Brian
Posted on: 2011/5/20 8:46
|
|
_________________
WARDMAN ENGINEERING
CNC machining
Race Car Fabrication
Suspension, Brake, Drivetrain modification
TIG welding of all metals
0413 595 627
|
|
|
Re: racetech's 1200 SR20VE Project |
|
Home away from home Joined:
2009/4/16 10:37
From Cape Town, South Africa
Group:
Registered Users
|
Just trying to find out what size pipe I had to use was fun, some of the well-known rally personalitys down in Cape Town couldn't even tell me with precision what size pipe I had to use. More or less at that point that I wipped out the FIA manual and tried doing my best.
Trying to find a rule book will be fun.
Posted on: 2011/5/20 8:54
|
|
|
|
|
Re: racetech's 1200 SR20VE Project |
|
Home away from home 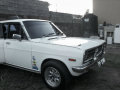
Joined:
2009/10/13 21:28
From Trinidad and tobago
Group:
Registered Users
|
Awesome build man.Keep it up 
Posted on: 2011/5/20 14:53
|
|
_________________
'71 Four Door Sedan.
A15 Engine + Lighten Flywheel.
E15 Electronic Ignition 32/36 Weber EI Coil 4 into 2 into 1 Extractors 1 3/4 Exhaust Pipe Semi Flow Hotdog 60 series Gearbox H150 Diff.
Street Sleeper!
STILL LIVIN' THE 70'S LIFE !!
|
|
|
Re: racetech's 1200 SR20VE Project |
|
Home away from home Joined:
2009/4/16 10:37
From Cape Town, South Africa
Group:
Registered Users
|
19 June 2011 - Bodywork II        The last couple of weekends 90% of our time was spend getting the body ready for paint, after a total of 6 weekends in a row I'm glad to say the body is coated in at least 3 coats of grey primer. Besides the roll cage, bodywork isnt fun, but at the end of the day if I look back, I'm glad it is done, now it can sit in the shed until the weather is good for colour to be added to the very dull grey that it is currently. Even with the help of an orbital air sander, sanding still takes time, I reached a point with the preparation that I want to say, I hate sanding, but then the thought creeps back in mind that there is still doors, fenders, bonnet and boot lid left; this leaves me with only one answer left, and that is that I just have to like it until it is done. The thought have come to mind to take it to someone to do it, but my last experience wasn't one that I want to experience again, just after I bought the car I took it to a body shop for a fresh coat of white paint and the results was shocking.    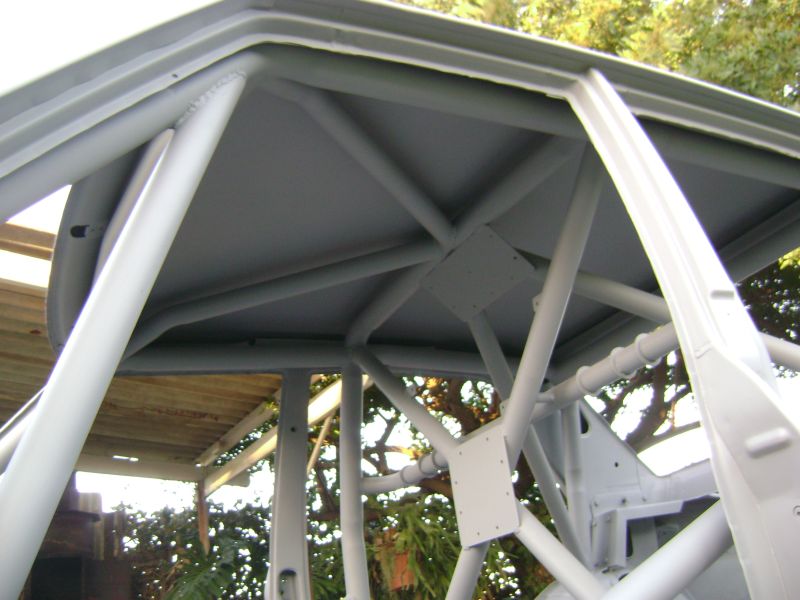   A few people have asked me when I think the car will be done, the easy answer will be hopefully this year still, previously I have set targets for myself and every time the target date came and left equally as fast, the problem is that there is only so much work that can be done on a Saturday. Now that the body is coated in primer, I'll start focusing on getting the rest of the loose panels done, just for interest sake, it takes roughly 4 hours of sanding to get a door sanded if there is no repair work involved. Luckily during this whole sanding process I have been able to make good progress on the front suspension, especially the planning and parts acquirement. Pillow Ball Camber-Castor adjustable shock mounts: these arrived back from laser cutting, just need to drill and tap them all the holes to size and test fit them, maybe make a few changes to allow to fit flush with the shock towers. I'll be using the D2 front spring retainers and pillow ball bearing mount. Lower Control Arms: M18x1.5 rod ends purchased for the mounting to the cross member and the bush that will be attached to the LCA is back from machining, on the outside I have sourced a set of Nissan 1Tonner upper ball joints to use, these are nice and strong and mounting is done with 4 bolts. The mounting plate for the ball joints came back from laser cutting, this piece will be welded to a pipe on the outside. I have opted to use pipe as it will be the easiest to work with and is strong in all direction. Track rods: these will also be from pipe with bushes machined to be attached to it with the correct thread for the rod ends, in my case I purchased 4 rod ends with M16x2 thread, 2 off which is left hand thread to make adjustment easier, only the bushes is outstanding and this will be the next items to be machined. Knuckles: I decided to use a set of Nissan S13 knuckles to form the basis of my front suspension in conjunction with the D2 RX7 coil overs, the only challenge with them so far was the fact that the shock mounting face was too big and had to be milled down to accept the coil overs, this is completed and I'm very happy with the results. Spacer-Converters: Seeing that we had 2 of these converters laying around, my brother kindly donated them, these units was made to convert 4-114.3 pcd to 4-100 pcd, I just had to machine to inner bore to spigot on the S13 hubs, they will be send to the engineering shop to have the previously cut 12mm thread drilled and countersink to accept a set of new studs.        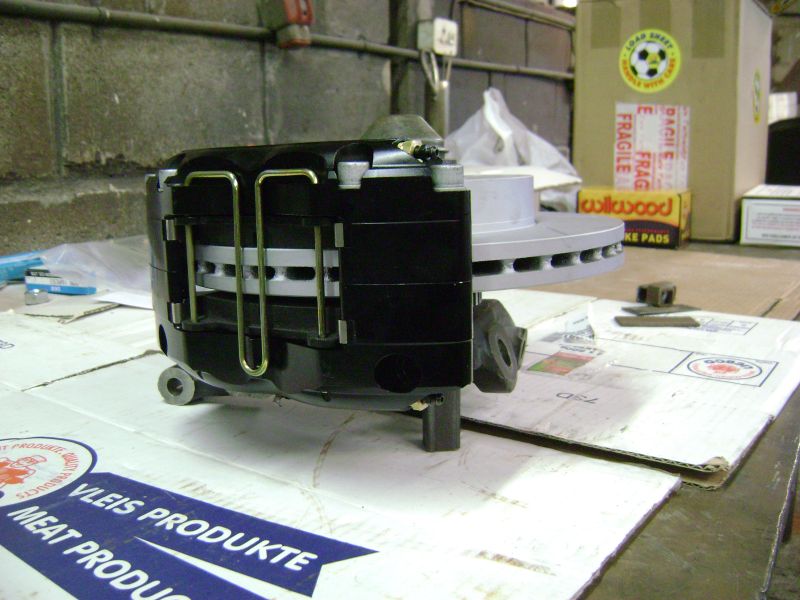  Brakes: Brakes: After a lot of headaches, I finally decided to purchase a set of Wilwood Dynapro Radial mount 4 pot calipers and pads, they are currently on their way, choosing the rotors was the easiest of it all, went for a set of GT Series Powerbrake rotors in the size of 257mm which will allow the calipers to clear my 13" wheels, these arrived. Chassis: after a little thought I decided to remove the original track rod mountings, this would allow me to build my own mountings which will allow me to set the height on the track rod location. I had a set of base plates cut and bend, these must just be shaped and attached, then it is on to the track rod mounting, the base plates will also form the basis for the anti-roll bars front mounting, originally the anti-roll bar was located behind the track rod mounting, this one will be in front in order to use a straight anti roll bar with arms to the LCA. The above is the primary reason why I hate sanding so much, with a table full of suspension parts to play with, who wants to sand. Further to the front suspension, I was able to put the plans together for the Surge tank, Oil breather tank and Radiator expansion tank.
Posted on: 2011/6/24 10:50
Edited by racetech on 2013/12/23 12:36:22
|
|
|
|
|
Re: racetech's 1200 SR20VE Project |
|
Home away from home Joined:
2009/4/16 10:37
From Cape Town, South Africa
Group:
Registered Users
|
13 August 2011 Front Suspension   The last couple of weeks was quiet busy with background planning being done and a few smaller parts being made. It almost feel as if we took a break after the last coat of primer was sprayed. Racing and other stuff kept me busy on the weekends, at least we were able to work on a Surge Tank, Oil Breather Tank, these are 90% done. In the meantime I found a guy that is a certified aircraft welder that do aluminium welding in the evenings as a hobby. He was able to weld my Radiator Expansion bottle quite quickly, but what a piece of art his welding is, this was the first part that we had laser cut out of aluminium, just to test the overall experience, the down side to this is that it sparked a nerve to redo a few parts on the car in aluminium as alu welding in the past was difficult. 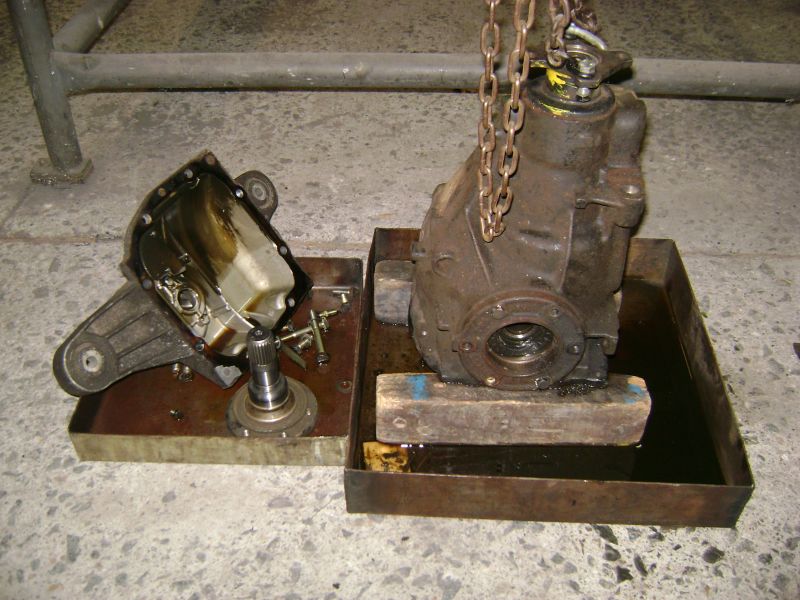 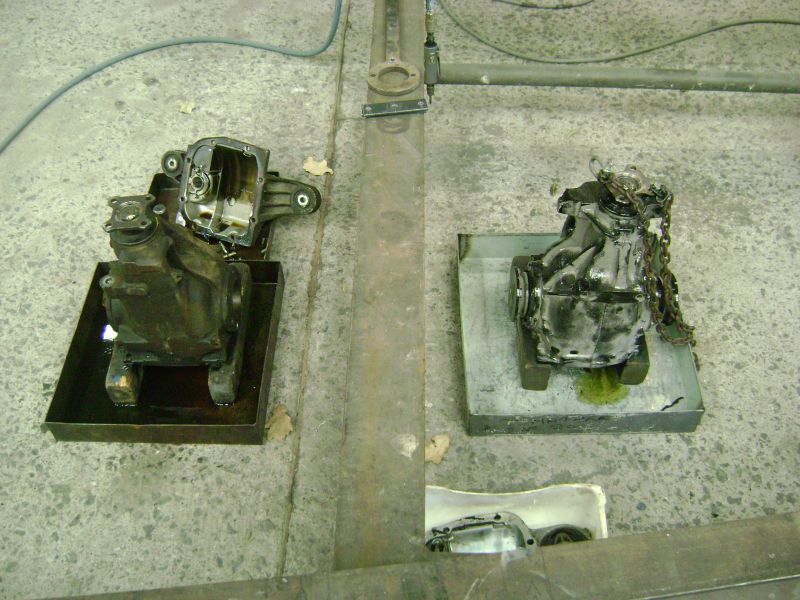    On arrival Friday evening it didn't take me long to get started as I was quite in the mood to start some work, first order of business was to remove the rear cover on the BMW E36 differential I bought for the ratio, being 4.45:1 would be an ideal ratio for Tar Rallies, hill climb and track days, maybe a bit slow for track days, but will see how it goes. Work started with getting all the parts for the front suspension together after gathering dust for a few weeks. Hubs was assembled, wheel studs shortened to keep the pcd converters in place. Then I made myself some studs with the first 6mm machined down to aid in getting the wheel nut to take thread. After all this was done the whole bunch was bolted together, all ready for some action the next day. The lower ball joint mountings was marked and the holes drilled. Seeing that it was nice and late I retired for the night.  Saturday morning started nice and early with a coffee in the hand and a lot of expectations for the day to materialize. All the preparation work of the previous night paid off as we could get started with the mounting plates for the track rods and anti-roll bar mountings. We removed the old track rods mountings a while ago as we had this plan in mind and the old ones would just not have been up to the task. These was measured and cut to the desired shape and drilled in such a way that it can be bolted to the front chassis, in case we want to change it at a later stage. Two of the original bolt holes could be used with a few extra drilled to make the mounting plate nice and strong, some extra holes were added to attach the anti-roll bar and track rod mountings.   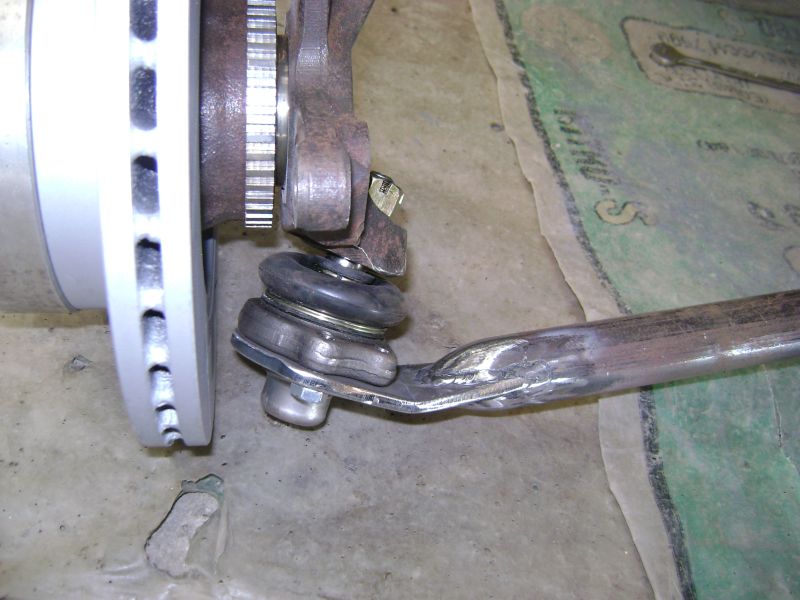    We again spend a few minutes getting the car as close as possible to ride height in order to measure the rear track from hub to hub face, now we were ready to start with the front lower control arms. My father started with the ball joint mountings, cutting the slot into the pipe and welding to bunch together, this would form the starting point on the lower control arms in order to measure the total length. While he was doing his thing I had the opportunity to do my magic on the lathe to get the threaded bushes for the track rods to size, we decided to cut them to the exact same size as the inner diameter of the pipe for a nice snug fitting press fit. Once the ball joint mount was in place we quickly assembled the lot to get the correct length of the LCA as I wanted to be able to extend the track as much as possible in the future without redoing them, not that it would ever be needed, but if I decide to redo the pcd converters and opt to use a thinner setup the adjustment on the rod end would allow for the difference in thickness and a little camber if needed. The pipe was cut to size and the M18 x 1.5 threaded bush welded in place. Afterwards me added the mounting tabs for the track rods and anti-roll bar, we assembled the suspension again, this time with coil over in place to keep everything in place.    More or less the same process started with the track rods, weld the M16 x 2 threaded bush in place, turn a rod end in and put it in place to help aid the design of the track rod mounting, we first have to finish the mounting before we can get the length of the track rod. Luckily the mounting tabs have already been cut and also a dummy base plate to aid in keeping everything in place to get the final design together. We also managed to design the anti-roll bar mountings, now just to source a company that would sell 30mm cut to size Aluminium sheet, hmmm, this is going to be interesting.   Sunday morning was all business from the get go, first things first, pack all the tools used the previous day away, just to use them again, at least I learned a while ago this helps a lot if you are working on your own, if you need something and have not use it yet, it is on its place. Two weekends ago I decided on the location of the battery, which is behind the navigator seat, this is a nice hiding place as it is out of the way, far from the fuel cell and the length of the cable could be kept to a minimum. All in all this sounds very nice, but as luck would have it, require the seat bracket to be changes to allow more space to remove and install the battery. A mounting plate was cut, drilled and made to fit, a couple of tags drilled and welded in place, once the seat bracket was removed, I welded it together on the bench, just need to cut the rear part away on the next visit.  I moved on to the differentials, luckily for me the E30 and E36 medium case BMW diffs parts are interchangeable, this really helps if you want to change the ratio as more ratios is available in the E36 models, or at least the ratios that I want to use. Started with checking the preload on the diffs before dissembling them, which turned out to be spot on with the specifications. The process to take these diffs apart is quite straight forward as long as you have some tools to aid the process, do not try to attempt this if you do not have a decent press close. Everything was marked and measured as it was removed as I was just after the crown and pinion of the E36 unit, all the bearings on the E30 unit was still in a very good condition, this opted us to press everything apart and just swop the crown and pinion. Luck definitely was trying to give me the finger as we were unable to get anything strong enough between the pinion gear and bearing. At the end of the day I packed my stuff up and took a 100km detour to home to get my uncle to press the bearing of with his half-moon puller. All this work for only this:  This coming weekend our main goal is to get the front suspension done and get the car on 4 wheels, which would aid moving the car around for spraying. Also worked out the fuel system layout in the boot. One side will be high pressure and the other side low. Low Pressure side, this will consist of feed from fuel cell > Holley Red pump > Fuel filter > Surge Tank > Fuel cell and High Pressure side, this will consist of feed from Surge tank > Walbro 255lph inline fuel pump > Fuel Filter > Fuel Rail > Surge Tank   In the meantime the following parts arrived: madevnology DASH2 LCD Display   
Posted on: 2011/8/18 10:11
Edited by racetech on 2013/12/23 12:34:52
|
|
|
You can view topic.
You cannot start a new topic.
You cannot reply to posts.
You cannot edit your posts.
You cannot delete your posts.
You cannot add new polls.
You cannot vote in polls.
You cannot attach files to posts.
You cannot post without approval.
|


;)
;)
;)
;)
;)
;)
;)
 Transfer

;)
;)
;)
;)
;)
;)
;)
;)
;)
;)
;)
;)
;)
;)
;)
;)
;)
;)
;)
;)
;)
;)
;)
;)
;)
;)
;)
;)
;)
;)
;)
;)
;)
;)
;)
;)
;)
;)
;)
;)
;)
;)
;)
;)
;)
;)
;)
;)
;)
;)
