|
|
Browsing this Thread:
1 Anonymous Users
|
|
Re: racetech's 1200 SR20VE Project |
|
|
Guest_
|
My temp fixes usually turn into ongoing fixes lol
Posted on: 2012/3/3 6:43
|
|
|
|
|
Re: racetech's 1200 SR20VE Project |
|
Home away from home  
Joined:
2009/4/16 10:37
From Cape Town, South Africa
Group:
Registered Users
|
10 March 2012 - Cape Town meet Datto   Two week since my last visit to Datto, only the second non-working weekend since November last year, maybe it was a good thing that I did something else for a change over a weekend. Luckily for me I was able to get a few things done during the two weeks. First on the list was to take the measurements or sample to the relevant businesses, the prop shaft was the 1st, 2nd the plating and 3rd the sample for the gear-lever boot. After a few visits to Tri-Torc the shaft was done to my specifications. The gear-lever boot came out looking great, just hope the red stitching on the black leather will look good once installed.      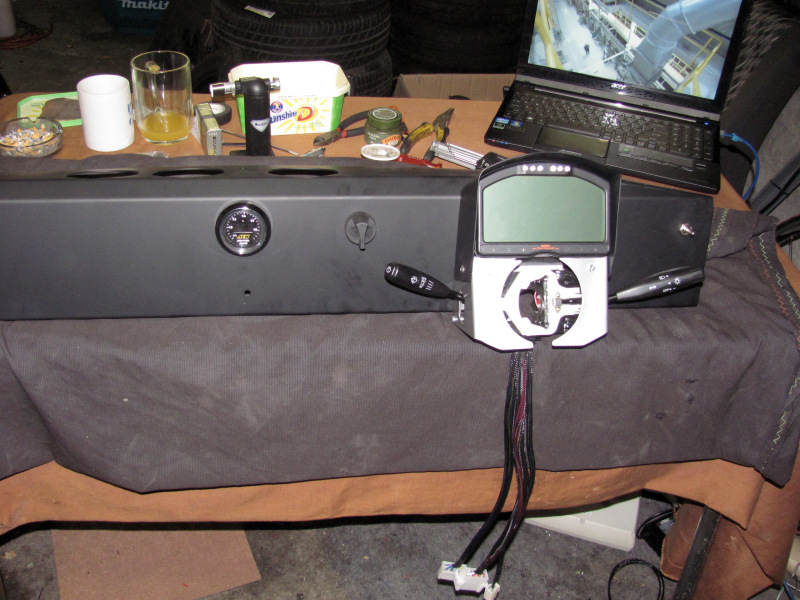  During the weeks my exhaust flanges also arrived back from laze cutting, these are cut for 63mm pipe with 3 bolts, after plating they will be ready for service, at least one less thing the exhaust shop needs to worry about once I take the car for the exhaust as I want the complete system flanged, basically before and after every box etc. I also managed to change the plug on the steering column switches to more generic plugs and installed the switches on the Dash, now it is just a matter of waiting for the car to come home for all the assembled parts to be wired.  Driving the route from Bellville to the shed on Friday I had this strange but relaxed feeling within myself, something was out of whack, normally I would try to overtake anything that is in front of me, but not this time around, I was relaxed and not in a hurry, but in the back of my mind I knew there is a lot off work waiting to be done. We all have heard the acronym RTFM (Read the f*^%ing manual) well it is not that easy if you are the person writing that said manual. I learned this past weekend that I should document even more, I actually thought I'm quite good at it, but this time round, the one thing that I did not update in my documents bit back and hard, I'm talking off 4hours + here. After a nice cup of coffee since arriving home, I started getting the rear lights working 100%, this involved fixing a wiring mistake on the front connector that goes to the female plug mounted in the engine bay for towing, connecting the wires in the cabin, how freak in long can this take, besides the part that it is a crap job, but 1hour max. Well after I fixed the wiring mistake, made a loom that connects the front and rear looms with a loom to the future fuse/relay box, I noticed that the same wiring issue was present in the cabin that runs to the back, looked at the documentation and sure, the same mistake, well fixed that, now busy with this wires for 2 hours, 1 more than I wanted to spend on it. Hooked the car up to a trailer plug, left & right flicker all good, brakes & parks dead, more or less the time when the swearing started. Went thru every wire in the engine bay and interior checking the correct placement etc., everything is 100% as documented, never expecting the rear as this was individually tested and all working. Let me just add, another 2hours later and the lights were working 100% with the same wiring issue at the back. I made a change to the looms down the line and did not update the documentation. In this case I would have been better of not to RTFM. Keep this in mind when you are the person writing the manual.   Saturday morning 07:00 looking at the car with a cup of coffee, if only I didn't waste so much time with the wires the day would be easier. I started with the power-steering fluid pipes, the mission of the day was to get all the holes covered and alignment done for towing the next morning. The pipes went in without any issues, filled the reservoir with some ATF and installed the grill, the car started looking like something. More or less at this time of the day everything went a miss and the rest was a blur, the next opportunity I found for a photo was late at about 22:30 when we had the car almost ready for towing.  During this blur the following happened. The idea was to finish the car from the front to the back, well this sort of happened, but I would rather say it happened like this, hmmm, no it is in possible, my father was busy with this, Selina was doing that, I was running around the two while trying to get my own little job done, madness. Prop shaft was bolted in, with the most expensive 4 little bolts I have ever seen in my life, R298 for 4 M10 x 25mm bolts, well I must add this is genuine BMW E30 prop shaft bolts, but still not an excuse to be that expensive. Gearbox filled with enough Redline MT90 to keep it happy for a while. Front suspension almost completely rebuild while doing the alignment, first off the track rods was removed to install the new parts and thread cut for the front grease nipples. Alignment was adjusted which took a while, well the mission was to get rid of toe and get the front track the same both sides. Double checked and torqued every bolt. Afterwards we moved to the interior, made the new gear-lever, this time much shorter and thinner than the original, fitted the bottom dust cover around the gear-lever and reinstalled the accelerator pedal. Next in line was the rear suspension, after a few shim changes we had this thing dialled in, I think 0.5mm toe-in at the back, not perfect as I need thinner shims, but good enough to tow the car back home, then started checking bolts and torqueing the rear, what a freak in mission. Working on your back is not nice once you stand up suddenly, you are really hit with a huge change in depth. Then moved to the boot, installed the fuel cell and surge tank, seeing that I still have not found the boot catch, it was fasten with a bolt thru the number plate light mounting hole and a piece of rope, the rest of the holes covered with some clear and duct tape. By this time I realised there is not going to be enough time left, and asked Selina to start sorting and packing the rest of the parts etc. into boxes and containers, at least while my father and I was busy getting the rest done, Selina could get the rest ready for loading on the two bakkies for transportation back home. The rear doors became the next challenge for the next hour, the right doors rubber is buggered, or more to the point I messed up installing it as it is too big and hit the outer frame and is difficult closing, will redo it on a rainy day. The left door was a different ball game all together, for the love of God it was impossible to close, once you close it, you hear a solid metal sound, even thou the lock and striker plate was all working 100%. It took us almost an hour to figure out that the problem was the inner part of the striker plate not sitting low enough, once you close it it jams. A pencil grinder further and this was sorted. Installed the drivers side door handle to be able to open at least one door from the outside. Once this was done we quickly installed the bonnet and hook up the A-frame. Packed the two bakkies, by this time we were decently overworked and tired as hell.       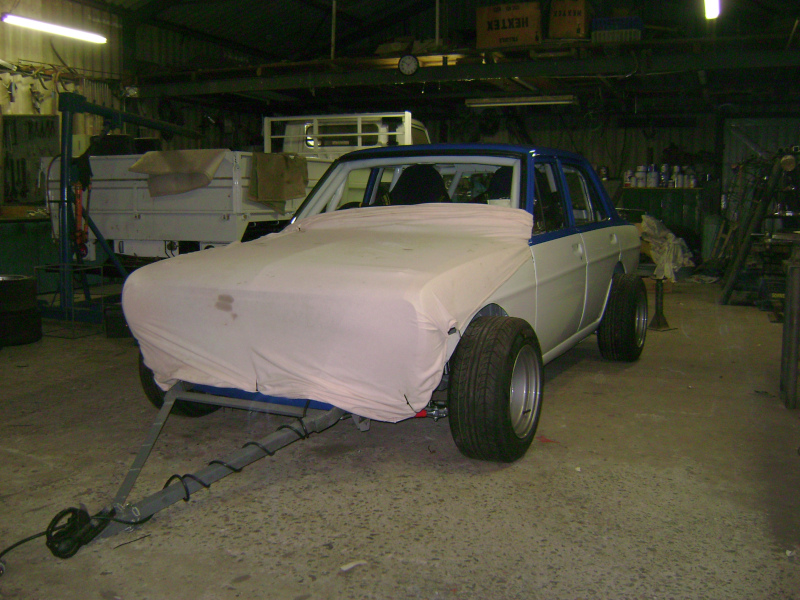 By this time it was 22:30 and I took a photo of the car ready to be towed. At this time I decided to add a blanky over Datto's bonnet to keep stones away and dust. My father decided to hook the car up to his bakkie as he never towed with it to make sure all the lights was working 100%, as with everything in live you try to do when you are tired something must go wrong. Left, right flicker and parks was working 100%, but once you press the brake pedal the flickers first comes on then the brake lights, not the sort of fun we were looking forward to, being tired we never suspected the earth, after completely going thru the wiring with a test lamp, we found the bugger off a earth was bad.    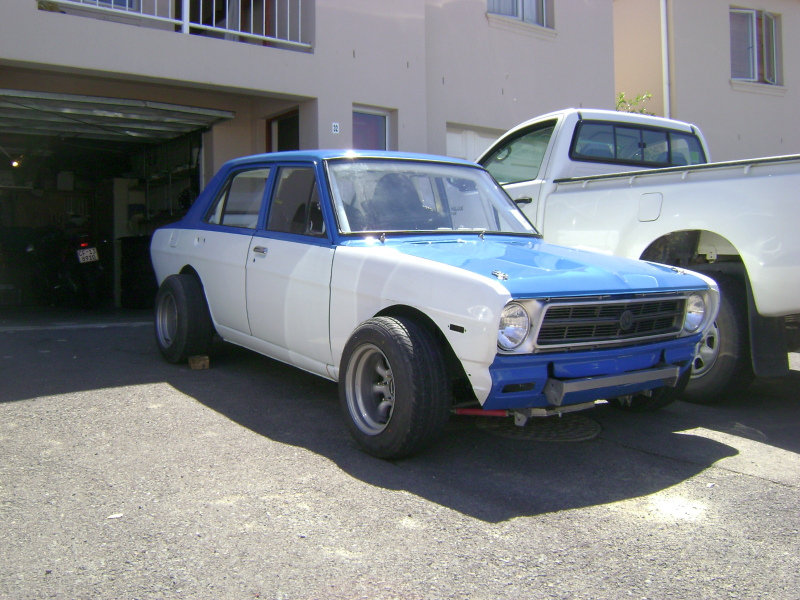  4 Hours of sleep later we grabbed, breakfast and head out for Cape Town, 06:50 we arrived home and in need for a coffee or two. One of my friends did not take long to come and give his approval as he never seen the car, by the look of things he approved, while they unpacked the bakkie I gave Datto its first ever rinse to get rid of all the dust. Know that Datto is home, the real slave works starts, every night and weekends will be used to get the car up and running.
Posted on: 2012/3/14 7:35
Edited by racetech on 2013/12/23 12:05:04
|
|
|
|
|
Re: racetech's 1200 SR20VE Project |
|
|
Guest_
|
Work out the flares yet?
Earths and wiring my weak point, you seem to have it covered mate. Can wait for its first shake down run
Posted on: 2012/3/14 9:40
|
|
|
|
|
Re: racetech's 1200 SR20VE Project |
|
Home away from home Joined:
2009/4/16 10:37
From Cape Town, South Africa
Group:
Registered Users
|
unfamilia, you coming for the first shakedown, maybe you can bring me a bootlid latch and lock.
Posted on: 2012/3/14 12:44
|
|
|
|
|
Re: racetech's 1200 SR20VE Project |
|
Home away from home 
Joined:
2009/1/10 21:02
From dominican republic
Group:
Registered Users
|
i love this thing, can't wait to see some videos of it cause im to far to see it in person :(
Posted on: 2012/3/14 14:11
|
|
|
|
|
Re: racetech's 1200 SR20VE Project |
|
|
Guest_
|
If I win a lottery I would in a heart beat. Gold plated boot latches and all.
Posted on: 2012/3/14 20:43
|
|
|
|
|
Re: racetech's 1200 SR20VE Project |
|
Home away from home Joined:
2009/4/16 10:37
From Cape Town, South Africa
Group:
Registered Users
|
20 March 2012 - Wiring III Since I started with the wiring on the car and especially while busy with the relay/fuse box, I realised why so many people hate wiring, it is properly the most time consuming piece of work you will ever do on a project, well definitely if you have nothing to work from and not scared for doing a job off it that you can be proud of. One thing that came to mind was how does a auto electrician that really does a neat job charge his clients, there is no way in hell I would've been able to afford the time it took to get my wires to the point where it is currently if I had to pay someone to do the job. It just takes to damn long, well since the car is back home, I enjoy working on it a lot more, it is now a hoppy, every joint I solder is fun and done in no hurry. I think my girlfriend had more of my time when the car was at my parents, at least she had some of my attention during the week. Anyway back to the work at hand. I don't know why I started with the relay/fuse box, maybe because the majority of the wires was pulled in and waiting for the it. The main wires running to it from the cut-out switch was replaced with a thicker gauge wire as I intend using two sets of spotlights on the car running anything between 100-150W globes. Overkill you may think, hell yes, I can't agree with you more, but I just like an old rally car with its 2-4 spotlights on, if ever I get the opportunity to display the car somewhere, it will most properly be with the spots. As things currently stand with rallying in the Cape, I don't think it would take me long to enter the car in a Rally Sprint. In fact I'll marshal at the 2012 Witzenberg Ceres Rally Sprint, before you want to throw glasses on my for not want to work on the car, it's all a part of the bigger picture, I want to go and have a look at the conditions, atmosphere etc. of these sprints, from the organizing/official side, it is a nice bunch of people making these possible, why not slap a set of other springs on the car, lift it by a mile and go have some fun on gravel. Rallying is a dream, just maybe I can try it with this car, all the work done by my father and I sure as hell is strong enough to make it to the end of at least one sprint.   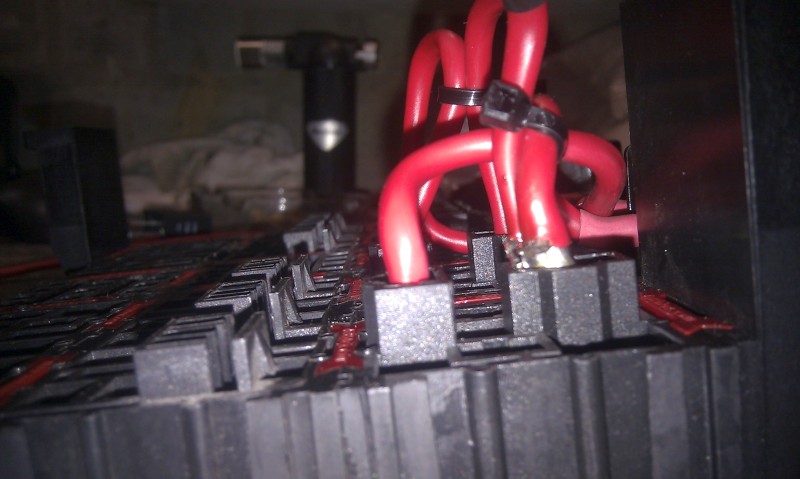   OK, back to wires. The first thing i did was figure out the way I want the layout to be of the Relay/Fuse box, easiest and most logical way I could come up was chassis on the right, fuses in the middle and ECU related on the left, let me explain. I'm running two separate feed wires from the cut-out switch to two main fuses, one for ECU and the other for Chassis related functions, these fuses then supply the fuses with power, but before the power reaches the fuses, it is switched via two main 70A relays which is triggered by the ignition switch. The logic behind this is as follows. After a lot of discussions regarding a alternator feeding the motor with power in the event that the cut-out switch has been disconnected, the above is my answer to the problem, this way all power around the car is controlled from a central point, being the relay/fuse box, in the event that the cut-out switch is disconnected, the main relays immediately loses power and opens, thus no power not even power to the alternator, which renders it useless to generate additional power. Clever hay, not overkill again, but that is just me. My brother also came up with the most brilliant idea called a switch fuse, this little bugger supply some of the switches with +12V with the ignition off, thus some of the relays can be triggered, but since the main relays is not energised, nothing will happen. Again if something goes wrong, the switch fuse will pop and render the circuits useless. Too much to try and explain in a few sentences. The main fuses is mounted just below the relay/fuse box to make managing the wires easier and neither, well at least those that will be visible. 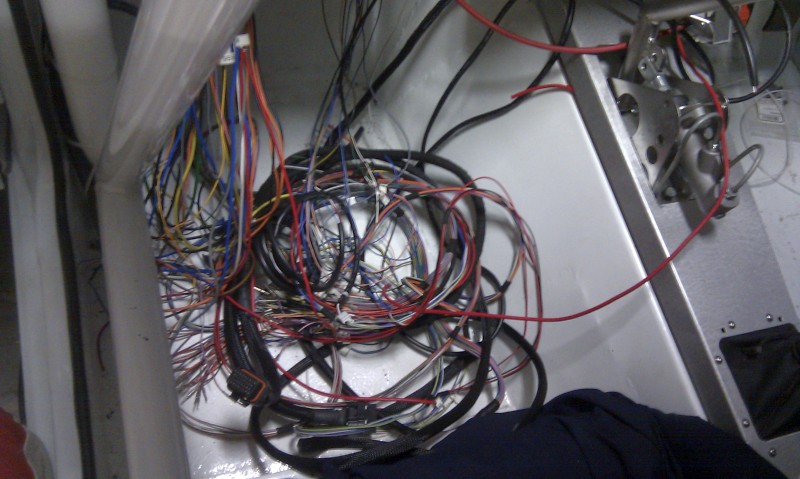  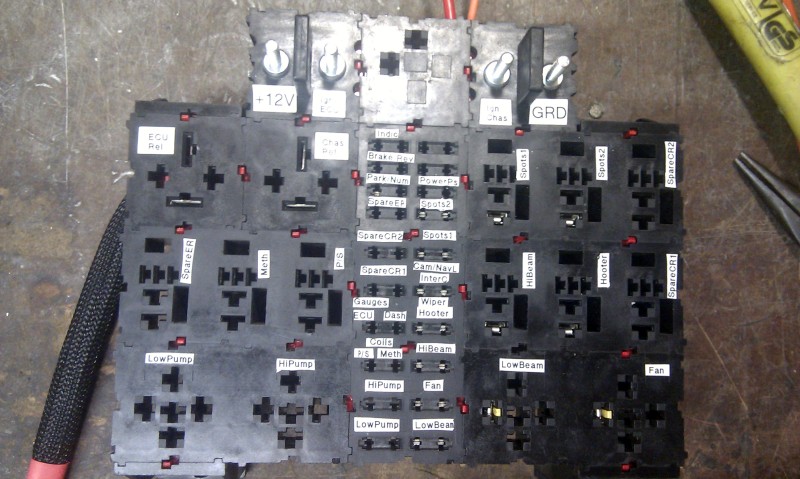      Since the modular parts I use to construct the relay/fuse box did not have buzz bars, I had to make my own. These modular parts are very nice, you decide what you need and buy the individual components and build your own. Soon after I started with the distribution off power, I realised that I will need to label the different components. The main feed wires was done and then it became a mess, with trying to figure out what needs to go were. At this point I can motivate the use off a very handy, easy to use, free application called [img width=500]http://www.expresspcb.com/expresspcbhtm/Free_schematic_software.htm" target="_blank">ExpressSCH</a> with my limited electrical knowledge I figured the application out and started drawing the schematics, thus helped me allot in understanding the logic around the different circuits. Know you can start to understand why I said in the beginning that I cannot think what a job like this would have cost me. Any way the relay/fuse box is finished, just need to add the trigger wires and output wires.    During this whole wiring phase, the car actually went to Profit Exhaust for the branch and exhaust, but at least I was able to continue with the dash wiring. During the preparations for the branch, I noticed that I need a few additional Deutsch connectors to make life easier. One for the coils and some for the ignitors. The wiring for the dash kept me busy for quite some time and up to know it is not done yet, everything is in place, but still needs to be taped up and sleeved. While I was busy with the dash I noticed in my spread sheet that I have used +-350m off wire on the car, this excludes stuff like a 7 core cable for the rear lights and ECU wiring, not allot if you consider the amount of wires they use in modern cars, but sure as hell allot for a freak in 1972 Datsun.
Posted on: 2012/5/4 11:19
Edited by racetech on 2013/12/23 12:00:53
|
|
|
|
|
Re: racetech's 1200 SR20VE Project |
|
No life (a.k.a. DattoMaster)  
Joined:
2002/10/28 6:49
From under the Firmament LOL no twiglight effect BS
Group:
Registered Users
|
towing a race car that way is ingenious. Electric cars should have such a provision just in case they run out of juice until batteries get better, then can be towed by a cow :)
Any idea on the wheel track width? looks like its getting close to AC cobra dimensions!
Posted on: 2012/5/4 11:42
|
|
_________________
"Australia" is formed by all its geographically listed territories "including" Norfolk, Christmas & Cocos Islands. The word include excludes all else before it therefore you have no legal rights.
|
|
|
Re: racetech's 1200 SR20VE Project |
|
|
Guest_
|
wow i feel like spagetti now. i bet you dont
how did exhaust turn out?
Posted on: 2012/5/4 12:08
|
|
|
|
|
Re: racetech's 1200 SR20VE Project |
|
Home away from home Joined:
2009/4/16 10:37
From Cape Town, South Africa
Group:
Registered Users
|
D I need to measure it, front and rear outside hub flange to flange is 1510mmm, will measure it with the wheels and report back.
Exhaust, that is for next time, I'm quite happy with it, will later on make my own one using mandral bends, but for now it is perfect. I'll get the branch back next week, busy getting electroplated, then I'll wrap it and install again.
Posted on: 2012/5/4 13:19
|
|
|
You can view topic.
You cannot start a new topic.
You cannot reply to posts.
You cannot edit your posts.
You cannot delete your posts.
You cannot add new polls.
You cannot vote in polls.
You cannot attach files to posts.
You cannot post without approval.
|


 Transfer


;)
;)
;)
;)
;)
;)
;)
;)
;)
;)
;)
;)
;)
;)
;)
;)
;)
;)
;)
;)
;)
;)
;)
;)
;)
;)
;)
;)
;)
;)
;)
;)
;)
;)
;)
;)
;)
;)
;)
;)
;)
;)
;)
