|
|
Browsing this Thread:
1 Anonymous Users
|
|
Re: racetech's 1200 SR20VE Project |
|
Home away from home  
Joined:
2009/4/16 10:37
From Cape Town, South Africa
Group:
Registered Users
|
13 November 2010 - Rollcage Phase 1 - Bottom StoneChip  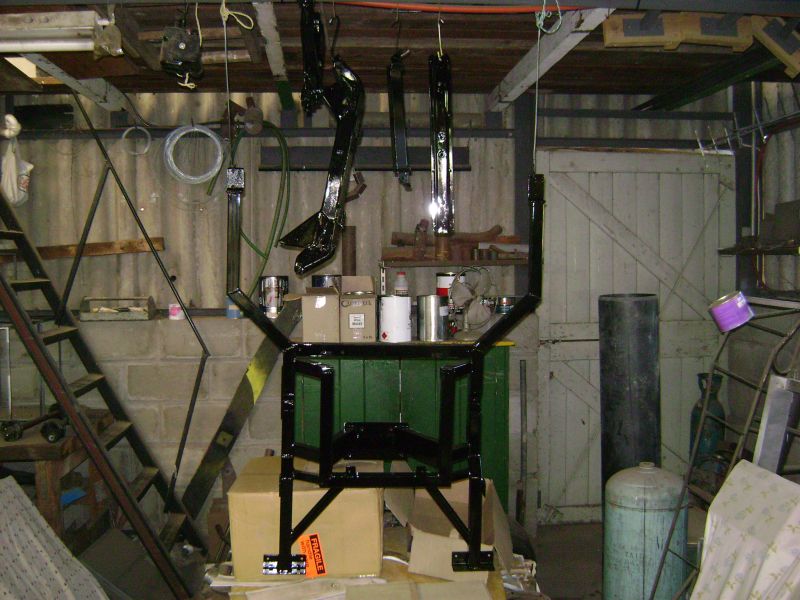  The weekend almost did not happen, as I was still feeling very bad after being ill the last 2 days, but at the last minute on Friday I decided I can just as well be ill at my parents place and when feeling better at least do something on the car, much better than doing absolutely nothing. Got home on Friday, feeling rather bad, went down to the workshop and had a look at all the parts that my father sprayed the last 2 weeks. Rear sub frame, cross member and a few of the other front and rear suspension bits all done in a nice black finish. Went back home and after my mother was done with me, I had more strength, went down again and asked my father to help me draw and measure the main roll bar for the roll cage. After we worked out all the measurements and angles we made a quick drawing and it was set to be bended the next morning. Saturday morning started with not feeling 100%, but working on the car was way better than lying in bed and thinking of working on it. At this stage of the build, it is too late to give up, too early to be excited, youre in that middle stage were you just take every opportunity and work on it, every little bit helps to get you too that exciting stage. Having that crappy feeling, I figured Ill rather put a set of ear muffs on, hear nothing and just do my own thing. Being in my own little world, I started with the support plates for the roll cage. These pieces was cut and bended to size, but still needed that final bit of bending and forming to get it to fit nice and snuggly against the old floors and wheel arches. Once this was done, I quickly went to town (60km in and out) to have the roll bar bend and lend the Mig Welder from friends of us, the owners of Budgit Fit in Worcester. After getting a quick 5min intro into welding with a Mig I was quite confident that this could be no more difficult than welding with a arc welder or Tig.    After arriving home and having lunch, we unloaded the Mig Welder and set off with a quick how-to weld with a Mig. Well after about 15minutes of welding pipe and thin pieces of sheet metal together we had the machine figured out and adjusted correctly and started with the support plates, after cleaning the floors as best as possible we started with the welding. I must say, it is one hell of a pleasure to weld with a Mig, but these machines does not like old or dirty metal, just the same as a Tig welder. At the end of the day we had all 6 support plates for the cage welded, also the rear seat rail brackets in place. Next in line was the Main roll bar, after a few trial fits and cutting to size we had it at the correct size, we quickly realized that we had to at least add a coat of primer to it before welding it in place as it would be difficult to spray or paint it once in the car, this way the top at least have some sort of protection. After spraying it and giving it a few minutes to dry it was a matter of a few minutes to have it welded in place. I opted to place it just after the B pillar of the car, this would allow me to move the seat a little more to the rear without compromising sideways vision and ease with the installation of the seats.         Sunday morning started at 8 oclock. Yea I know it is a sin to work on Sundays, but now and then you need to do what is needed. If you can braai and drink on Sundays, I can work, braai and have a beer. We started with permanently installing the rear sub frame mountings and the Shock cross member mounts. Welded the shock cross member mountings to the rear cage support plates on the wheel arches. After the final pieces was permanently fixed we started the prep work to spray the underside of the car with Stonechip. After a few pieces of newspaper and masking tape was added in strategic places the underside was covered in a nice thick coat of Stonechip. Im very pleased with the outcome and it would add that protective barrier for stones. On my next visit to the car we will either add a layer of Stonechip to the floors or make a few pieces of the cage fit, it all depends on the amount of time available.
Posted on: 2010/11/15 12:14
Edited by racetech on 2013/12/23 12:50:43
|
|
|
|
|
Re: racetech's 1200 SR20VE Project |
|
Just can't stay away  
Joined:
2008/7/30 6:37
From Trinidad and Tobago, West Indies
Group:
Registered Users
|
wow, great work.. It's coming together nicely, again i can't wait to see vids of this on the rd.
Posted on: 2010/11/16 4:07
|
|
|
|
|
Re: racetech's 1200 SR20VE Project |
|
Home away from home Joined:
2009/4/16 10:37
From Cape Town, South Africa
Group:
Registered Users
|
18 December 2010 - Rollcage Phase 2 & Lil DattoA few things happened in the last month, not that much to the Datto, but at least we were very busy with Datsuns. First things first, since the last update, I managed to apply 2 layers of battleship grey to the underside and front wheel arches, I:m pretty sure it is sealed good and will keep future rust away for a while. I must admit, it is a pleasure working on the underside of the car, no oil and other deposits that just cause chaos with the whole experience, I love it and would recommend the extra time taken to do the same to their vehicles.     Work on the roll cage is going very slow, 2 reasons for that, we were busy with 2 other Datsuns and building the cage as neat as possible is a very time consuming job, especially with all the pipe miters that need to fit decent, then welding these pieces together is no small task, you need to teach your body to assume positions that it never knew were possible. With my free time between the other 2 Datsuns, I was able to lend a hand and help my father with the cage, we managed to get 2 lateral half-roll bars and the 2 backstays in on a weekend. On the subject of the backstays, this could be the only possible part of the cage that some scrutineer could have a issue with, as out of all the FIA documentation there is no place that suggest that the backstays need to be straight, but all the pictures show it as being straight. I opted to have it following the roof line to hide it in some way, in case of a slow roll, not messing up the complete roof and to enable me to stick my head in further thru the back doors. If they have a issue with it, I:ll add 2 more straight pipes for them.  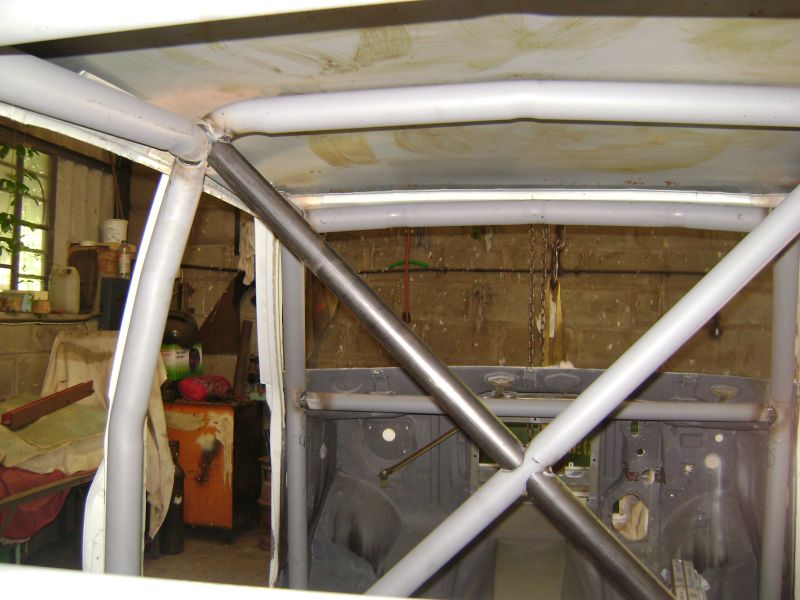   During the next weekend we managed to add the rear transversal member and the front transversal member above the steering column, we had the front transversal member that follows the roof line bend, but it became apparent that we needed 2 extra bends in it to make it fit better, you know when you look at something that it just does not look 100%. We opted to leave it out for know and added the solid pipe for the diagonal cross behind the seats.        The weekend that followed we managed to add the front transversal member, know sporting 3 bends, it just fitted in place as this was the way it was meant to be. We also managed to add the 2 separate pieces on the diagonal behind the seat to complete the cross. Some time was spared and I was able to start with some of the final or semi final installation. I wanted to start with this to figure out if I had all the bolts and little pieces needed. Managed to install the rear sub frame permanently, the front cross member was installed, but I realized that I forgot to get it:s washers electro plated, this was a sore point, but at least I know now what to get done to make it a final assembly. The logistics on this project is starting to get to a point where it alone is a little project on its own.      On my last visit we started the morning with welding all the pipes together, completely. Previously only the support plates and roll bar was welded completely. This alone took about 4-5 hours to get completed, some time was left to add the rear diagonal backstays. The rear of the cage, behind the seats is now 80% complete, only 2 supports is missing. On the front side of the cage there is still a lot of work, windscreen pillar supports, door bars, roof reinforcement, supports and gussets is missing. I also managed to assemble the rear suspension to make sure everything is in order, this looked like quite a easy and fast job, but it turned out to be completely the opposite. I forgot about the hub carriers that we had machined to take VW Golf III front wheel bearings. There was quite allot of work needed to finalize the conversion, luckily I got everything done and the car was sat down on its rear wheels and pulled out of the workshop for a fresh coat of primer to keep the rust away over the big days. Know let me explain the story regarding the work on 2 other Datsuns, as some of you would know, I retired my bakkie at the end of the season with a overall placement of 8th in the championship and 2nd in class, missed the class victory with 1 single point. It was the best season for me to date and the most fun, by no means easy as every event was a challenge as my main competition is running a 1600 Toyota 4age powered Nissan bakkie with a LS in the back. Im not looking for excuses here, but I just need to say, it is very nice to chase down these sorts of vehicles with a 1400 powered bakkie with a open differential, the amount of thought that went into controlling wheel spin could be felt after each event. Rust was taking over and after each event I could say that the bakkie was on a nice steady diet. Thanks to the :Rust Bucket: for sticking with me and performing the way you did, you will be remembered. To get back to the actual story regarding the 2 Datsuns. As the bakkie was retired and the new car is far from done, I need something to compete in next year. Our original thought was that I will just sit out until my car was done, as this would give me more time to complete it. After some discussions between me and my brother we decided that I can start the season with his Datsun 1200 until my car was done, just for the fun of it and to support the sport. But then our motor club decided that they need to be the only motorsport club that only allows one chassis number to compete, this meant that if I start with x car I need to finish with it, if I want all the points to count. This had me thinking, leave the sport, scrap the season or just go and leave marks on the track. Well this is the process and outcomes that followed our decision: Tow my bakkie and my brothers 1200 to the workshop and start the transformation. :Rust Bucket: was to enter retirement with a 1200 motor, gearbox and differential. Whilst 1200 sedan will make its start to gymkhana as a 1400. We basically started to swop the motor, gearbox, differential, suspension, pedals, etc , etc. This was one hell of a load of work, as both vehicles had to go thru police clearance and pass road worthy. We decided to finish the bakkie first as it was to be sold, currently we are still busy with the 1200. This is what emerged to date: Little Datto 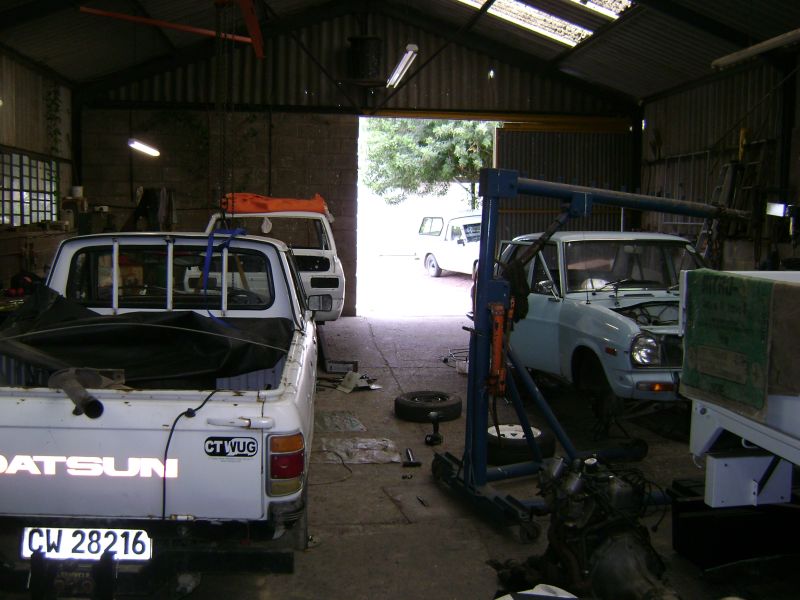          We still have a lot of work to do, suspension will be pulled apart and replaced with some trick bits and the rest is our little secret. Once we have a gap in the season or we decide to stop next season, :Lil Datto: will be pulled apart and given a fresh coat of paint.
Posted on: 2010/12/23 10:26
Edited by racetech on 2013/12/23 12:49:57
|
|
|
|
|
Re: racetech's 1200 SR20VE Project |
|
No life (a.k.a. DattoMaster)  
Joined:
2007/5/23 7:17
From Wagga Wagga, NSW
Group:
Registered Users
|
Mighty cool shed dude!
Posted on: 2010/12/23 10:43
|
|
_________________
Ryan(Zigzag) says:
mmmmm men
Jake(tuf-110) says:
i thought you might say that
Ryan(Zigzag) says:
its raining men
Jake(tuf-110) says:
oh its your day
|
|
|
Re: racetech's 1200 SR20VE Project |
|
Home away from home Joined:
2009/4/16 10:37
From Cape Town, South Africa
Group:
Registered Users
|
Just a pitty air conditioning was optional, not fun to work when it is 40 degree C plus in the shed.
Posted on: 2010/12/23 11:03
|
|
|
|
|
Re: racetech's 1200 SR20VE Project |
|
Home away from home 
Joined:
2009/1/10 21:02
From dominican republic
Group:
Registered Users
|
dude where i can get that valve rocker cover? do yo sell it? pm me if so and post the price.
cheers!!
PS: love your project
Posted on: 2010/12/23 13:10
|
|
|
|
|
Re: racetech's 1200 SR20VE Project |
|
Home away from home Joined:
2009/4/16 10:37
From Cape Town, South Africa
Group:
Registered Users
|
mpower, our South African Datsun Pulsar came out with that rocker cover.
One day when me and my brother is done with Datsun A series motors, I will remember you and pass it on to someone that will appreciate it.
What I will do in the mean time, if at scrap yards ask around, if it is cheap I will buy and and we can arrange shipping.
Posted on: 2011/2/10 14:41
|
|
|
|
|
Re: racetech's 1200 SR20VE Project |
|
Home away from home Joined:
2009/4/16 10:37
From Cape Town, South Africa
Group:
Registered Users
|
5 February 2011 - RollCage 3 & SeatsAt last work on Datto got back into full swing after the initial building of "Lil Datto", I'm very proud about the work on the second Datsun as this is the car that I will use to compete in this year Witzenberg Motor Clubs Gymkhana Series. Hopefully I will have Datto running before the end of the championship to at least enter it to gain some experience behind the wheel and if time allows on the particular day to play around with the setup.   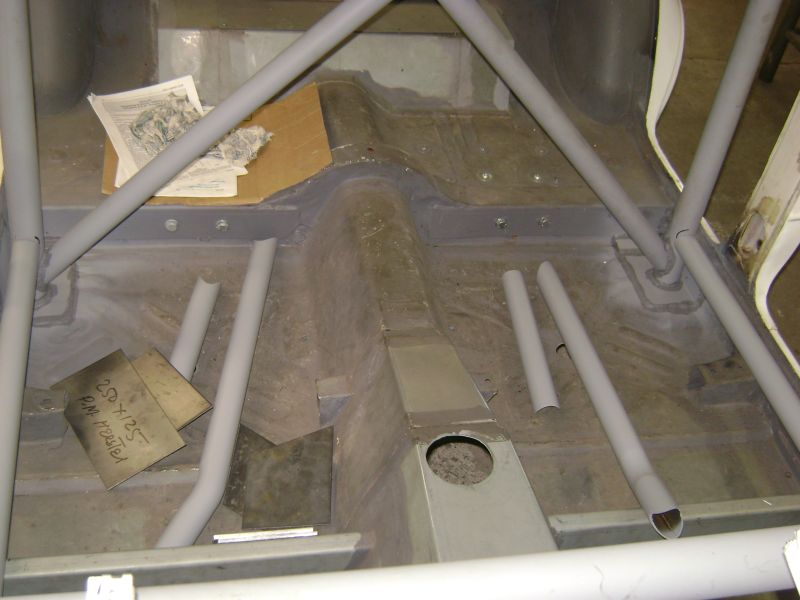      One thing that we realized was the building a roll cage was no easy task, you need to have your own pipe bender and MIG Welder to make it easier. Work started on the Windscreen pillar reinforcements, first we tacked them in place, this allowed us to manufacture the bottom door bars and the roof supports. After the previous mentioned was manufactured and we were happy we proceeded in welding the windscreen pillar reinforcements, this turned out to be our biggest mistake on the cage to date. I'll explain this to you later as I have pictures that will show it more evident. Since we made the error that we have not been aware of, the dog started to keep a watchful eye on us, he must have sense the problem but due to his communication skills could not share it.        Next on the list was the roof supports, here we opted for a slightly different than the normal configuration, instead of the conventional cross, and we went for 2 separate pipes that start in the front corners and en next to each other in the middle at the roll bar. This must have been the most difficult pieces to weld, seeing that we made the complete cage so close the roof, at the end of the day the easiest we could figure out to do the welding was using mirrors. We placed these between the roof and the cage, oh boy let me tell you, welding while having a look at a mirror image is no fun if you aren't used to it. To make this worst was the fact that the mirrors that we used were not designed to cope with the heat generated from an arc welder. Arc Welder, yes you read correct, an arc welder was the only welder we could get into the confined space. But after a few hours we had them in place with a few shattered mirrors. Installing the seats was moved to the next important components that had to be done before we could continue with the roll cage, all this due to the fact that the drivers side windscreen pillar reinforcement was too close to where we thought the steering wheel would be, so we also had to get that done before we could continue, this would allow us to make a decision the rectify it or continue.         After some trail fitment of the seats we decided that we would need some seat rails, we opted to make these in such a way that they are bolt in, this would allow us to make the necessary changes in the future if needed. The rails ended up bolting to the seat supports and to brackets welded to the roll cage and the chassis and the also bolted in the middle to the old seat mountings, this ended in a very strong configuration and the option to be removed. We then moved on to the seat brackets, as space is my biggest enemy, I couldn't use the pre made brackets and had to make my own, after a thorough read thru the documentation we set about making our won as this was allowed in the FIA Rules. We opted for two 8mm bolts per bracket to seat rail, even if only 1 was needed as per rules. Three of the four brackets per seat were easy, the remaining one was the biggest challenge, and we decided that we will have to make these outside of the vehicle. After removing the seat we tacked two pieces of square bar between the rails to keep them in place as if they were mounted in the vehicle and the made the last bracket on a workbench.  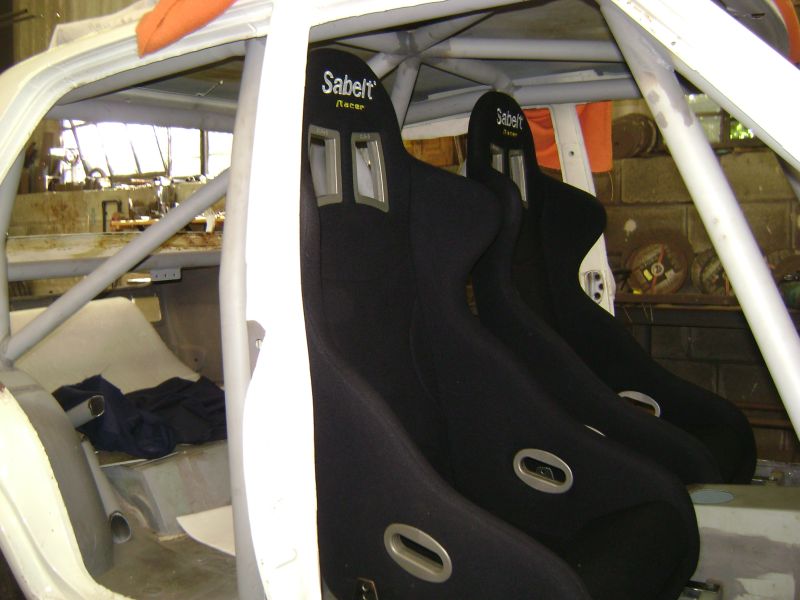              Due to the very confined space the drivers seat had to be mounted in such a way that only I will be at ease with the seating position, this is due to the bigger gearbox tunnel and the huge wings of approved bucket seats. I'm very pleased with the view from the drivers seat, originally I thought the windscreen pillar would add a big obstruction, but this is not the case.    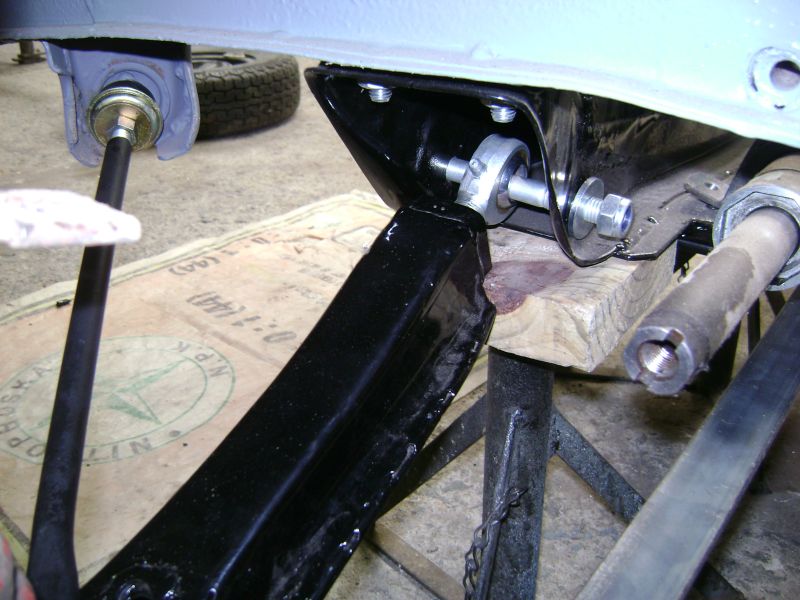     During my spare time I did a few mock up installs of front suspension, power steering rack and steering column, this allowed me to move the car around easier and to start with some much needed front suspension and steering column planning.
Posted on: 2011/3/15 10:42
Edited by racetech on 2013/12/23 12:48:44
|
|
|
|
|
Re: racetech's 1200 SR20VE Project |
|
No life (a.k.a. DattoMaster) 
Joined:
2009/8/26 6:58
From mandurah
Group:
Registered Users
|
awesomw work ,top notch fab work and a nice shed too !
youve got a nice collection going !!
keep up the great work !
Posted on: 2011/3/15 10:46
|
|
_________________
77 1200 ute
77mm bore a15 ,12:1 comp
ported and reconed h89 head
fairly aggro cam ,billet rocker spacers
twin 40mm solex carbs on bpro manifold
MSD 6al2 with 2 step limiter
4speed 60a box
hd clutch
2 inch exhaust
locked 4:11 ute diff
...
|
|
|
Re: racetech's 1200 SR20VE Project |
|
Home away from home Joined:
2009/4/16 10:37
From Cape Town, South Africa
Group:
Registered Users
|
Lucky for me is that my father is the owner of the shed, unlucky for me is that I have to drive 110km to it, to work on the car the Saturday and return the 110km home on the Sunday.
I drive the 220km there and back with a smile on my face, I would never have been able to get this far in my own garage.
Posted on: 2011/3/15 17:31
|
|
|
You can view topic.
You cannot start a new topic.
You cannot reply to posts.
You cannot edit your posts.
You cannot delete your posts.
You cannot add new polls.
You cannot vote in polls.
You cannot attach files to posts.
You cannot post without approval.
|


;)
;)
;)
;)
;)
;)
;)
;)
;)
;)
;)
;)
;)
;)
;)
 Transfer

;)
;)
;)
;)
;)
;)
;)
;)
;)
;)
;)
;)
;)
;)
;)
;)
;)
;)
;)
;)
;)
;)
;)
;)
;)
;)
;)
;)
;)
;)
;)
;)
;)
;)
;)
;)
;)
;)
;)
;)
;)
;)
;)
;)
;)
;)
;)
;)
;)
;)
;)
;)
;)
;)
;)
;)
;)
;)
;)
;)
;)
;)
;)
;)
;)
;)
;)
;)
;)
;)
;)
;)
;)
;)
;)
;)
