| Revision as of 05:37, 17 September 2010 ddgonzal (Talk | contribs) (->ddgonzal's 'Quick Rebuild' method) <- Previous diff |
Current revision ddgonzal (Talk | contribs) |
||
| Line 1: | Line 1: | ||
| - | When the engine is running, look at the '''float glass''', make sure the level is right. If it's not very close to the center line of the glass, you'll need to take the carb apart to adjust the float level (assuming you've already tested the Fuel Pump per above). A manual will be useful here. I briefly describe this below. | + | When the engine is running, look at the '''float glass''', make sure the level is right. If it's not within 1 mm of the center line of the glass, you'll need to take the carb apart to adjust the float level. A [[repair manual]] will be useful here. |
| - | Rebuilding a stock Hitachi is not too difficult '''if you are careful and patient''', so why pay somebody to do it? OK, if you are not patient, hire a good expert to do it for you. | + | {{Template:Hitachi_306}} |
| - | It doesn't usually cost much either. You may not even need new gaskets, even 20-year old ones are often resuable. Or you can get a "rebuild kit", but I think that's not usually worth it. The most you'd need is the top (float chamber) gasket, and that only if it tears. | + | = Checking = |
| + | If the float level is OK | ||
| - | = ddgonzal's 'Quick Rebuild' method = | + | {{Album|2215}} {{Album|7792}} |
| - | I've taken to just doing quick clean and inspect. You don't even necessarily need to take the carb off the manifold (makes it easy, not throttle linkage and wires to disconnect). The keys are to success are: | + | |
| - | * Be careful taking the top off, note where the parts go | + | |
| - | * Be careful of parts "flying off" or "falling out" | + | |
| + | If the fuel level is within 1mm of the dot, it is already at the correct adjustment. | ||
| - | # Take the top off | + | {{Album|6854}} |
| - | #* remove pump lever cotter pin. The hardest part is disconnecting the throttle pump linkage on the outside of the carb. This is the long lever along the top of the carb and rods that connect the throttle to the pump. There are also small clips that hold the levers. Be careful and don't lose them | + | |
| - | #* remove choke linkage cotter pin | + | |
| - | #* remove and plug fuel line | + | |
| - | #* remove choke pull-off hose | + | |
| - | #* remove the top screws | + | |
| - | # Rinse the insides off with carb cleaner. Spray carb cleaner through every passageway to make sure they are clear | + | |
| - | # Unscrew the idle mixture screw and blow through that passage. Screw it back in the same number of turns (two turns is a good starting point if you're not sure) | + | |
| - | # Don't take the throttle plate off the carb. There is almost never a need for that | + | |
| - | # If the float level was incorrect before (see above) adjust it now (see below) | + | |
| - | # Test the power valve by using a bit of hose to suck on the right passage. | + | |
| - | #: [http://datsun1200.com/modules/myalbum/photo.php?lid=2927 http://datsun1200.com/modules/myalbum/photos/2927.jpg] | + | |
| - | #: Power Valve test | + | |
| - | #: It should pull the power valve down. | + | |
| - | #: [http://datsun1200.com/modules/myalbum/photo.php?lid=1009 http://datsun1200.com/modules/myalbum/photos/1009.jpg] | + | |
| - | #: If this is busted, it can cause black smoke and lack of power at full throttle. | + | |
| - | # Put the top back on. Just tighten the bolts enough to compress the lock washers. No more. | + | |
| - | = Float Level Adjustment = | + | = Adjustment = |
| - | Quick and Dirty way of adjusting float level: | + | IMPORTANT: High fuel pump pressure can cause a high float, so if it is high, perform the [[Fuel pump pressure test]] first -- before taking the carb apart to adjust the Float Level. |
| - | 1. Take carb top off (see above) | + | |
| - | 2. turn top upside down (level). | + | |
| - | 3. The floats should hang with .418 inch space per the diagram below[http://datsun1200.com/modules/myalbum/photo.php?lid=5087 http://datsun1200.com/modules/myalbum/photos/5087.jpg] | + | |
| - | Carb float-level | + | |
| - | * if necessary to adjust float, bend the tang under the float pivot pin. Any 1200 repair book should explain how to do this if you are not sure | + | |
| - | [http://datsun1200.com/modules/myalbum/photo.php?lid=1009 http://datsun1200.com/modules/myalbum/photos/1009.jpg] | + | |
| - | Turn top Upside down | + | |
| - | [http://datsun1200.com/modules/myalbum/photo.php?lid=7793 http://datsun1200.com/modules/myalbum/photos/thumbs/7793.jpg] | + | 1. Remove the air cleaner assembly. For details, see [[Air_Cleaner#Removal|Air Cleaner Removal]] |
| - | [[Category:Fuel System]] | + | 2. Remove the top of the carburetor. See [[Carburetor Top Removal]] for instructions. |
| + | |||
| + | 3. Turn the top upside down (and level) | ||
| + | <br>{{Album|5087}} | ||
| + | |||
| + | 4. Measure that the float hangs with .418 inch space per this diagram | ||
| + | <br>{{Album|7793}} | ||
| + | |||
| + | 5. if necessary to adjust float, bend the tang under the float pivot pin. | ||
| + | <br>{{Album|1009}} | ||
| + | |||
| + | '''Reassembly''': Put the top back on in reverse order of dis-assembly. Just tighten the bolts enough to compress the lock washers. No more. | ||
| + | |||
| + | Then perform [[Carburetor_Adjustment#Idle_Speed_and_Mixture_Adjustment|Idle Speed and Mixture Adjustment]] - which will change due to changed float level. | ||
| + | |||
| + | = Bad Float = | ||
| + | See main article: [[Float repair]] | ||
| + | |||
| + | [[Category:Fuel System]]{{End}} | ||
Current revision
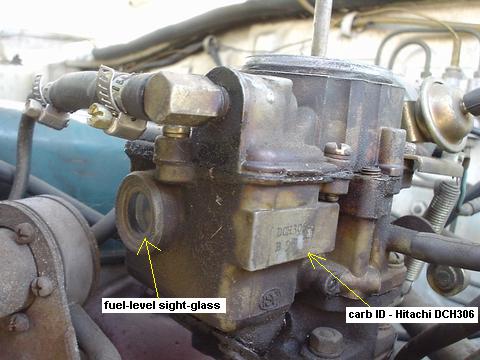
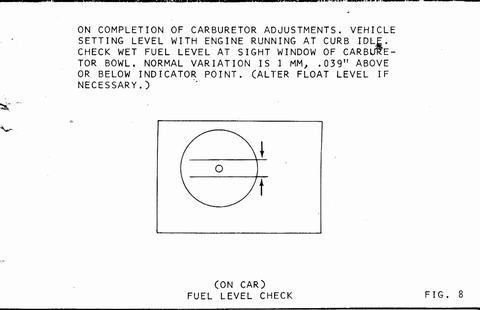
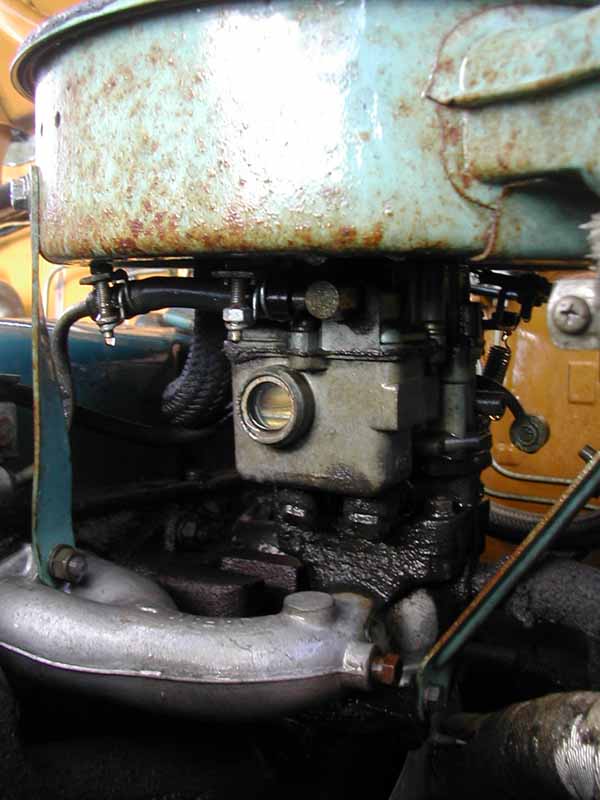
When the engine is running, look at the float glass, make sure the level is right. If it's not within 1 mm of the center line of the glass, you'll need to take the carb apart to adjust the float level. A repair manual will be useful here.
Checking
If the float level is OK
If the fuel level is within 1mm of the dot, it is already at the correct adjustment.
Adjustment
IMPORTANT: High fuel pump pressure can cause a high float, so if it is high, perform the Fuel pump pressure test first -- before taking the carb apart to adjust the Float Level.
1. Remove the air cleaner assembly. For details, see Air Cleaner Removal
2. Remove the top of the carburetor. See Carburetor Top Removal for instructions.
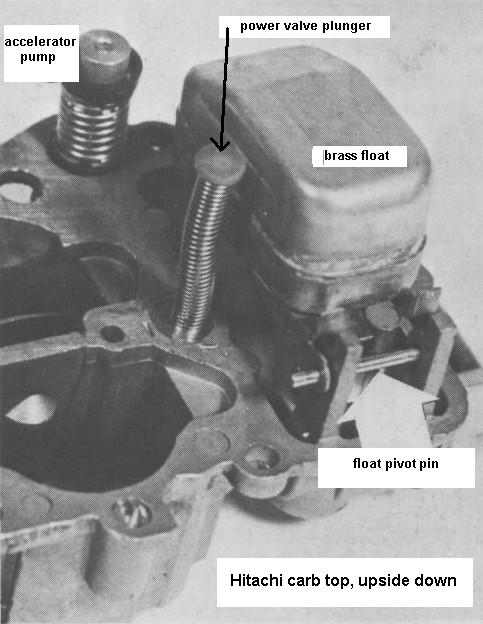
3. Turn the top upside down (and level)
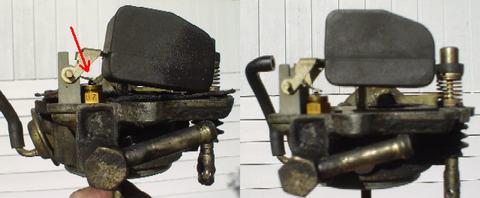
4. Measure that the float hangs with .418 inch space per this diagram

5. if necessary to adjust float, bend the tang under the float pivot pin.
Reassembly: Put the top back on in reverse order of dis-assembly. Just tighten the bolts enough to compress the lock washers. No more.
Then perform Idle Speed and Mixture Adjustment - which will change due to changed float level.
Bad Float
See main article: Float repair

![[Datsun 1200 encyclopedia]](/wiki/upload/wiki.png)
