|
|
Browsing this Thread:
1 Anonymous Users
|
|
Re: racetech's 1200 SR20VE Project |
|
Home away from home  
Joined:
2004/8/30 11:04
From Christchurch
Group:
Registered Users
|
Its a tricky one, You really want to measure what the difference in angle between the two wheels at full lock. Which is the hard part, you might want to have a browse around on the internet and see how some of the cirle track racers do it or something. It really depends on suspension geometry as to the offset as steering arm angle and offset and tie rod length will all affect it. But with my friends 260c we found that moving it is far forward as we clould (as close to the Crossmember as possible) still only gave us about 1 deg ackerman so without bending the arms (which we didn't want to do) we weren't going to get anymore. His was a custom crossmember to take a VH41de and airbags as well as R&P so I designed the crossmember in CAD. Its much easier to measure stuff in CAD!
I'd say with the standard datsun 1200 steering arms you'll be in the same boat.
I can't remember exactly what the 260c had standard but I seem to recall it had something like 8 deg. Maybe someone can chime in here with standard ackerman angle of a 1200 I believe it is listed in some service manuals.
However the important thing is you don't want negative ackerman (for the type of racing you're doing, I believe circle track racers use negative ackerman) If you were in the vicinity of 0 to 4 deg you'd be close enough. But like I say moving it as far forward as practical will *probably* get you about 1-2 deg. Thats just an educated guess though as I haven't done a R&P conversion on my 1200.
Hope that sheds some light.
Posted on: 2010/9/29 13:36
|
|
|
|
|
Re: racetech's 1200 SR20VE Project |
|
Home away from home Joined:
2004/8/30 11:04
From Christchurch
Group:
Registered Users
|
the other thing i'll add it the amount of ackerman is generally dictated by the type of racing your doing. Circle track is at one end of the spectrum having very little steering input with pretty much weight constantly on the outside wheels due to cornering forces. Too much ackerman (to much inner wheel angle) in this case would cause the inside wheel to scrub losing cornering speed. 1200's being little ecomony boxes they are would have been aimied at the general public so i'd say in racing apps you could quite happily reduce it from standard with no ill effects on the race track. Maybe it just won't be quite as nice to park when you whip done to the groceries :)
One thing i've wondered and this is more of an observation than anything is I wonder if drag links inroduce more ackerman than a rack due to the arc they travel in during movement. The reason I say this is because if you look at say some s13 struts for example the steering arms point towards the center of the car say 30deg where as datsun steering arms have a lot less angle more like 10-15 deg. That would also explain why we had trouble getting anything near standard ackerman angles for my mates 260c
So in your situation i'd be moving the rack as forward as practical as I doubt you'll end up with more than factory ackerman. It would be nice if you could quantify it though.
Posted on: 2010/9/29 21:46
|
|
|
|
|
Re: racetech's 1200 SR20VE Project |
|
Home away from home 
Joined:
2009/4/16 10:37
From Cape Town, South Africa
Group:
Registered Users
|
nick_m: You sure as hell got me thinking on this, thanks for the input. I'm busy looking for ways to measure ackerman at home, keep in mind I do not have special suspension measuring tools, do you perhaps have a few options that you would share in measuring it.
Posted on: 2010/10/1 8:47
|
|
|
|
|
Re: racetech's 1200 SR20VE Project |
|
Home away from home Joined:
2004/8/30 11:04
From Christchurch
Group:
Registered Users
|
Posted on: 2010/10/1 9:52
|
|
|
|
|
Re: racetech's 1200 SR20VE Project |
|
Home away from home Joined:
2009/4/16 10:37
From Cape Town, South Africa
Group:
Registered Users
|
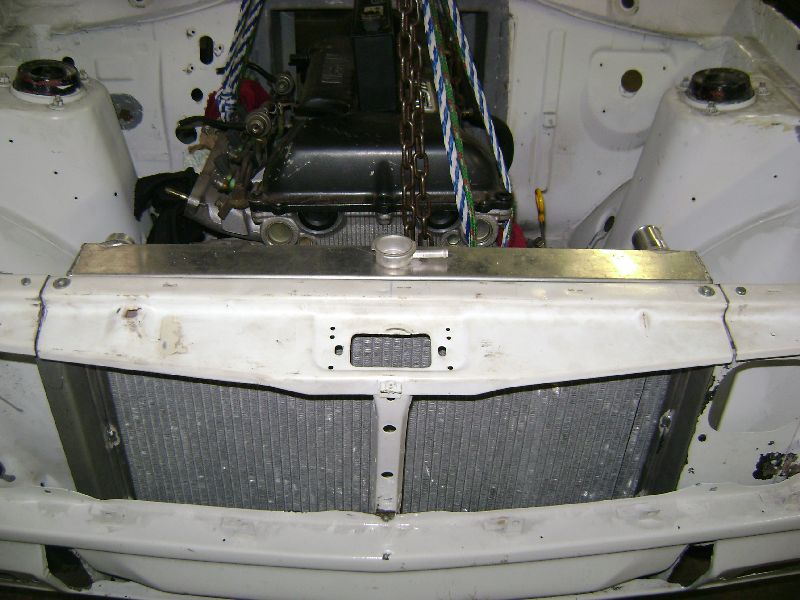
2 October 2010 - Radiator, Steering Column and Fuel Cell 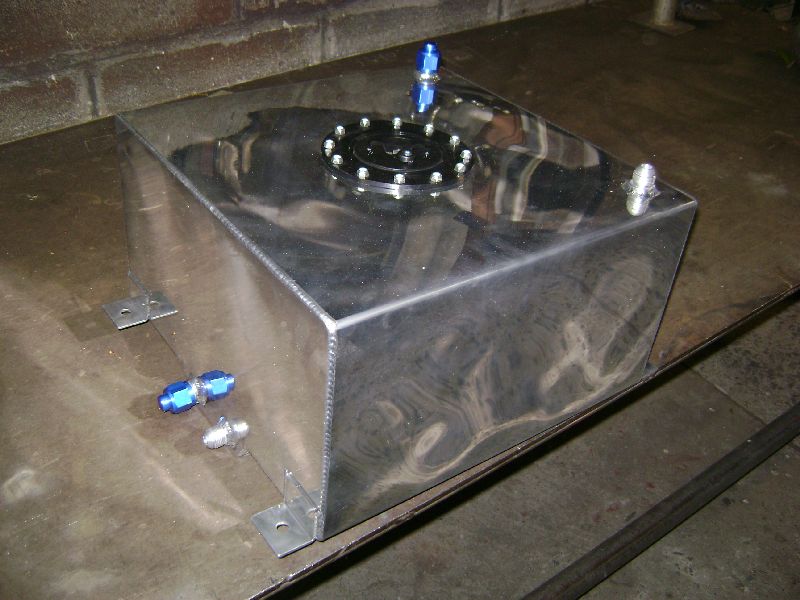 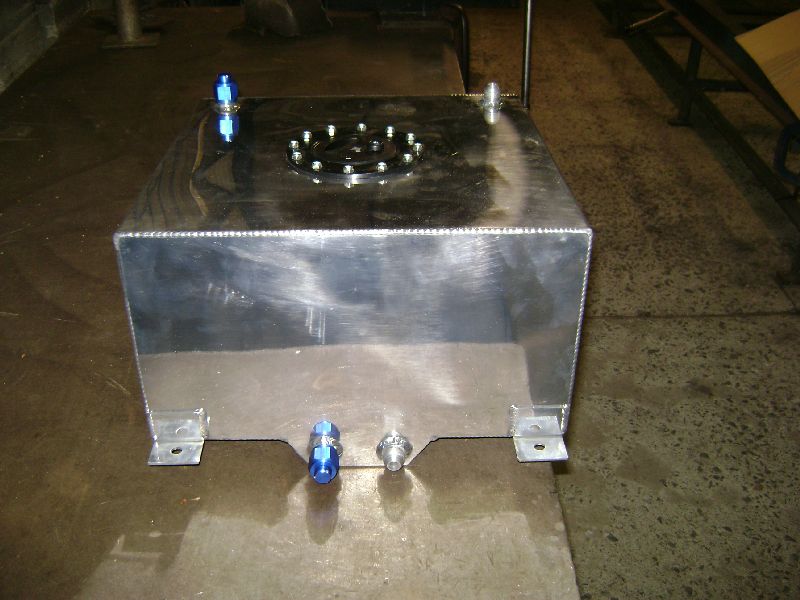 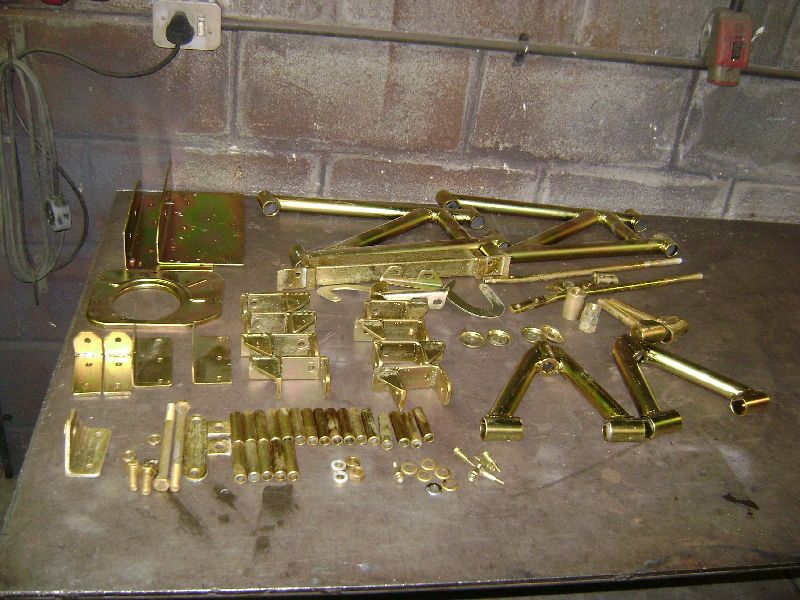 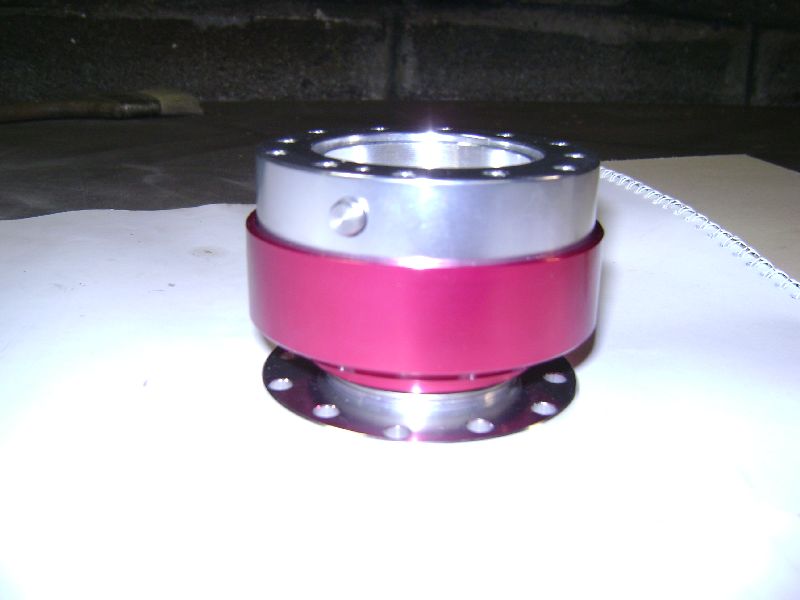  The weekend started of with unpacking the new parts and ensuring everything was in place. Just with my luck, the bulge at the bottom that houses the outlets and the mounting brackets would throw a spanner in the way I thought Ill. be able to mount the unit. The Fuel Cell is made of 3mm Aluminium with 2 inlets, 2 returns and a filler cap. The exhaust flange that I had lazercut was fitted to the motor, luck was on my side as it is a very good fit. The quick release steering hub was expected and a few plans was made to design the weld on adaptor, as Im unable to bolt it to the steering column, I will weld a adaptor to the column and bolt the hub to the adaptor. What is nice about this particular hub is the fact that it has no movement and the steering wheel can only fit in one specific place. The rear suspension parts and a few odds and ends went in for electro plating, these parts was checked to make sure everything returned. I must say, this picture creates the illusion that these parts is cold plated. 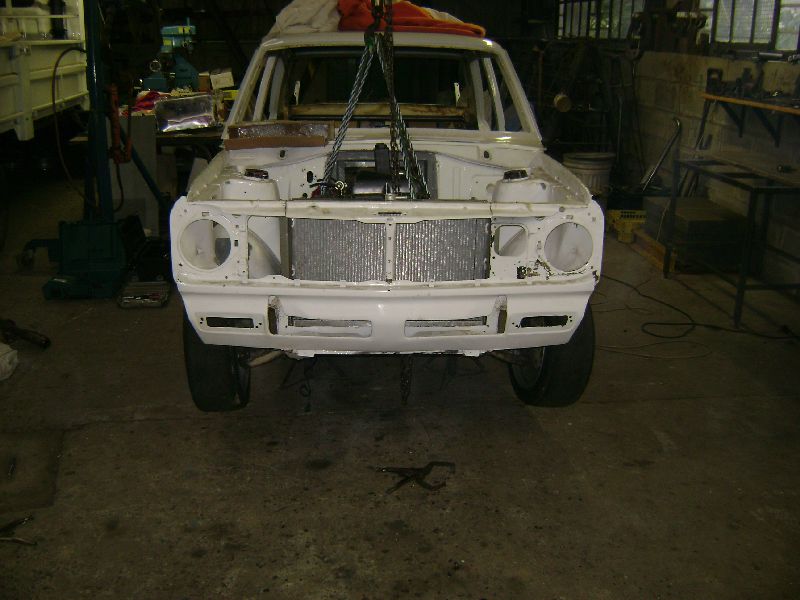    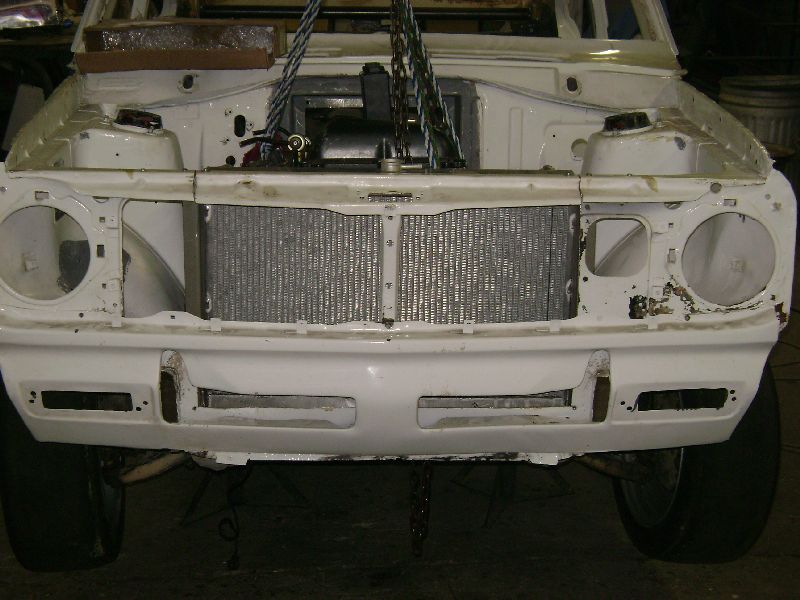  Saturday morning, work started with the mounting of the Radiator, first order of business was to remount the nose section that was cut out, to be made removable for engine installs. I had some electro-galv plate bend for the radiator mounts, these was formed to fit snuggle against the radiator support panel to follow all the different angles, was then fitted to the car with a few 5mm bolts, during the final assembly I will mount them with a layer of sealer to keep water out. The radiator was aligned and holes drilled in the unit itself and in the mountings. 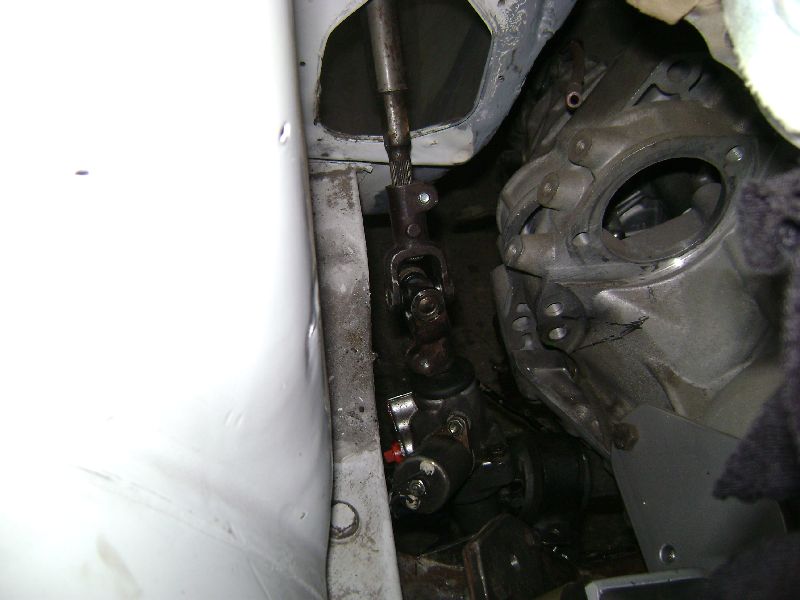   Due to the fact that I was working alone this weekend I only managed to get a few things done, next on my list was the mounting of the steering column. As the power steering rack is a Toyota Cressida Unit, I felt it would just be easier to also source a steering column from the same model, I settled for the môre luxuries model which offered angle adjustment of the steering wheel, this is the ideal unit in my case as I have a extra universal which will aid to mount the steering as I prefer it. First everything was cleaned and then everything was stripped, at the end only the shafts, bearings, universal and upper bearing carrier was left, the top bearing carrier will be used as a temporary mounting point until the seat is mounted to determine final ride position. I managed to determine the steering position by using a old bucket seat, this was then used to mount the bottom bearing on the steering shaft. Once the roll cage is at a stage where I can mount the top bearing, the final installation wil be done. To keep some Datsun/Nissan in the car, I decided that the remote reservoir bottle for the power steering fluid would be a Nissan Skyline Unit.    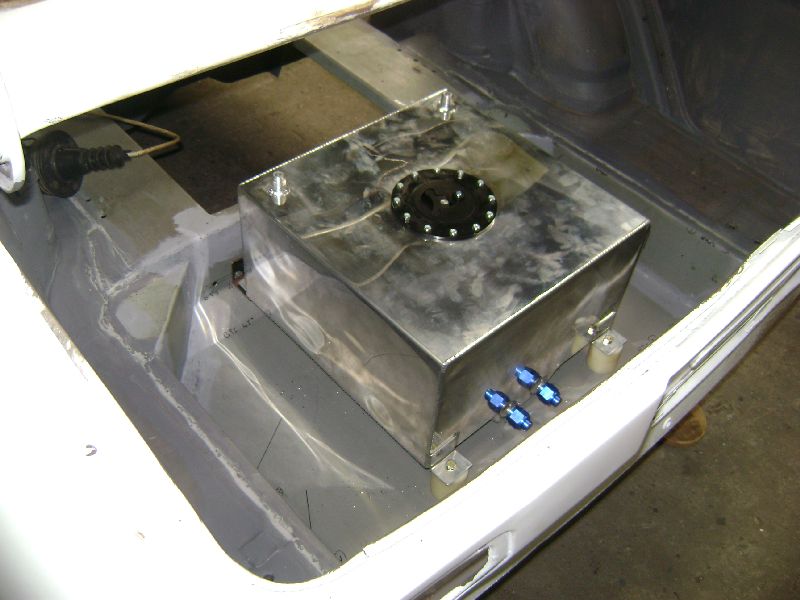 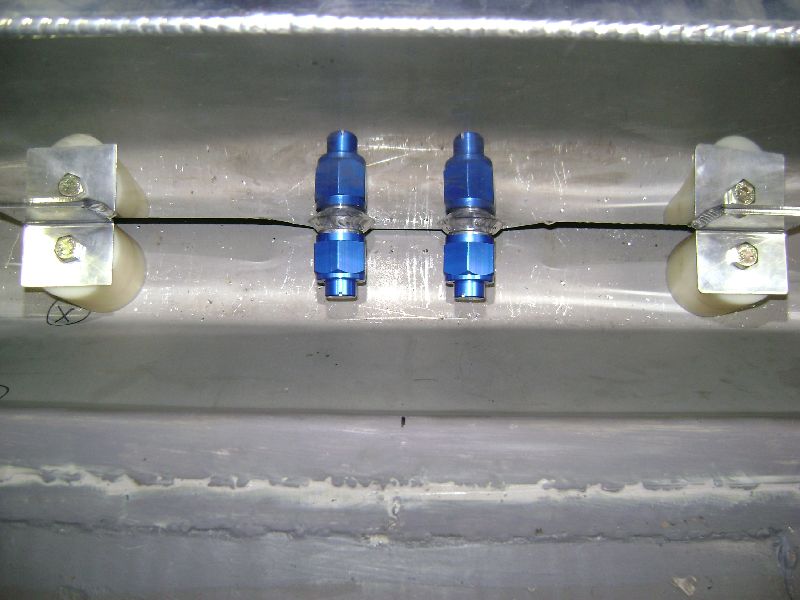  Sunday morning started with me in front of the lathe to machine the spacers for the fuel cell out of nylon. Due to the fact that it was Sunday the front mountings was cut the previous night, I had to mark out the position of the tank and drill the holes. The tank was mounted in the middel of the car, at a later stage i will measure the corner weights and adjust as needed. This also allows me to mount the surge tank with lift pump and filter on the one side and on the other the side the Hi Pressure Pump and filter on the other side. The rest of the afternoon was used to measure out the roll cage support plates on the floor and planning around the seat mounts, these can now be ordered to ensure that there is parts available for the next visits. We also found the time to measure the Ford Sapphire Hubs and Carriers, i decided to mount VW Golf III front wheel bearings in them, some minor machining will be required, these will be send of to the machine shop and hopefully on the next visit wil be done.
Attach file:
 Datto2October16.jpg (98.31 KB) Datto2October16.jpg (98.31 KB)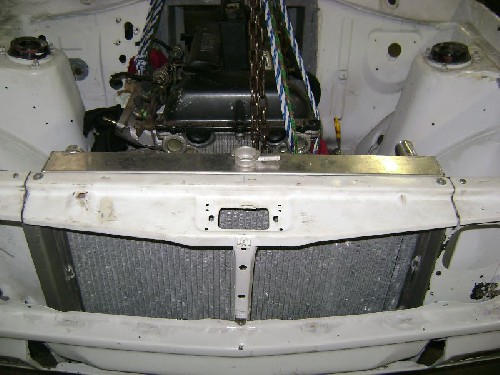
Posted on: 2010/10/8 11:02
Edited by racetech on 2013/12/24 6:12:40
|
|
|
|
|
Re: racetech's 1200 SR20VE Project |
|
No life (a.k.a. DattoMaster)  
Joined:
2009/8/26 6:58
From mandurah
Group:
Registered Users
|
hey great work being done on this thing ,but i have a question about the toyota rack ,do you need to get it shortened or will it all be right width wise ??
keep up the great work !
Posted on: 2010/10/8 16:31
|
|
_________________
77 1200 ute
77mm bore a15 ,12:1 comp
ported and reconed h89 head
fairly aggro cam ,billet rocker spacers
twin 40mm solex carbs on bpro manifold
MSD 6al2 with 2 step limiter
4speed 60a box
hd clutch
2 inch exhaust
locked 4:11 ute diff
...
|
|
|
Re: racetech's 1200 SR20VE Project |
|
Home away from home Joined:
2009/4/16 10:37
From Cape Town, South Africa
Group:
Registered Users
|
I will get the thread on the rack ends extended, this way I can cut it down to the length I need, will also have to tap some new thread in the tie rods.
This is a very easy conversion, putting together a door is more complicated.
Posted on: 2010/10/8 18:33
|
|
|
|
|
Re: racetech's 1200 SR20VE Project |
|
No life (a.k.a. DattoMaster) 
Joined:
2002/10/28 6:49
From under the Firmament LOL no twiglight effect BS
Group:
Registered Users
|
What did the galvanising cost you and do they do it in silver as the place I have
do but charge a fortune. What is the brand of the polyurethane you use?
Absolute love what you are doing, this is one the most influential threads round.
I still think you can 2 door sedan this beast using 2 door sedan sections after
all no-one would ever sell such a blood and sweat creation as this and it deserves
its icing :)
Posted on: 2010/10/9 2:25
|
|
_________________
"Australia" is formed by all its geographically listed territories "including" Norfolk, Christmas & Cocos Islands. The word include excludes all else before it therefore you have no legal rights.
|
|
|
Re: racetech's 1200 SR20VE Project |
|
Home away from home Joined:
2009/4/16 10:37
From Cape Town, South Africa
Group:
Registered Users
|
D: yes they do silver, here in RSA we call silver electro galv, blue passivated. I like the Yellow as allot of factory parts are yellow, but 2/3 of those parts will be sprayed a colour. I payed R180 ($27 AUD), it is more expensive to spray these small parts than plating them. Polyurethane Sealer is SikaFlex Pro HP2, very good stuff.
I want the access to the rear, the roll cage I will be building into this thing will not allow access to the rear from the front seats.
Posted on: 2010/10/11 8:33
|
|
|
|
|
Re: racetech's 1200 SR20VE Project |
|
Home away from home Joined:
2009/4/16 10:37
From Cape Town, South Africa
Group:
Registered Users
|
30 October 2010 - Oil Cooler & Front Control Arms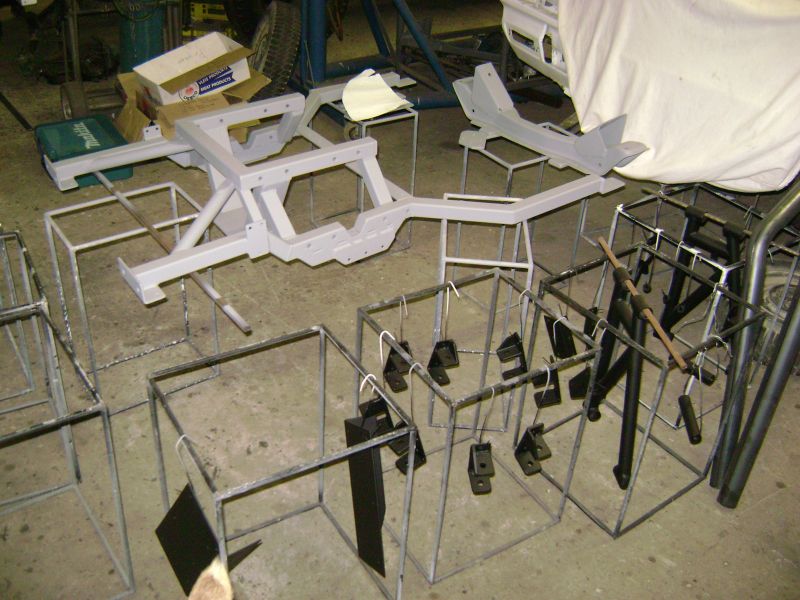     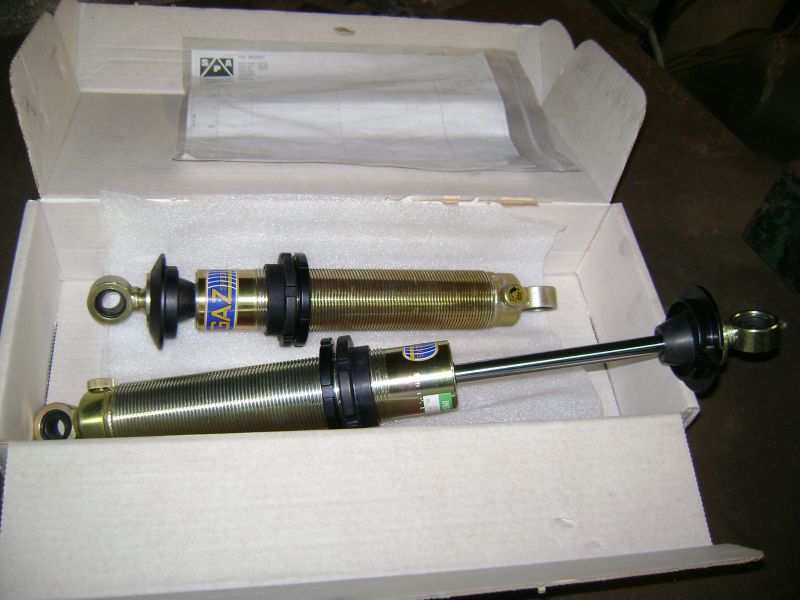   On arrival Friday afternoon I was greeted with a bunch of parts that my father primed since my last visit. I cannot wait for the color coat to be applied to them, but for that I will have to wait for the end of the month when there is time and the weather is looking better. I to had some time on my hands to source a few parts, managed to buy the new rubbers for the car, still a few outstanding as the suppliers are waiting on stock, almost the same story regarding the seats, our country is out of stock on Sabelt Racer seats, I managed to get one, well better than nothing, at least we can continue with the roll cage and seat mountings with the single unit. During the previous week I received a very surprised but welcome email from the agents of GAZ shocks, they notified me that my shocks arrived a month and a half early, I arranged a courier and was able to get them before the weekend. I must say the adjustability on these units ( Gaz Adjustable 2" Diameter bodies with 14mm Rods and Spherical Bearings - 200/125R14 ) will help allot when it comes to setup. Saturday morning started with a few changes to the cross member and rear diff cage for future improvements, not even sprayed color yet and the changes already started. Well we made provision for some additional mounting brackets and holes for mounting pipes, brackets, etc.   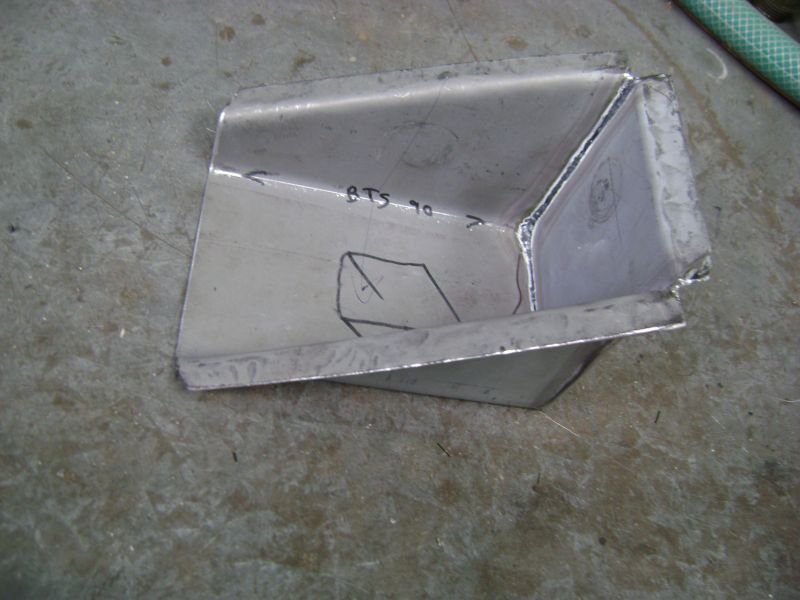     Next was the Oil Cooler, previously during planning the mounting of the unit, we decided to get a box bend that we would weld into the wheel arch to provide the necessary clearance for the oil cooler without additional modifications to the cooler. We had everything ready and started with cutting the hole for the box, welded the basic box together. After some final trimming of the hole we got to the desired size and manufactured the box to the correct size with bend tabs for welding it into place. After the TIG welder was switched of I took a grinder to it and finished it off with a flapper wheel for a nice smooth surface. We started with the mounting brackets one by one to ensure a 100% correct fit as we wanted it. 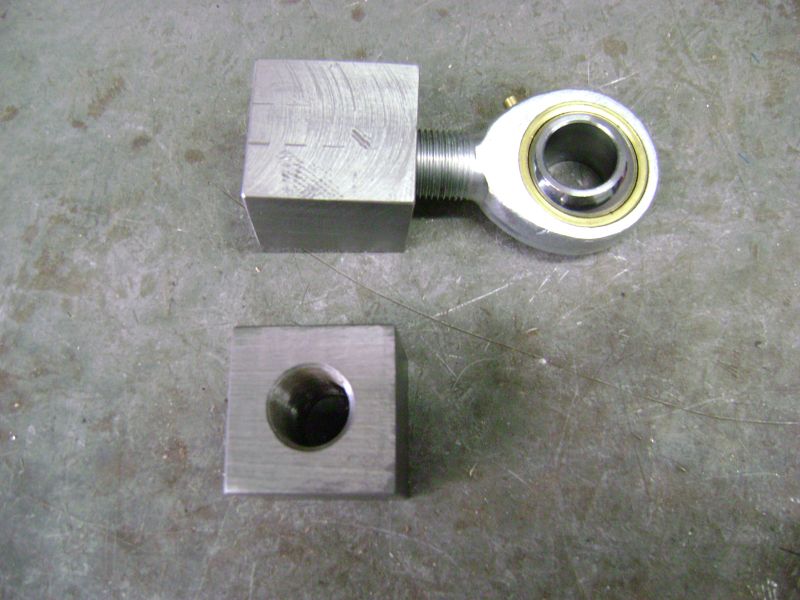 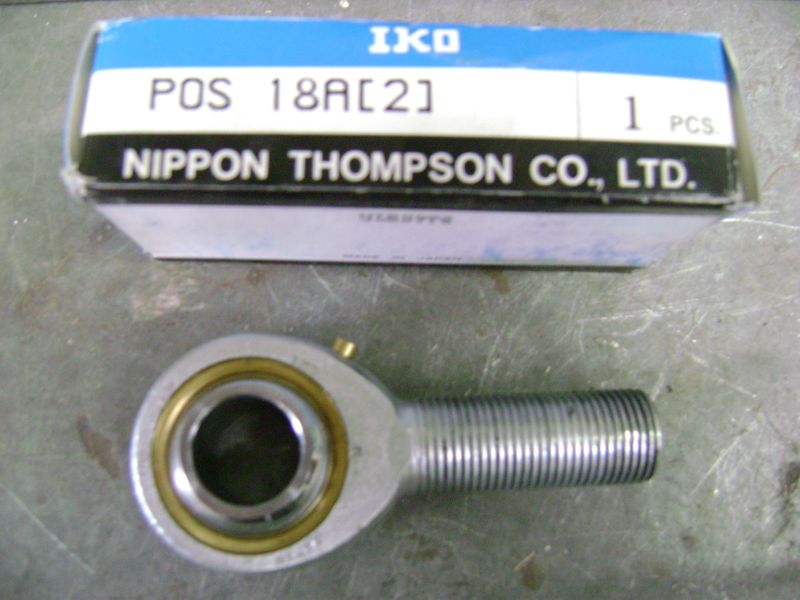  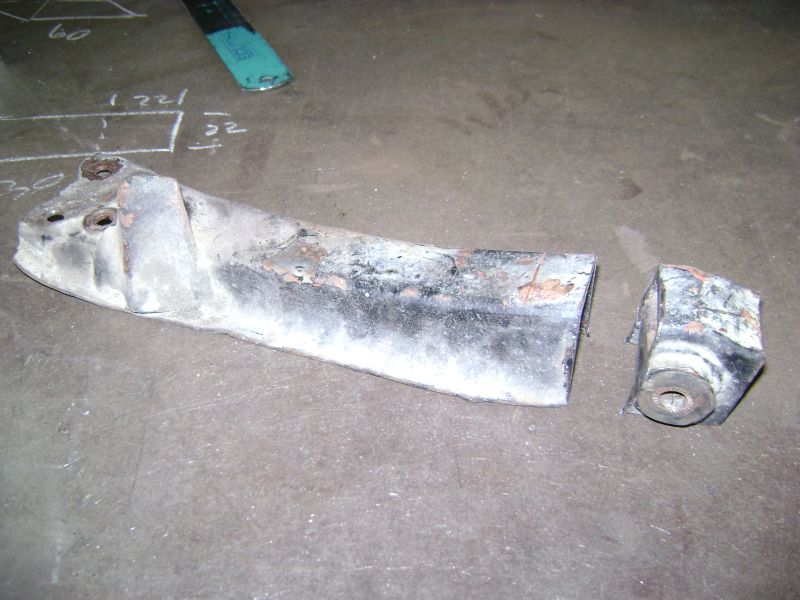 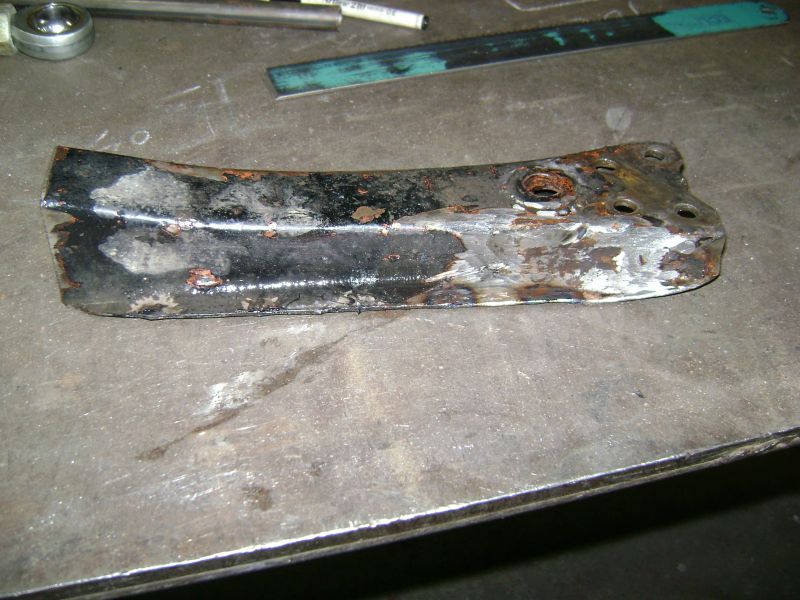    Next on the list was the front lower control arms, from our calculations, they had to be extended at least 40mm, we also decided to make them adjustable to gather for ease of setup, we decided on rod ends for the adjustable part. We sourced some solid square bar and had our machine shop machine them to size which will fit the inner diameter of the control arms. After cutting the front part of the arms off, I proceeded in removing the old support plates on them, the control arms was treated with 2 coats of anti rust paint and the new support plates welded on. Im quite confident that these units will be able to handle the added strain of running slicks and semi slicks with ease, the rose ends will also enable me to adjust a decent amount of camber and due to their amount of movement, a large amount of caster can be adjusted via the track rods. I just hope these rod ends is as strong as the price, these units does not come cheap. The rest of the evening was used to tread some of the smoothed out surfaces with primer, anti rust paint and the last of the seams on the rear interior was treated with polyurethane sealer.  Sunday morning started off where I left off the previous night, all the seams on the rear exterior was sealed up with sealer, also a few seams and spots that a missed previously. The box for the oil cooler was also done during this time. Im so glad the majority of sealing work is done, I do believe sanding the body will be nicer than sealing. Hopefully on the next visit Im able to lend a MIG welder and weld the roll cage mounting plates in place and spray the underside with Stonechip.
Posted on: 2010/11/4 11:13
Edited by racetech on 2013/12/23 12:52:56
|
|
|
You can view topic.
You cannot start a new topic.
You cannot reply to posts.
You cannot edit your posts.
You cannot delete your posts.
You cannot add new polls.
You cannot vote in polls.
You cannot attach files to posts.
You cannot post without approval.
|


 Transfer

;)
;)
;)
;)
;)
;)
;)
;)
;)
;)
;)
;)
;)
;)
;)
;)
;)
;)
;)
;)
;)
;)
;)
;)
;)
;)
;)
;)
;)
;)
;)
;)
;)
;)
;)
;)
;)
;)
;)
;)
;)
;)
;)
;)
;)
