|
|
Browsing this Thread:
1 Anonymous Users
|
|
Re: racetech's 1200 SR20VE Project |
|
Home away from home  
Joined:
2009/4/16 10:37
From Cape Town, South Africa
Group:
Registered Users
|
April 2013 - Fixing the List IILooking back at the previous update, it was a slow month waiting for parts, but at least I'm quite confident the throttle body screws will stay intact. April was a much better month when it comes to parts arriving and work being done. Orders, when it comes to waiting I'm quite bad, and these few was getting the better of me. I ordered a rotary table for the mill to make life easier drilling precision holes, no stock in the country and is waiting. 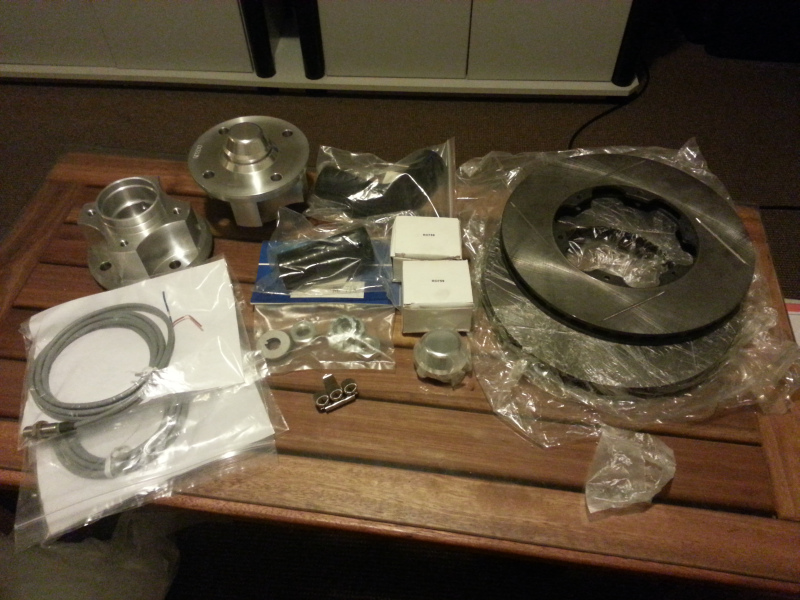 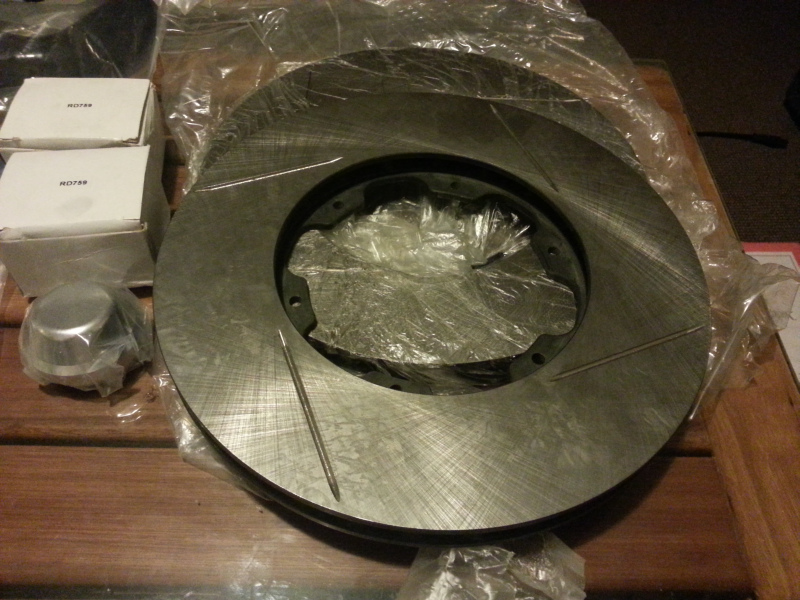 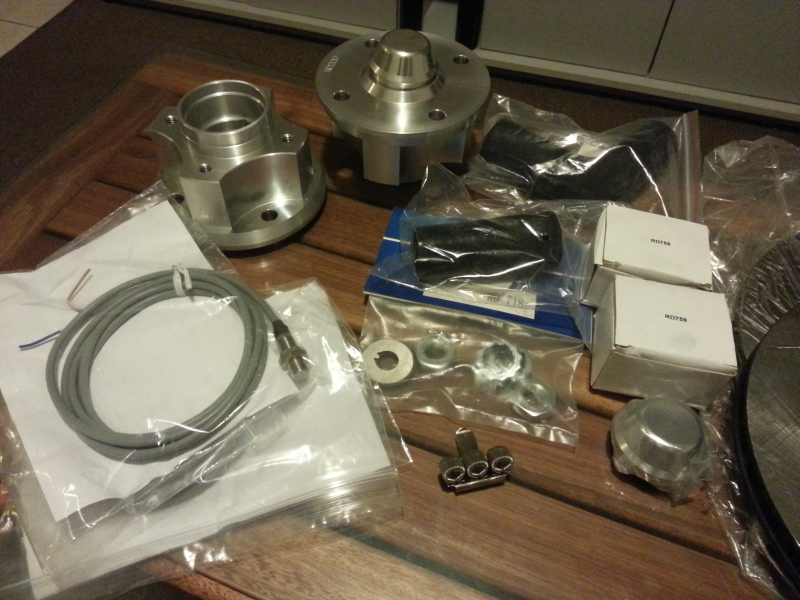 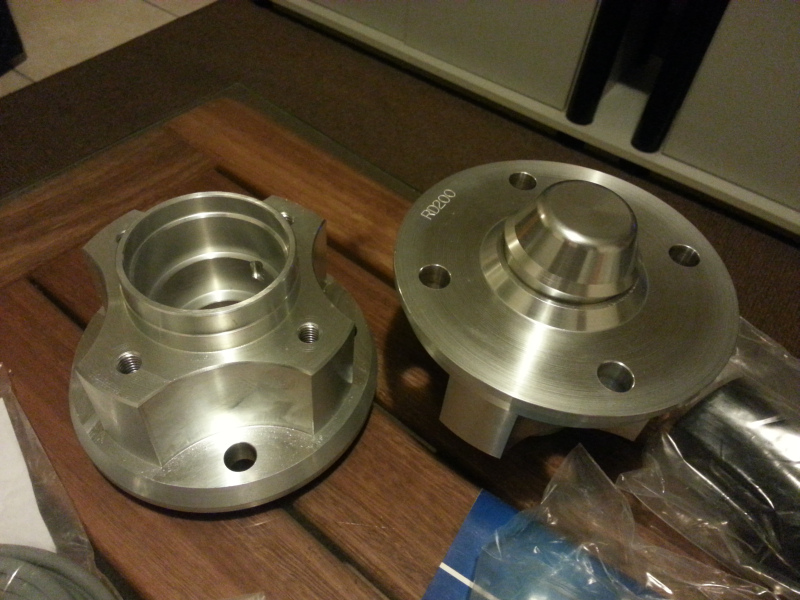 RallyDesign.com - This one consisted of Escort MK2 aluminium hubs, bearings, fastening kit, 266mm Forest Rotors, Brantz wheel speed sensors, silicone hoses and for flair a navigators pen holder. One of the reasons for the Aluminium hubs is the fact that these units uses a larger outer bearing, but still standard wheel studs. Seeing that the rotors does not have a integral hat, it is just another part that will have to manufactured, again waiting for the rotary table, on a positive note, I can at least continue with the calliper mounting seeing that the rotors can be fitted with a temporary hat.  Fittings - hose, spanners, v blocks, fittings and clamps to finish the fuel/oil hoses in the engine bay and rear fuel hoses. 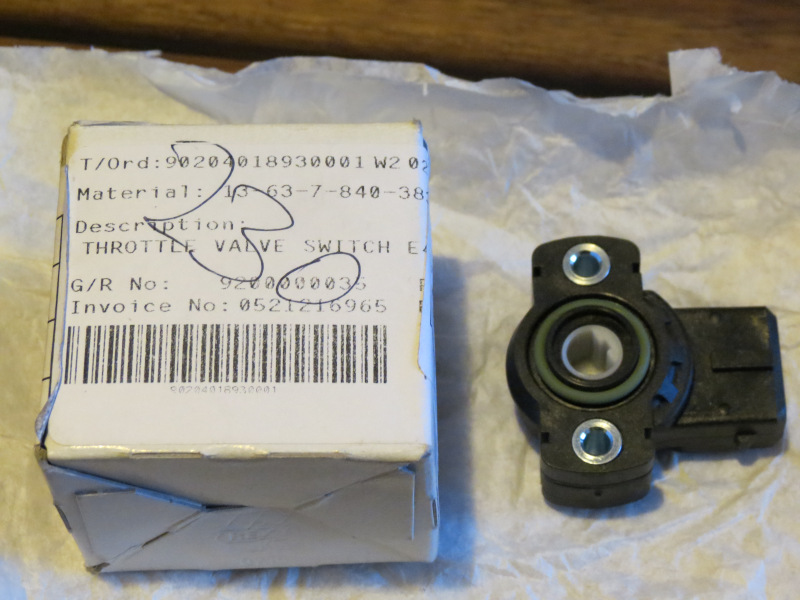 Throttle Position Sensor - if I knew I was going to manufacture a complete adaptor for the TPS I would have considered using a cheaper unit, but you cannot always win, this is a original E46 M3 unit, had to get this unit from the local agents as postage from the States would have killed me. Ball Joints - since I decided not to use Escort lower control arms and unable to source a loose ball joint to fit the Escort struts, I opted for stronger Maxi ball joint, however I had to enlarge the taper on the struts if I wanted to use them, thus I had to wait for a reamer from the States as I was not willing for another rapping from SA tool shops. 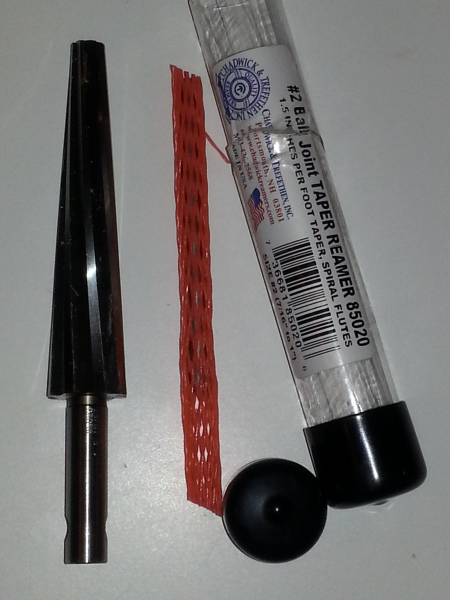 Taper Reamer - yes my first thoughts was also, damn this thing can be dangerous. This is a 1.5inch per foot taper reamer, what you are not willing to learn or research to buy the correct parts, thanks for the internet in this regards as our local part stores are either too stupid to be interested or just know a part number, not actual details around it. For those not as stupid as they, 1.5inch per foot tapers is what Ford used during the 70's and 80's on vehicles like the Cortina, Escort, Sierra, etc. onwards tie-rod ends and ball joints. At least we have a lot of work for this one, it will also be used to make tapers for my steering arms and parts for two other projects.  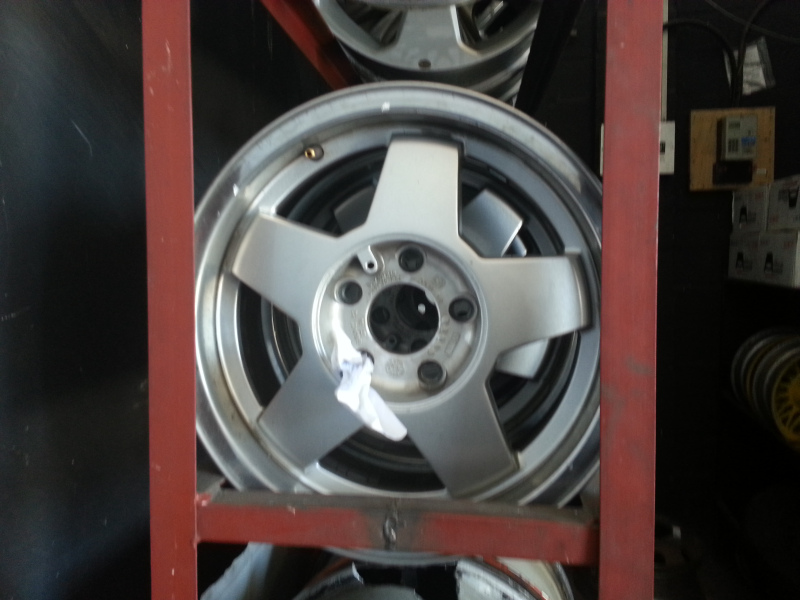 Rims - Since I decided to use 15" Rally rubber, I had to get the pcd changed of my Smith Wheels, when it comes to wheels, there is only one person that we use in Cape Town called Kassiem from A&K Magwheel Repair Centre (021 692 4412/4483). He was tasked to change the pcd and make sure they will handle the gravel roads. I'm still waiting on these, luckily they will only stop me from making spacers. While I was looking around in his shop, I noticed my next set of 15" wheels, seeing that these units are OEM VW Microbus units, they will be super strong and a good fit for the car. Fuel & Oil Hoses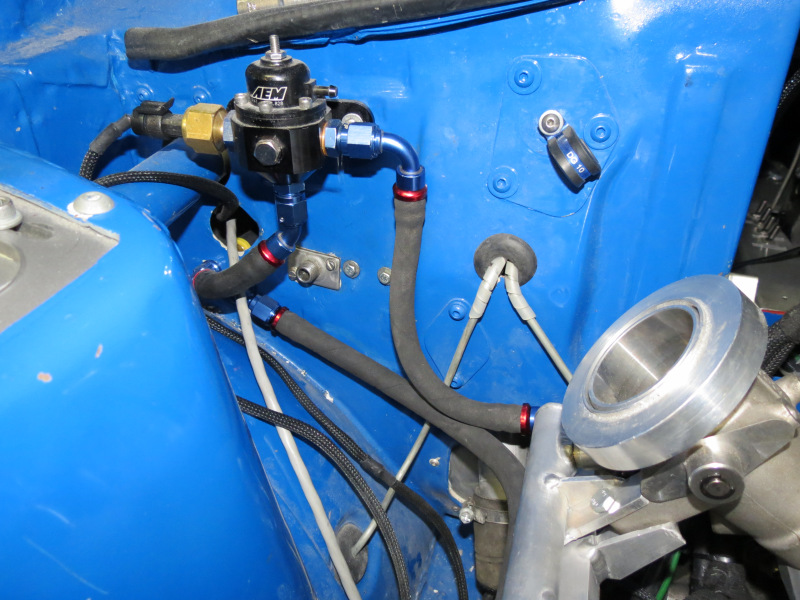  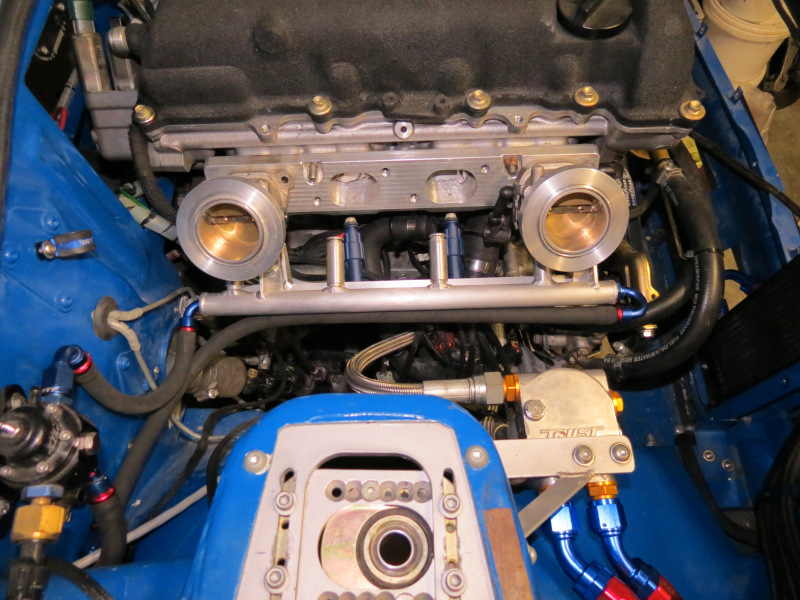 At least I did not spend the whole month waiting for parts, I actually did some work, starting with the fuel hoses front and back. These push on units are such a joy to work with, you can easily make a few hoses per night. But be damn sure about measurements before assembly as removing fittings are virtually impossible without the aid cutters and knives Now that two of the hoses in the boot is black I want all of them black, the silver are just to overplayed and hard to work with, as I experience issues with the old ones I'll replace them with black units. 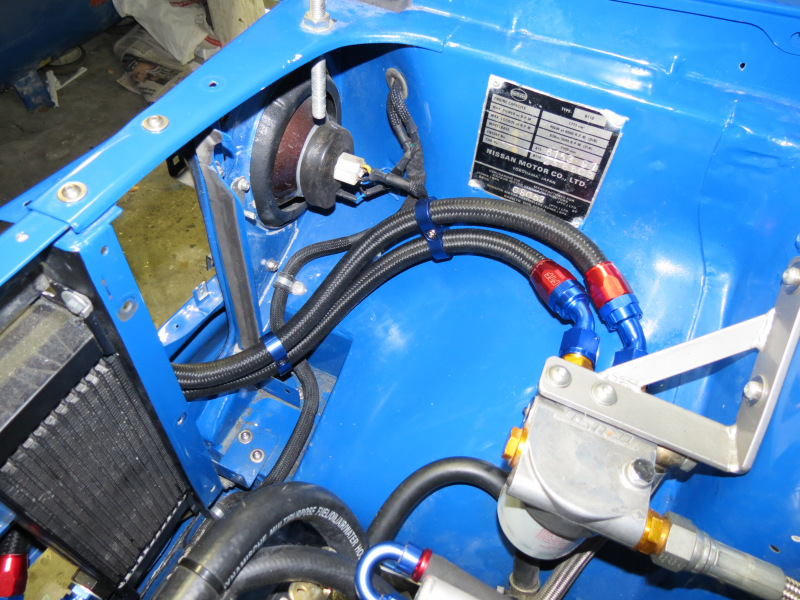  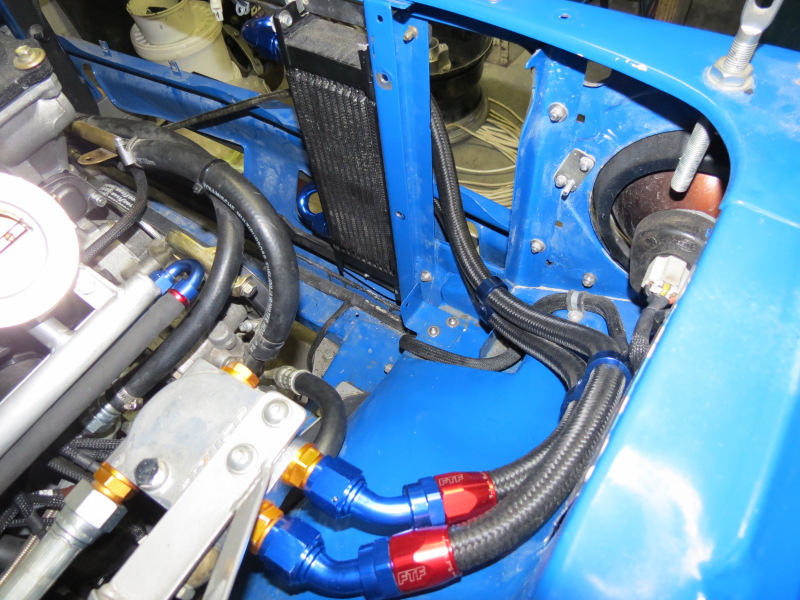 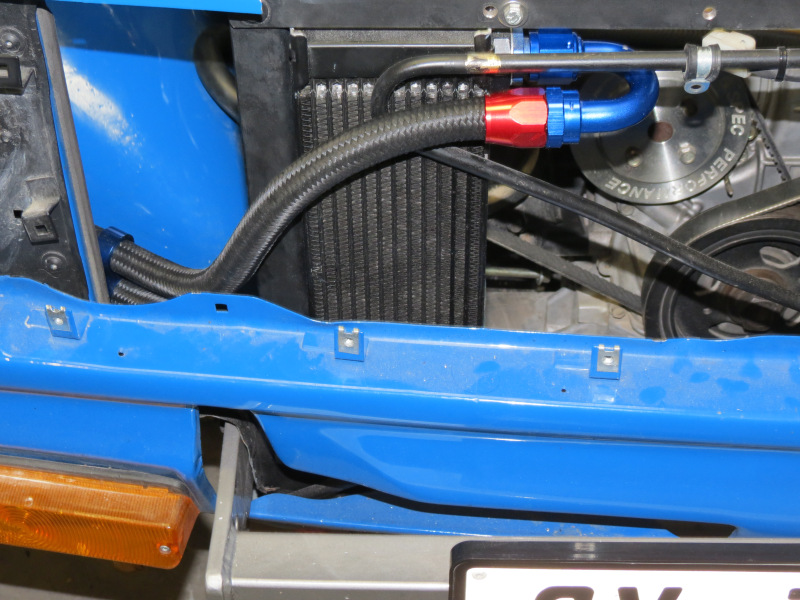 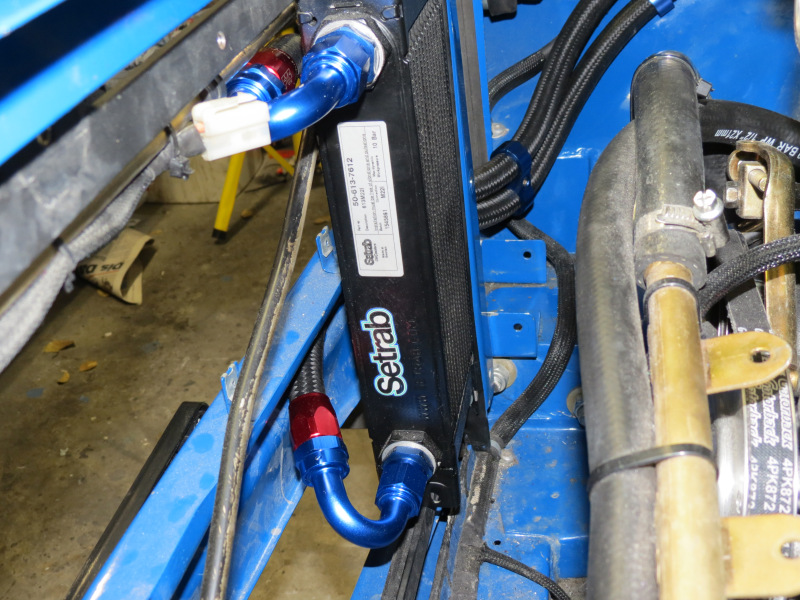 Seeing that I moved the oil cooler to the front of the radiator to aid with Intake temperatures and space was limited, I had to use some clever fittings to make everything work, here I opted for -10 AN units and Nylon braided hose, the final results is slightly different to what the pictures state as I added additional insulation in the spots were it could rub. I'm very happy with the neat outcome and will be replacing some of the old stainless braided lines with these black units in the future. Rear Shocks 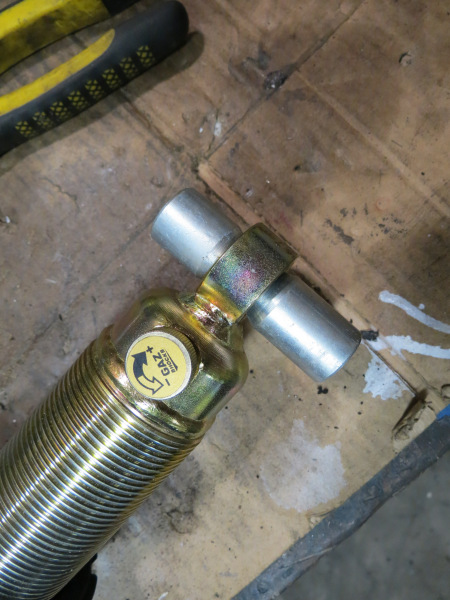  These units are originally designed for the Ford Escort MK2, I'll be using them with 225lbs/in x 12" long main springs and +-80lbs/in helpers, to always keep tension on the mains if at full droop. A few minutes in front of the lathe and the top and bottom bushes were done after some careful measuring and a few new techniques learned to cut taper surfaces. I must admit, since all the mounting is in place and originally designed for this kind of shock configuration, mounting them actually went quite easy, what took the longest was moving the suspension from full droop to maximum compression over and over to make sure nothing is touching or rubbing, especially the lower bushes.  While all of this was going on, I got my new front bearing retainers back from the machine shop as they were tasked to cut the bearing surface and circlip groove for the front top mountings, they also tapped the M18 thread in the bushes for the lower control arm's inner bearings. I'm still waiting on the suppliers stock to arrive for a set of Teflon lined plain spherical bearings, luckily I have some local units to use in the meantime. Here is a picture to illustrate how the 15" rubber will look on the car. I really prefer the look of the 13" rubber, but in RSA 15" rally rubber is just the best option without killing piggy bank. TPS Adaptor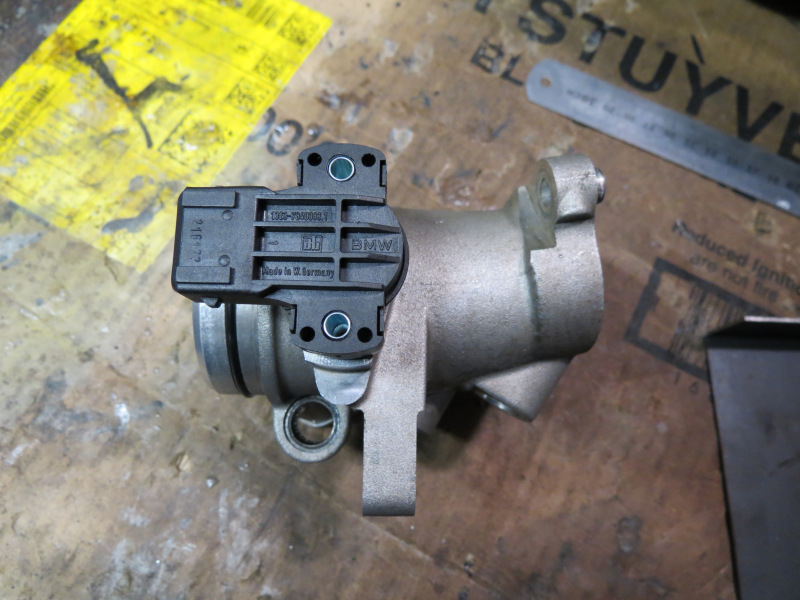 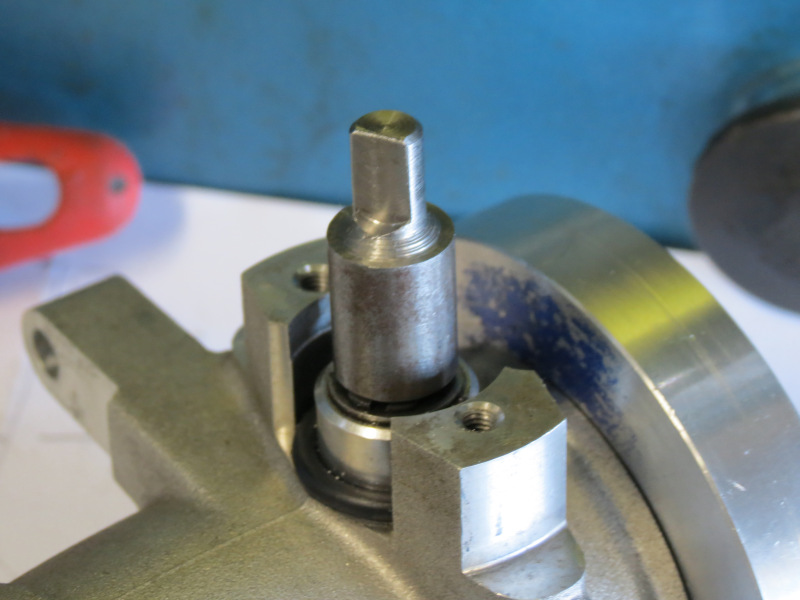 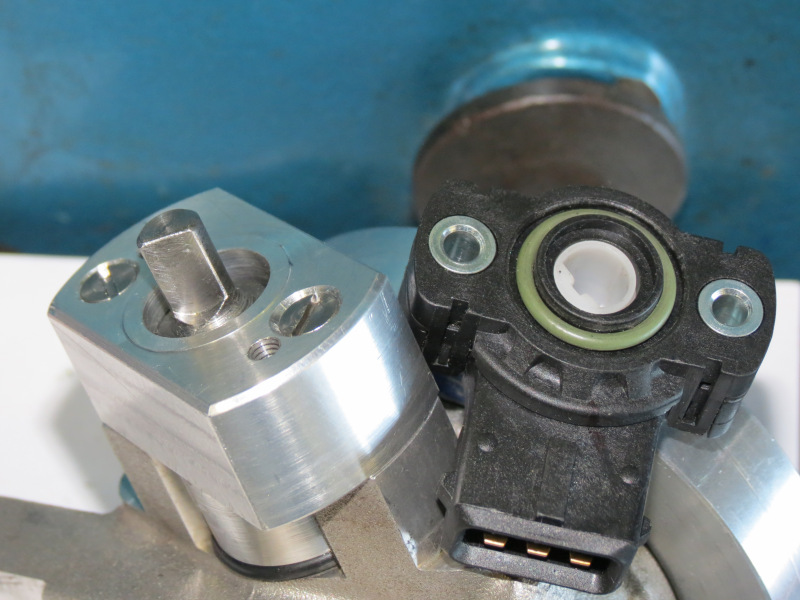 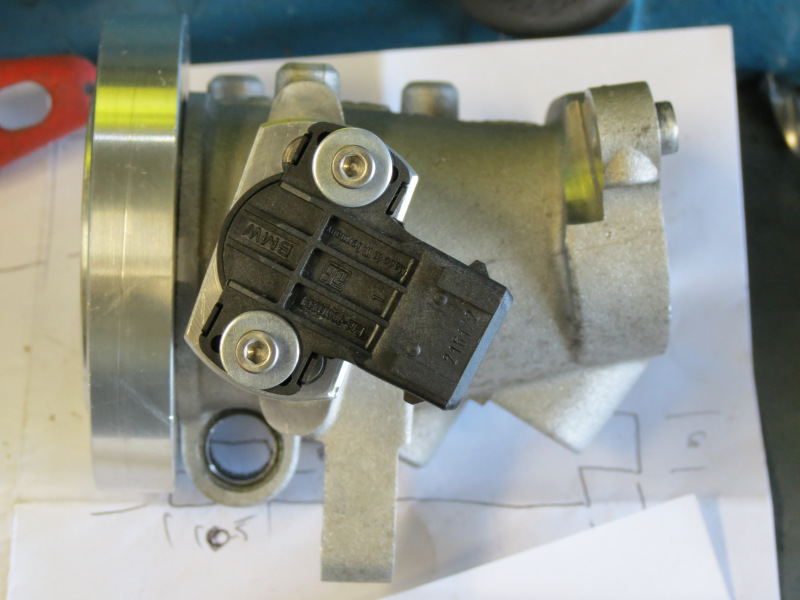 Just after the BMW E46 M3 OEM TPS (Part #: 13637840383) arrived, I noticed that the orientation is not what I needed as it was hitting the air box backing plate with the connector attached. The only option was build a recess into the backing plate or make an adaptor, seeing that the extra welding will destroy my idea of a clean look and the fact that I have access to a milling machine these days, I opted to make an adaptor that will change the units orientation enough to look neat and move the connector away from the backing plate and make the internals water tight from the shafts side at least. Seeing that the TPS body will be moving away from the original throttle shaft I had to extent it with another adaptor, this allowed me to make sure the flat surface on the shaft is in the correct position to allow full movement of the TPS. Sill Stands Seeing that the car is being transformed from a tarmac vehicle to a gravel vehicle, I felt it is absolutely necessary to make a set of Sill Stands for the car, unfortunately I'm unable or not willing to weld to the current paint covered sills, I'll make some special brackets that will be fastened to the bottom of the roll cage floor supports. While I was busy designing this stuff, I decided that I absolutely need small buckets on each stand to place wheel nuts in, nice and safe from the gravel which likes to end on the threads. Once I'm waiting on something again I'll continue with these. Brake Rotors 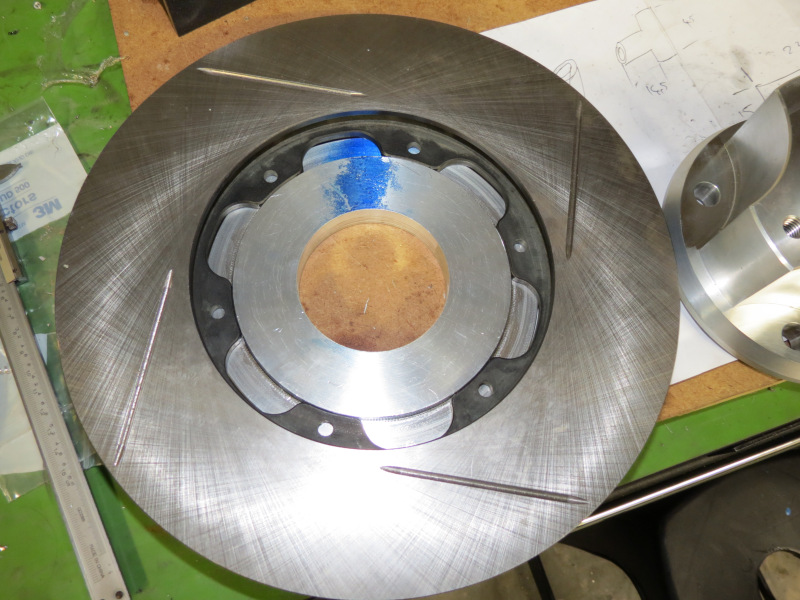 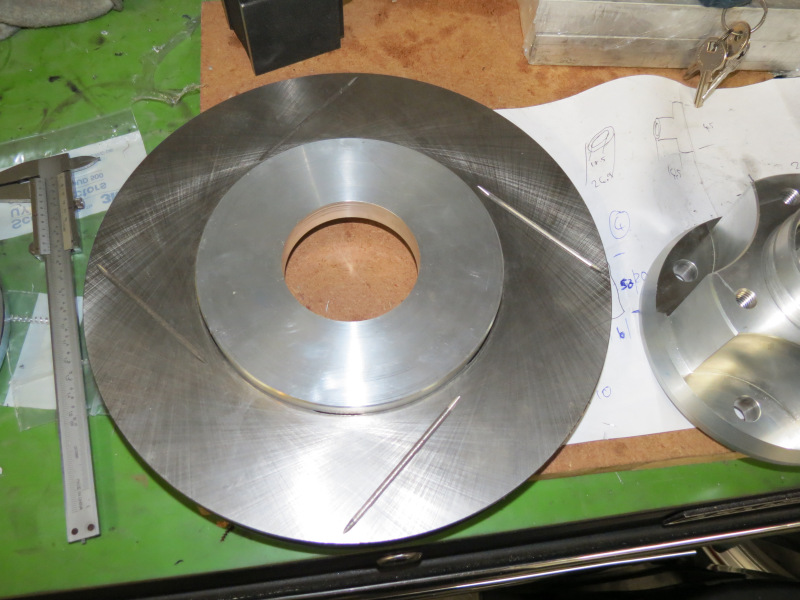 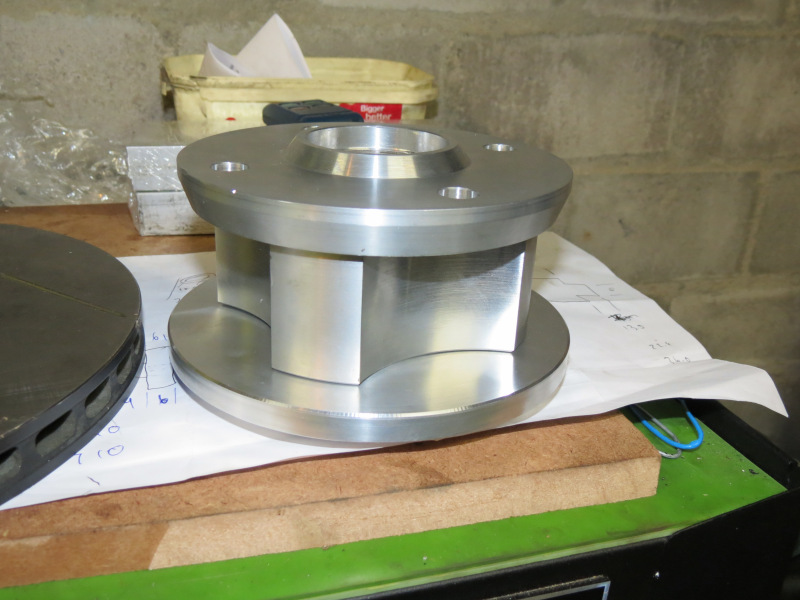  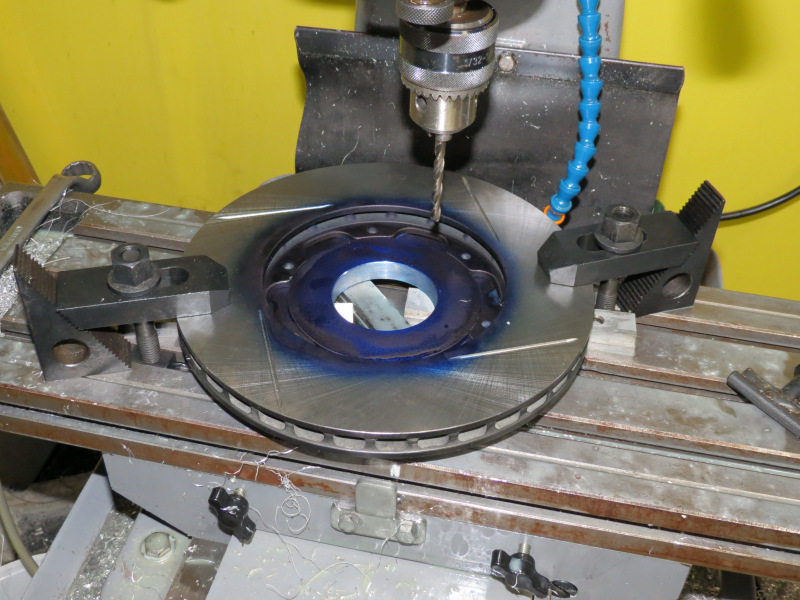    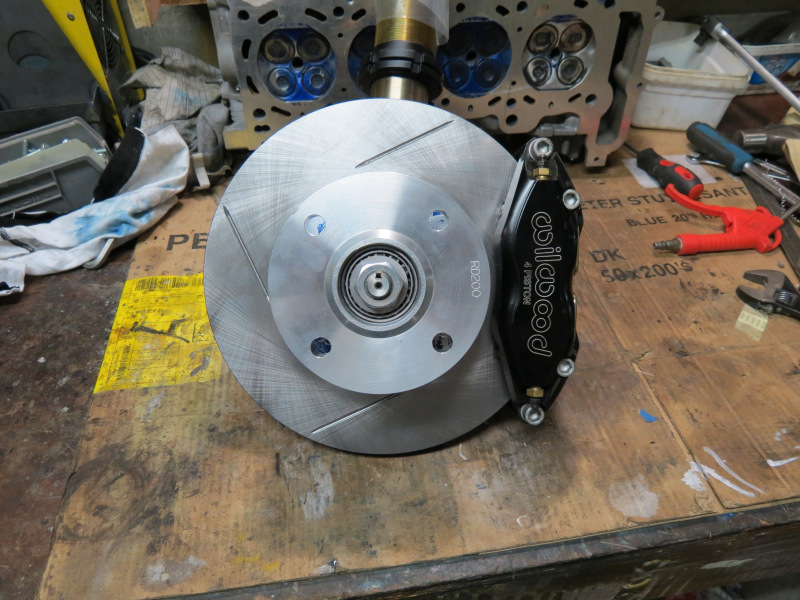   With the rotors sitting on the spares shelf, I developed quite an itch to mount these to the new aluminium hubs. But again the issue regarding the rotary tables voyage over the vast waters was placing a burden on these, but I quickly decided spending the extra money and effort on making a third hat/bell would pay off in the long run. For that I was more than willing to spend the extra R60 on extra slice of 150mmx15mm OD Aluminium. This units will be machined exactly as the other two units, the only difference are in the holes, which will be drilled by hand on this once versus the rotary table on the final two units, seeing that I'm not worried about thousands on the mock unit. Next StepsMount the callipers, while I wait for the rotary table, build lower control arms, finish air box, make wheel spacers, do a few wiring changes and hope for the best.
Posted on: 2013/5/14 13:56
Edited by racetech on 2013/12/23 11:31:31
|
|
|
|
|
Re: racetech's 1200 SR20VE Project |
|
No life (a.k.a. DattoMaster)  
Joined:
2002/10/28 6:49
From under the Firmament LOL no twiglight effect BS
Group:
Registered Users
|
really impressive work, great choice on Esky billet hubs.
If you ever get the chance of a vid and sound would really
be something to listen and watch before going to bed :)
Posted on: 2013/5/14 14:07
|
|
_________________
"Australia" is formed by all its geographically listed territories "including" Norfolk, Christmas & Cocos Islands. The word include excludes all else before it therefore you have no legal rights.
|
|
|
Re: racetech's 1200 SR20VE Project |
|
|
Guest_
|
I wish was tarmac but still such an awe inspiring build.
Posted on: 2013/5/14 14:12
|
|
|
|
|
Re: racetech's 1200 SR20VE Project |
|
Home away from home Joined:
2009/4/16 10:37
From Cape Town, South Africa
Group:
Registered Users
|
Datto Build Fixing the List IIIHaving a look at the previous updates thing to still do, I actually managed to almost accomplished what I wanted to finish in the last month. The list is almost completely done, well in the next month I'm pretty sure I would be done with all the items on the list, then only the new additions will have to be sorted, but more of that later. Without further delay, let's look how I spend my days the last month, with a sore throat as I had my tonsils removed, this can be seen as either a bad thing or a blessing as I actually had a little more time in the garage than usual, but it came at huge discomfort and pain. Front Struts 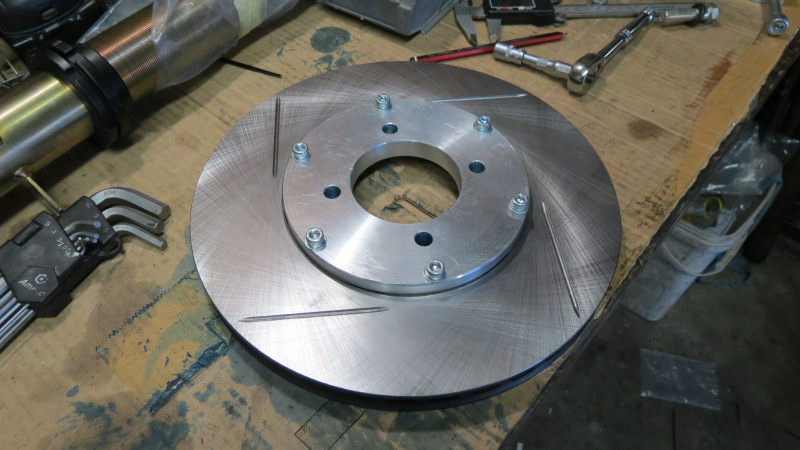 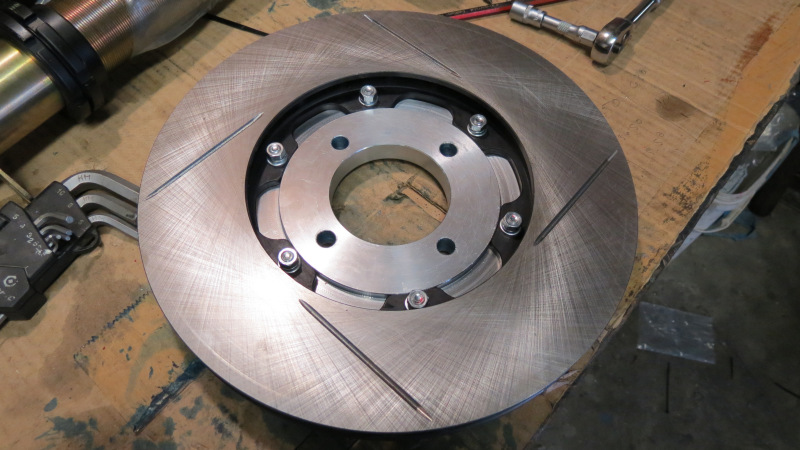   All the machining is finally done on the calliper mounting brackets, a lot of lessons were learned on these units when it comes to working with a milling machines, considering the one unit had to be remade as I had the misfortune of braking a small drill bit in one of the holes, this little bugger caused me to abandoned all hope of saving it and had to start from scratch. But as they say we learn from our mistakes. 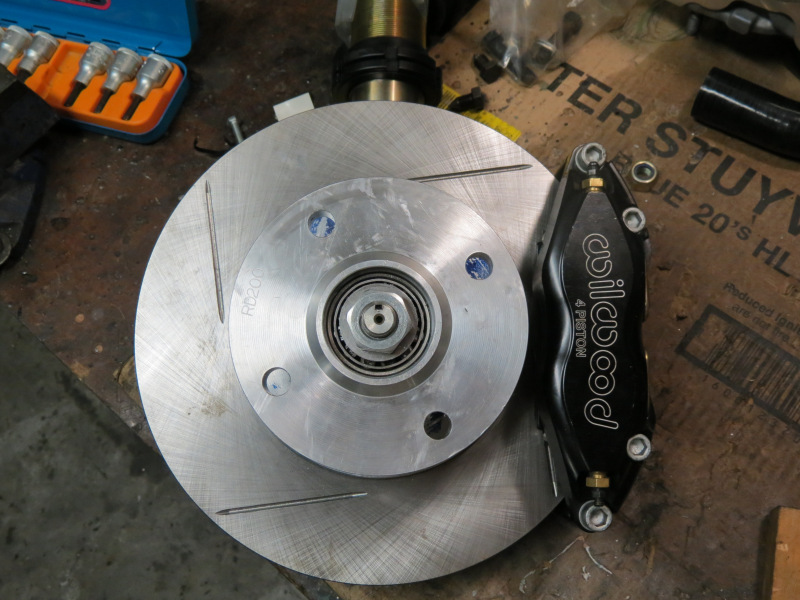   Final assembly of the rotor, hub and bells was also done, also took the time to make a quick design for the wheel speed sensors, just waiting on a piece of material and I'll make the final units. The only outstanding thing besides the wheel speed sensor bracket to make for the struts are the steering arm mounting bolts, as a normal bolt is hitting the rotor hat to hub mounting bolts, I'll have to use counter sink Allen cap to make space and the just half nuts on the other side to make double sure they will never come loose. Front Lower Controls Arms 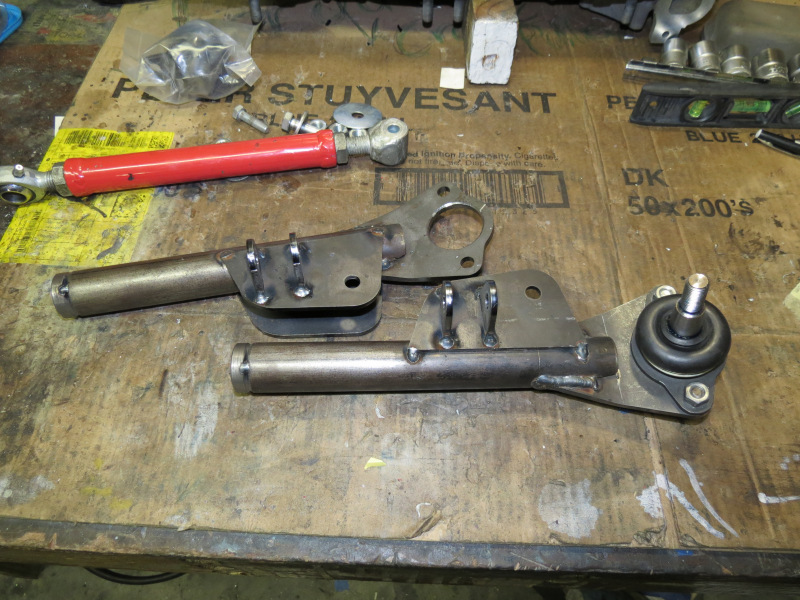 After a lot of measuring and decision making, I decided to build a set of LCA's which would be of such a length that I'm able to adjust to zero camber, seeing that I have to make some wheel PCD adaptors from 108 - 100 PCD, I can just as well mount the strut in such a way that the wheel is at zero camber on ride height with the camber/castor plates almost to the most outside adjustable position, the rest of the space between outer wheel and flare will be filled with the PCD adapters, rather all this than a setup that always have a lot of camber just to fill the empty space.  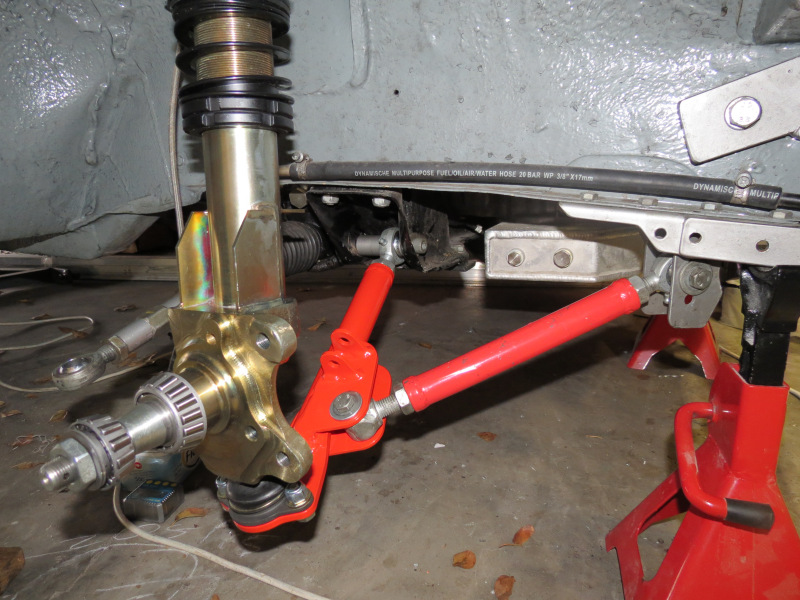 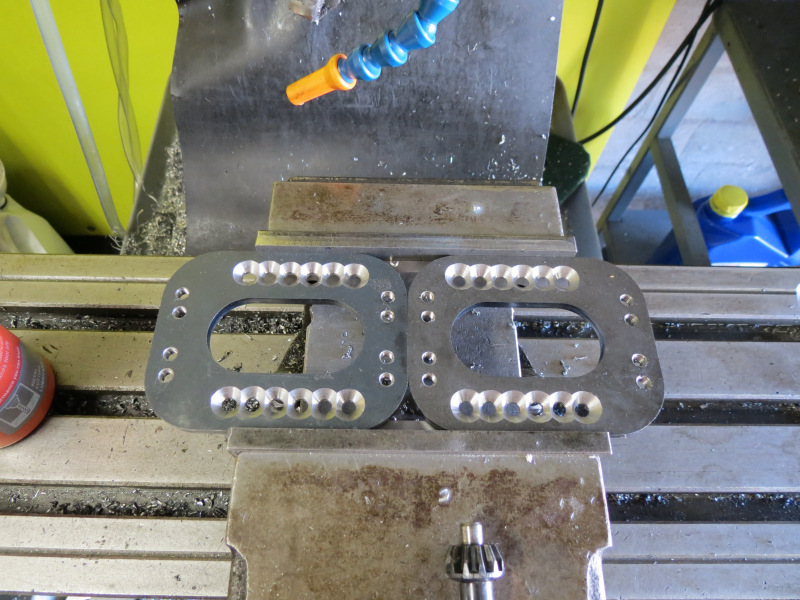  Once all this thinking was done, I just had to wait for the laser cutting and machining to arrive for the sparks to fly, once you have spent enough time to have all the measurements at hand, it's quite fast to build a set. I opted to just tack all the pieces in place, fit it and make 100% all is in order before I turned up the amps and MIG welded the pieces in place. I opted to powder coat them as my father is busy recovering from an hip replacement. Luckily for me I was able to retain the previously made track rods, which saved a lot of work and time, just the colour that is different from the LCA's. Rotary Table   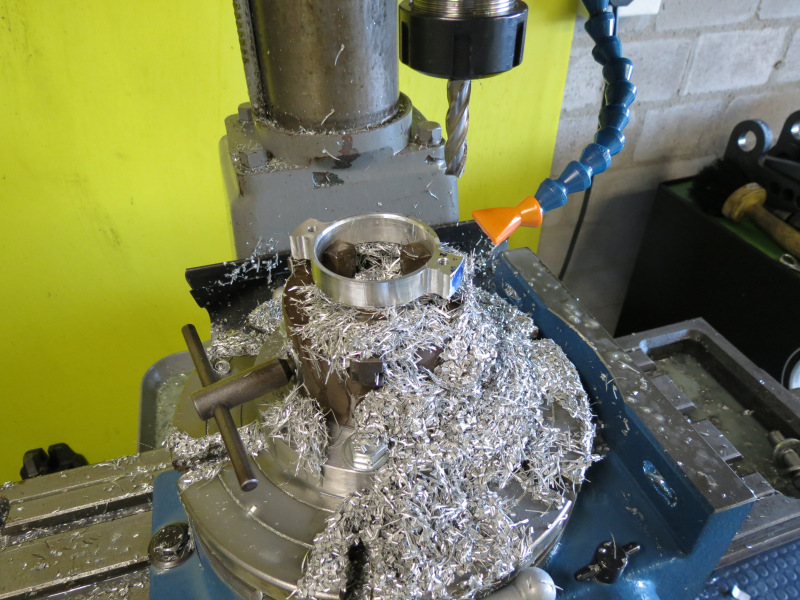 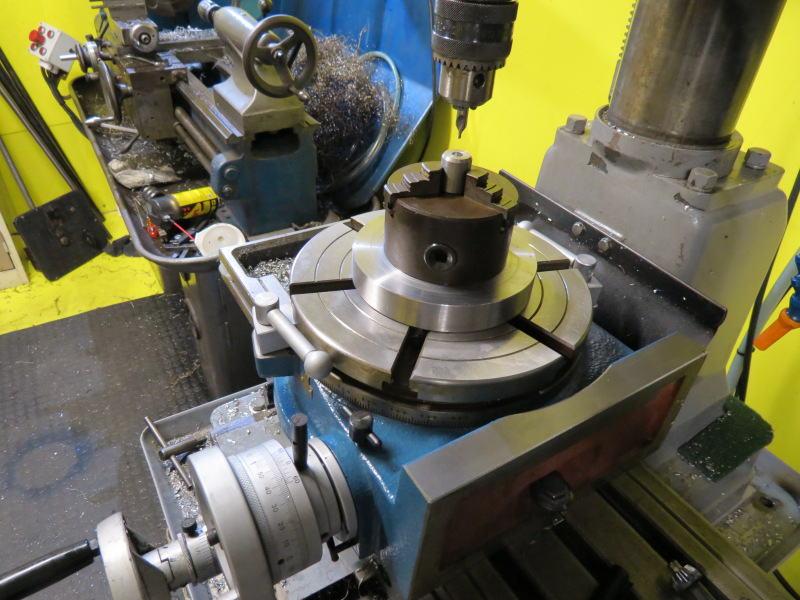 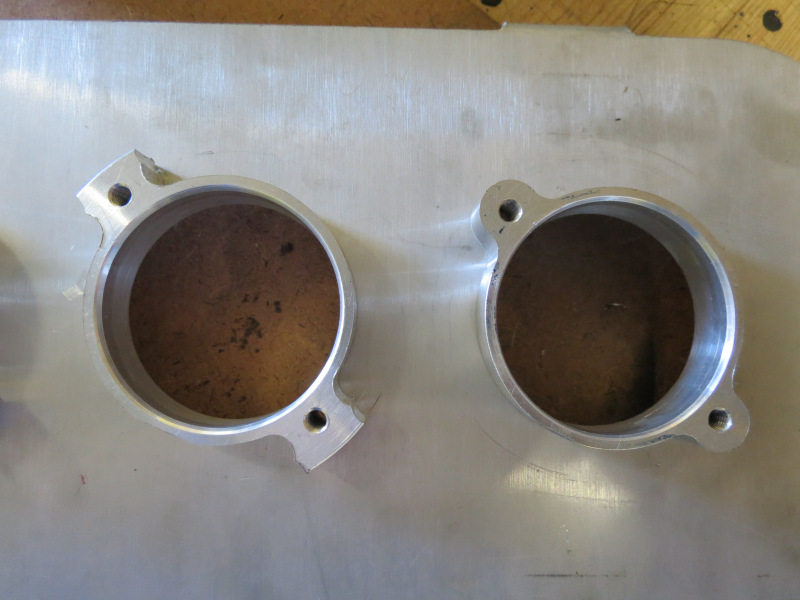   Seeing that me and my brother invested a little of our project money to buy a rotary table, I just had to think of something to use it, I decided to remove all the unnecessary material around the flanges between the ITB's and Air box back plate. The idea was good, the end results are good, but the time taken was allot. I can understand why milling work is so expensive, it takes ages and you need allot of different tools per job and these aren't exactly cheap.  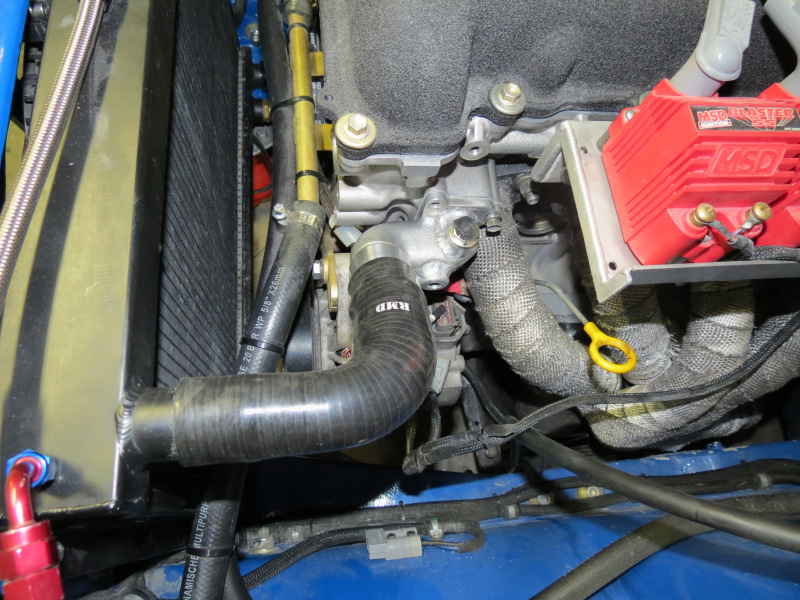  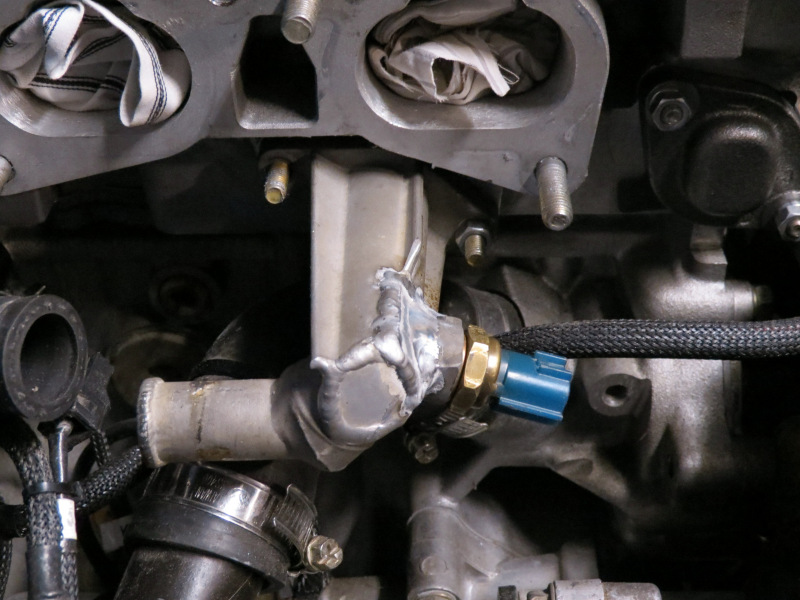 Since I had to have mounting tabs and the flanges weld, I decided to extend the water outlet on the head, to use a stock 90 degree silicone pipe that reduce from 35-32mm, now I'm finally happy with the pipe, funny how the smallest things can work on your nerves. While all of this was going on, I also moved the water temp sensor on the cold side of the head to allow the ITB's to be removed and mounted without firstly removing this unit, just a little something which could keep the tools not flying around. ITB's   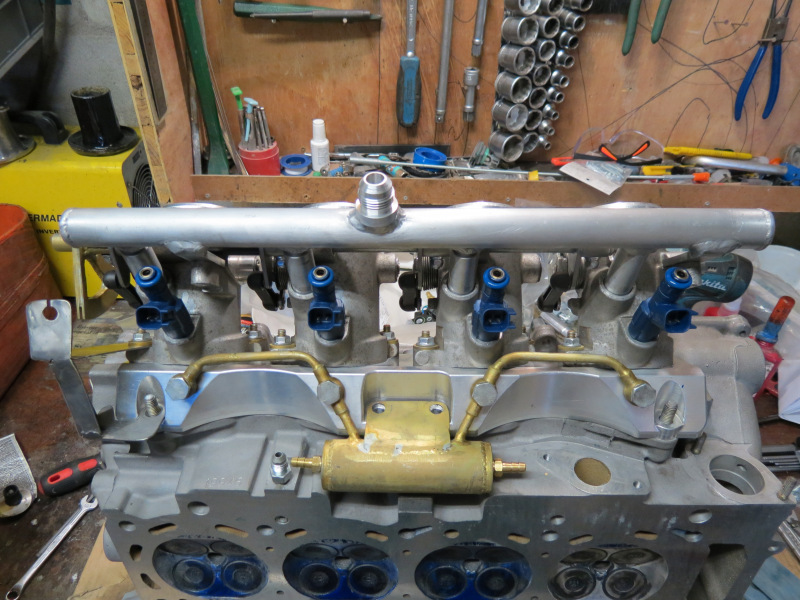  Final Assembly and installation is done on the units, just the small things to finish. I took my time assembling these as from previous experience, you have to be very specific with everything around ITB's as the smallest thing can cause you to remove or strip the lot to redo. One of the reasons I moved the temp sensor slightly. Everything went as planned, even had a brand new accelerator cabled made in under 2 hours, well all good things comes to an end as they say. Well I installed bigger O rings for the fuel rail as was originally supplied with the units, I installed the setup for testing, had the high pressure pump running for about 10 minutes at 3 bar, no leaks. Everything ready for final installations, finished off a few small things and installed everything the following day. 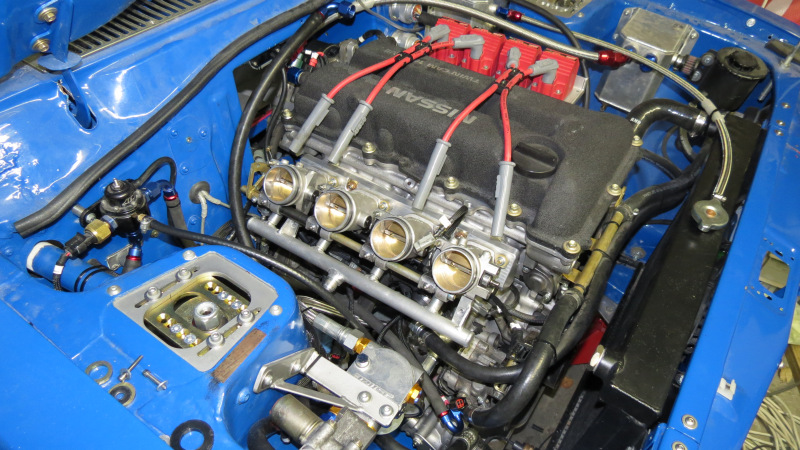 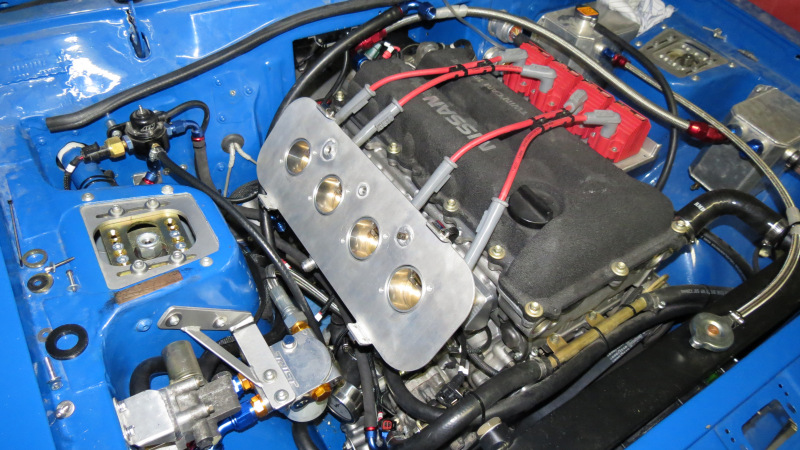 Now you can imagine my face by this time, smiling from ear to ear because the motor will be running for the first time in 5 months. Ready to set the timing etc., once I switched the ignition on all hell broke loose around the injectors with fuel pouring out. A few hard words were thrown around, one thing in life that pisses on my batteries is stuff just failing or acting up without any apparent reason, especially if it was tested in perfect working order before. At the end of the day it turned out that the new O-rings are just too small and I needed a set of 7x4mm units, but as it was Friday evening, I had to wait for Tuesday for stock to arrive. 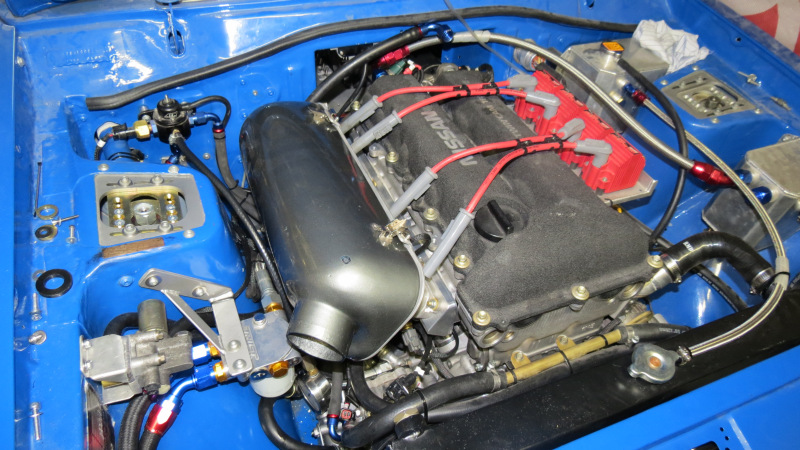 We continued setting the CAS timing, once the new O-rings were installed we proceeded in starting the motor, pumps on, no leaks, well this was expected as the new O-rings went into the rail so tight. Once my brother opened the butterflies slightly the motor roared into life, without drama, damn I like it when things can be relied on. I must admit I had some help, without the LinkECU's functionality things would be a lot harder, just the mere fact that I can test outputs does make life easier. Every time I work with the thing, it just makes more and more sense to not waste money on "Proudly South African" managements, there is a reason way you pay for what you get.   The next steps is to finish the Velocity stacks and sort the idle control valve out, as it is either broken or I need a degree in setting this thing up, because with the single throttle setup idle control was working nicely, but not anymore. Steering Arms Well well, during this whole exercise I almost lost a finger, let me explain why you never should get comfortable in front of machines with teeth or is strong enough to swallow body parts. Seeing that the steering arms was the last big stumbling block on the front suspension that had to be overcome, I was quite eager to get this done, first off I made the bushes that bolts to the strut followed by the ones with the taper for the tie rod ends. Yes this time around I decided I want to simplify things and not use rod ends and adaptors, but rather standard rack ends, shortened and threaded to accept stock toe rod ends. With this configuration I can drive down to the local parts store, buy a set of tie rods and rack ends go home and within an hour have shortened rack ends ready for the spares box. 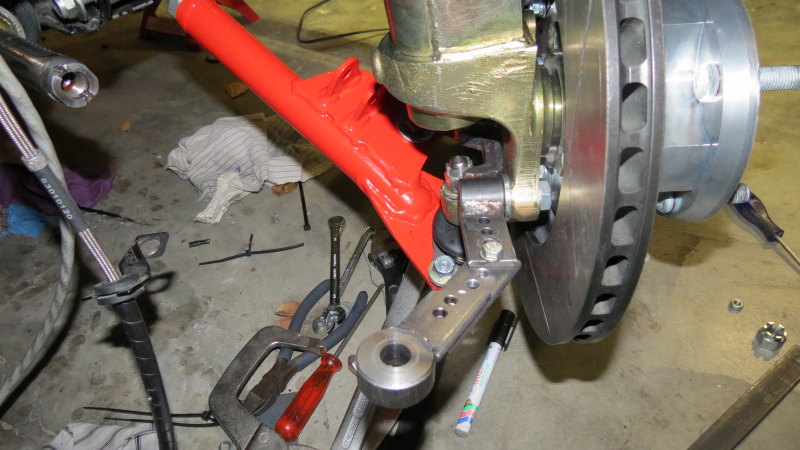 Everything started with finding the best position of the tie rod to at least have some sort of Ackermann effect, only allow travel of the wheel over the full travel of the rack, while keeping the centre points in the correct places to aid return from full lock and minimize bump steer. All of this was accomplished with a few pieces of flat bar moved around until everything worked, and this is where the accident happened, seeing that we decided to cut the old rack ends shorter to weld one of these flat iron pieces to it, I took a bolt to the bandsaw to cut it off, but rather than holding it in place with the correct tool, I held it in my hand, it caught and tried sucking my finger in and this is where the fingertip and the fine tooth band saw blade made contact. Since I wanted this done the evening in order to order the correct rack ends the following day, I decided to not get stitches and nurse the finger to get it to stop bleeding. Well as murphy wants it, just as I get it to stop bleeding and the pain levels acceptable, I hit it against the inner door as I moved my hand out after turning the steering wheel for my brother. Just a few things outstanding before I can put the car on its wheels, well if this weekend is a success, I'll be putting it on its wheels at the end of it. Let's hope for the best.
Posted on: 2013/6/7 14:19
Edited by racetech on 2013/12/23 11:30:10
|
|
|
|
|
Re: racetech's 1200 SR20VE Project |
|
No life (a.k.a. DattoMaster) 
Joined:
2006/7/12 1:44
From Cape Town ZA
Group:
Registered Users
|
In all honesty, while they might not have the features the over the seas expensive managements have, some of the "Proudly South African" managements are every bit as reliable and easy to set up as any others out there. I've had various of them in my possession over the years and have never had difficulty to start any car I wired myself. Admitted, there's a bad apple here and there, but they are well known and easily avoided. It's a little disingenuous to compare local ECU's to the Link, since they are designed to cater for the market over here. On a level playing field no ECU can make more power than another if they are equally well tuned.
I'll be trying my hand at a Perfect Power XMS5 soon, which is packed choc full of features, still not on the level the Link might be, but the guys are having great success with it and it has some very cool features comparable to and over and above others, notably using a speed sensor input you can have traction control, street dyno and others. It has closed loop lambda with long term automatic tuning ability, closed loop boost control and it will keep logs of anything in the ECU either internally or in a laptop plugged in. It 8 fully configurable auxiliary outputs on any of the values the ECU reads and or produces, with the option to chain them together with if/and/or. It also now has digital display out puts for up to 8 digital displays for any of the values in the ECU reads or produces, with the option to mirror them for headsup display. This all for around R3800 which includes the ECU and an ignition amplifier which in itself has over current and heat protection with LED indication of internal status. Not bad if I might say so myself.
On another note, I love your build, have been following it since the beginning and every time someone talks down on our little cars I point them towards this thread so that they can see what can be accomplished with enough dedication and time. My own car has been gathering dust in the garage for 2 years now, mostly due to work commitment on a project that is now in it's very final implementation stage, so I'll be starting work on it again soon. I hope we can have a get together so I can look at this little monster in the flesh. I just missed it when it was standing at Profit having it's exhaust made some time ago and might have saved you ending up with that bugger up...
BTW, if you ever decide to go forced induction, I build and have built a bunch of turbo manifolds for quite a few guys down here in Cape Town and elsewhere in the country. One or two of the fastest on the drag strip has run and will soon be running my manifolds, one of which will be a contender for the fastest turbo charged 4 cylinder car in the country(Toyota 3RZ motor with a turbo the size of a VW beetle). Will be glad to help and show you a few tips to build one yourself, it's really not rocket science so to say. I'm a computer programmer myself and cars is my hobby, well at least when I can practice it...lol
Posted on: 2013/6/7 23:22
|
|
_________________
1200 GX Sedan
New(being installed)
4AGE 20V NA
Old
4AGZE 16V turbo
196.5KW/283NM
800m - 200km/h
400m - 12.3s
|
|
|
Re: racetech's 1200 SR20VE Project |
|
No life (a.k.a. DattoMaster) 
Joined:
2007/6/15 10:47
From MOOROODUC. Victoria
Group:
Registered Users
|
Great work, great write up .... we all do dumb things with sharp tools - looks like you were lucky this time
Posted on: 2013/6/7 23:36
|
|
_________________
Red 1200 Coupe (Build: DEMAC's 1200 Coupe)
Blue 1200 Ute, CA18DE Auto (Build: DEMAC's 1200 Ute)
Green 1200 Sedan (Build: Kermit the beat up sedan)
Green Sedan #2 (Current build: DEMAC's 1200 Sedan)
|
|
|
Re: racetech's 1200 SR20VE Project |
|
Home away from home Joined:
2009/4/16 10:37
From Cape Town, South Africa
Group:
Registered Users
|
kululadotgroen, I'm not the sort of person that tells everyone local management are bad without knowledge, we sold a XMS4 Perfect Power unit and a Gotech to upgrade to the XMS 5 units, which turned out to be a piss poor product, we even uploaded vids to youtube showing how the uits loose spark with there new "improved igniters" if you are running a distributor. The whole thing was a joke.
It costed me a season as the now ex blue Datsun I was using lost power randomly on the Gymkhana tracks, costing me run after run and hundreds of rands. My brother lost more than 6 months of competition due to the above, eventually he gave up on any hopes of scoring a single point in his championship.
We sold the XMS units back to PP at a total loss and bought Megasquirts, a lot more bang for buck.
If you want to spend your money wisely, look at the MegaSquirt products. I agree no ECU can make more power than the other and I will never say that, but the way interact and control things is another story, the ease of use, limits, control etc.
Gotech, just to give the other people some insight into what I call local:
They rave about launch control as a feature on their website, not in beta or anything, well you activate it, the computer retards timing to keep the motor to set launch rpm, launch and all of a sudden the motor does not want to deliver power. If you go and have a look at the timing, the unit does not revert back to the main ignition table, it sit stuck at some random ign value.
We used everything except Spitfire, but with all our experience, the only one I'll use to run my petrol weed eater is a dictator. It basic, but the features you pay for works.
Posted on: 2013/6/10 7:56
|
|
|
|
|
Re: racetech's 1200 SR20VE Project |
|
No life (a.k.a. DattoMaster) Joined:
2006/7/12 1:44
From Cape Town ZA
Group:
Registered Users
|
Not trying to pick a fight if that is what you are thinking.
I make kits for converting the 1400's to 4AGE 16v/20V motors(mounitngs, water plates, 60-2 wheels and so on), a bunch of them running the XMS5 and appart from that there are Lexus V8(turbo charged as well), VW 8V's and turbo charged cars I personally know of who all run the XMS5 unit with no issues, none at all. One thing we did pick up is that their own 4 channel ignition amplifiers are crap and tend to give issues(they have amperage transistors in that can't take the punch), the 2 channel ones are perfect no issues there. Would love to see a link to the video if possible though.
Just wondering, if you install a management system of this nature, why do you still use the distributor and not go wasted spark?
On my own cars I've only ever used Dicktator(up to now), and if I want to build an airplane and it needs a ECU, I will use this, reliable as anything out there. If something does go wrong, you open it and solder back a 1k resitor most of the times, as they use those as a kind of fuse to protect the unit against short circuits and so on.
Go-Tech I would never use, lost maps, spikes in maps, odd behaviour as you describe, name it. Spitronics is a load of nonsense, they used to sell it as Joker down in the Cape and from those days it was bad, you have to fit resistors to use certain injectors, diodes and all kinds of stuff just to get them to work properly.
Posted on: 2013/6/10 13:05
|
|
_________________
1200 GX Sedan
New(being installed)
4AGE 20V NA
Old
4AGZE 16V turbo
196.5KW/283NM
800m - 200km/h
400m - 12.3s
|
|
|
Re: racetech's 1200 SR20VE Project |
|
Home away from home 
Joined:
2007/12/9 9:17
From windsor, sydney
Group:
Registered Users
|
hey racetech , I haven't looked at your build thread for a while and am very impressed with your machining skills , I too have made many parts on manual machines over the years and I know how much time it sucks up machining radii with the rotary table . so much so I bought CNC machines to make it easier , keep up the good work.
Posted on: 2013/6/23 2:35
|
|
_________________
WARDMAN ENGINEERING
CNC machining
Race Car Fabrication
Suspension, Brake, Drivetrain modification
TIG welding of all metals
0413 595 627
|
|
|
Re: racetech's 1200 SR20VE Project |
|
Home away from home Joined:
2009/4/16 10:37
From Cape Town, South Africa
Group:
Registered Users
|
wards: The only problem with that is the fact that CNC machines are crap expensive, thus it ain't really an option for the hobbyist in RSA. But I would love to have one.
Posted on: 2013/6/24 6:50
|
|
|
You can view topic.
You cannot start a new topic.
You cannot reply to posts.
You cannot edit your posts.
You cannot delete your posts.
You cannot add new polls.
You cannot vote in polls.
You cannot attach files to posts.
You cannot post without approval.
|


;)
;)
;)
;)
;)
;)
;)
;)
;)
;)
;)
;)
;)
;)
;)
;)
;)
;)
;)
;)
;)
;)
;)
;)
;)
;)
;)
;)
;)
;)
;)
;)
;)
;)
;)
;)
;)
;)
 Transfer

;)
;)
;)
;)
;)
;)
;)
;)
;)
;)
;)
;)
;)
;)
;)
;)
;)
;)
;)
;)
;)
;)
;)
;)
;)
;)
;)
;)
;)
;)
;)
;)
;)
;)
;)
;)
;)
;)
