![[Datsun 1200 encyclopedia]](/wiki/upload/wiki.png)
| Revision as of 00:08, 21 July 2011 ddgonzal (Talk | contribs) (->Coil) <- Previous diff |
Revision as of 00:39, 21 July 2011 ddgonzal (Talk | contribs) (->Coil) Next diff -> |
||
| Line 222: | Line 222: | ||
| Bosch HEC715 (made in China) is the aftermarket coil for EI systems, and draws more current (0.41 ohms). Consider using an ignition relay as this will draw 29 amps (I=V/R). | Bosch HEC715 (made in China) is the aftermarket coil for EI systems, and draws more current (0.41 ohms). Consider using an ignition relay as this will draw 29 amps (I=V/R). | ||
| + | |||
| + | MSD Blaster | ||
| + | For multi-channel coil drivers (not stock IE) | ||
| + | Low resistance, quick rise time for high-revving systems | ||
| + | Maximum Output: 43,000 volts | ||
| + | 85:1 windings | ||
| + | |||
| + | MSD Blaster 2/MSD Blaster 3 | ||
| + | Primary Resistance: 0.7 ohms | ||
| + | Secondary Resistance: 4.70K ohms | ||
| + | 100:1 windings | ||
| + | Maximum Output: 45,000 volts | ||
| == Performance == | == Performance == | ||
Revision as of 00:39, 21 July 2011
Obtain an Electronic Ignition distributor from an E15 engine such as from an N12 Pulsar. Fit a drive gear from an A series distributor. Fabricate a hold-down bracket. Plug it in. Cost is about $65 AUD for a used distributor from the wreckers.
Contents |
Sourcing
Obtain an E-series distributor from one of the following engine:
- E15S (single carburetor)
- E15I (Injected, central throttle body injection)
- E16S
- E16I
Any E-series dizzy that has vacuum advance can be used.
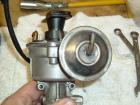
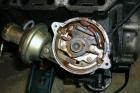
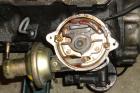
You want to get this type, Hitachi D4R and D4A types. Some Mitsubishi T4T types are also fitted with these guts. This is the same type of distributor used on A12 Sunny Trucks with factory EI, and also used in certain Ford, Mazda and Mitsubishi vehicles. So cap & rotor parts can be purchased in just about any country.

Or this type, Mitsubishi with top-mounted centrifugal advance:

You can also use this E15 "Matchbox" type (same as the B310 Electronic Distributor Swap), which was used on a couple of Japan-market E-series models. It is wired the same externally.

- B11 JDM 8110-[8608] E15S.(GL,LT).F5
- N12 JDM 8205-[8610] E15S.5F.(TS,D,FC)
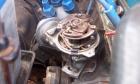
CAUTION: The E15ET turbo and some E16I engines use a different type of distributor than we will consider here. It looks like this, and has none of the familiar guts inside:
D4P distributor -- Easily identified as having no vacuum advance unit. Don't get this type as it requires a spark controller (computer) like the E15I engine ECU.
For more details, see E-Series Distributor.
Instructions
- remove gear from A-series distributor and fit to the E-series distributor
- Create new (or modify existing) housing clamp-down
- Insert distributor with correct timing
- Connect the two wires and enjoy maintainence free driving (no more yearly points changing)
Gear Changeover
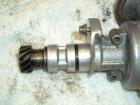
E15 doesn't use a gear, but is otherwise nearly identical to A15 distributor:

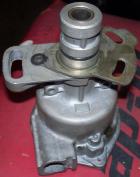
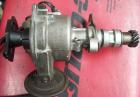
Top dizzy is from E15 to which the gear has been fixed, while the lower one is from A10/A12.

The E15 has been converted for A series. Note that it seems to fractionally longer that the A series when comparing shafts -- but that's because the plate is not installed yet.
Using a 3mm pin punch, remove the roll pin from an A-series distributor. Remove the gear from the shaft. Do the same for the retaining ring on the E-series distributor. Fit the A-series gear onto the E-series distributor shaft. Before drilling a new hole for the roll pin, ensure there is sufficient end float at the top of the gear. (Use a shim or similar when drilling). The clearance required is minimal but is needed to ensure the distributor spins freely. What is the spec for this clearance on the original distributor?
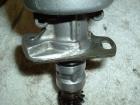
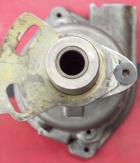
Mounting Flange
You don't need to modify the dizzy casting to install in an A-series -- it fits in just fine. However, the E-series distributor's hold-down bracket doesn't line up with the block's bolt hole.
Solution:
- modify the distributor
or
- rather than modify the distributor, make a simple bracket. Then leave the dizzy's own bracket hanging off the distributor unused. It is cast in with the housing so doesn't come off.
Use any single one of the following methods. For a more OEM look, you can drill, grind, cut and otherwise modify the E15 dizzy casting. But there's no need to modify the housing. Your choice.
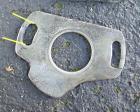
Custom Bracket
For Early blocks the simplest method by far is to drill two 6mm (1/4 inch) holes exactly 42 mm apart:
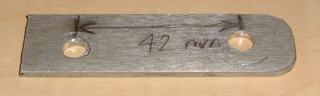
- 2 or 3 mm thick aluminum
- hole centers: 42 mm
- overall size approximately 65 x 20 mm
Fit the destributor in over the stock A12 dizzy plate, and bolt the bracket in like so:

- Use 2 longer bolts, 22mm long
- One bolt goes though the E15 cast dizzy bracket and uses a nut to secure it.
- As a spacer under the dizzy bolt, cut 10mm of 5/16" tubing. There's not enough room there for traditional washers.
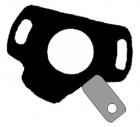
Alternative Idea for Early Blocks
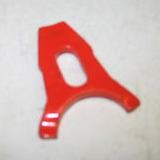
You could weld a tab to the A-series dizzy plate and secure the dizzy with it. Perhaps something like this gray tab added to the black Early A12 bracket:
Custom Bracket - Late Block
You can weld a tab onto the stock Datsun 1200 dizzy bracket, the secure the dizzy from below to the tab. This is not a clamp, but is secured by a bolt. Then the whole unit will bolt to the block very nicely.
For Late blocks (1974 and newer). Use 2 or 3 mm thick stock for the tab. Phunkdoctaspock succesfully used this method.
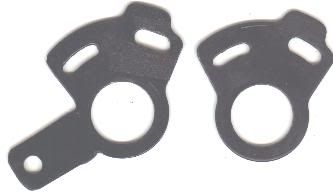
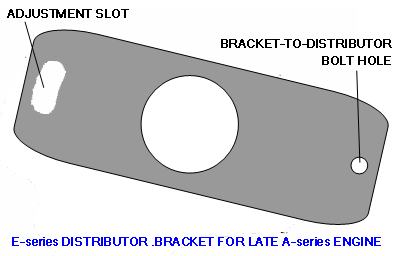
Another way is to make a bracket like this out of 2 or 3 mm thick aluminum. If you have a 1" holesaw to cut the center hole it is very simple to make. Use the stock dizzy brack as a template for the center hole and adjusting slot.
Hold Down Clamp
To secure the dizzy to the block, fabricate a Chevy-style "fork" hold-down bracket to secure it. Use a 8mm spacer on the bolt to the raise the clamp up to the level of the E15 dizzy flange.
However, for the Hitachi DR8, there are a couple of problems:
- the fork tines needs to be 31 mm apart and there is only 2.5 mm on each side if the dizzy to grip. You can grind small parts of the dizzy housing away to make it easier
- The distributor bolt-down hole in the A-series block is only M6 and may not have enough torque to clamp the chevy style (half fork) tight enough.
One idea was to cut an A-series dizzy locating bracket in half, creating a fork clamp. In actual practice this was found not to work, as the half-bracket doesn't go far enough around the dizzy and required more torque to hold the dizzy tight than the small bolt will allow. It 'almost' worked.
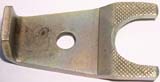
Here is a from-scratch fabricated Fork to mount E15 dizzy to A-series. It attaches to the far side of the dizzy (bolts to the slot) so the hold-down bolt doesn't have to be torqued very much to hold the body tight:

Chevy style fork may or may not work:
One with a long slot as in this photo might fit. It looks like the E15 dizzy has the right surface for the clamps finger's to grab. However there are several distributor types used for E15 engines, so time will tell.
When using a clamp you will leave the dizzy's own locating flange hanging off the distributor unused (it is cast in with the housing so doesn't come off).
You might be able to use an Austin clamp. This is a newer type that may or may not work if you cut one end:
Austin CLAMP HOLDDOWN
$21.95 at minimania.com
Austin Side Clamp
Beattie used an Austin engine dizzy clamp on a E15S Mitsubishi type. It fits right to a Late block (1973-up), and clamps the circumference of the dizzy -- once the original casting flange of the E15 dizzy was ground off. So this requires the distributor body to be modified.
beattie: I ground all of the alloy adjuster part off and used the dizzy clamp off a Mini. Fits perfectly around the dizzy shank and lines up perfectly with the hole! Dont ya just love that?

This is the Austin B-series dizzy hold-down clamp (photos are from 1974 MGB/GT)

Datsun C1 (1000) or E1 (1200) might be similar.
Hacksaw Method - Early Block
For early block engines, this is the most elegant way, but takes the most time.
NOTE: This method doesn't work for Late Block engine because the flange is in the wrong place.
- Hacksaw a bit off the E15 locating flange, so it is the same length as the 1200 flange.
- Create a new slot in the flange to match the early block bolt hole. Drill three holes in the aluminum flange and use a small file to hog it out into a slot
End result:
Use the stock locating flange as a spacer.
For the adjuster bracket unscrew and remove the plate from the A-series distributor. Install onto the E-series and mark it with a scribe on the original alloy (part of the housing) adjuster bracket.
Another way to do is pictured below is slight simpler because instead of slot, you only need to drill and tap one hole. However this puts the vacuum advance in the wrong spot -- it will only work with some of the dizzy types that have a short advance canister.
Hacksaw Method - Late Block
One way is cut the original bracket down to a length where it will rotate against the block. Fit a Datsun A-series bracket onto the distributor.
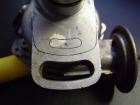
shoom: what I found was that the A15 adjuster plate fitted over the bottom of the [Hitachi] E15 dizzy. funnily enough there is a painted dot on the bottom of the dizzy that exactly matches the location of the original A-series securing bolt. so I just drilled and tapped a hole out and walah, plate fits. I then ground off the original adjustment slot on the body and with a little bit of buffing you cant even tell it was there before.
1. Cut the A15 flat bracket and bolt it like so to the E15 dizzy
2. Then grind away unneeded parts of the E15 cast bracket
Finished product:
Drill Method - Late Block
Also for Late Blocks, you can drill one hole in the E15 dizzy, and use use an Early Block plate to reverse how it mounts to the engine.
- Cut the slot open where the yellow lines are shown, as the Late Block has the bolt hole farther out than this bracket does.
-
- Fit the plate to the dizzy and trace where it overlaps. Drill a hole in the E15 flange where the center dot is
- No need to hacksaw part of the the flange away
-
- Bolt flange on to the distributor with the uncut slot bolted to the dizzy, like so (but with the exposed slot cut away):
- You can fit a through-bolt with nut rather than tapping a hole in the dizzy. Your choice.
- You might need a small-head bolt to clear the side of the block
-
With this mod it will bolt to the Late Block in an appropriate orientation, and allow normal rotation.
Installation
Install the new distributor (see Distributor Installation). Use the old adjuster plate as a spacer. This is necessary as the hole on the gear sits higher than the hole on the shaft. Thus drilling a new hole on the shaft means the gear is further down the shaft (The distance between the two holes can be measured to be approximately the same as the thickness of the spacer plate.
The rotation of the body relative to the block will be different from a stock distributor. for example (depending on your mount mod method):
Wiring
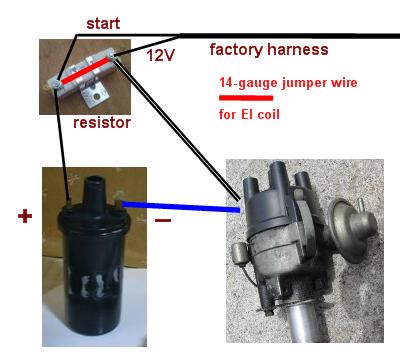
E15 dizzy has two wires. The E15 dizzy wires are long enough to reach the coil, so no extra wires are needed. Connect them as follows:
- Black/White wire to 12V ignition circuit -- the POSITIVE coil connector for EI coils.
- Blue wire to NEGATIVE coil connector
CAUTION: If you are still running the stock 1200 coil, connect to the POSITIVE side of the resistor, not to the COIL POS, which won't see 12V during normal operation. If you engine will start, catch for a moment but die when you release the starter, this is likely your problem.
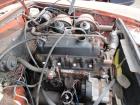
Stock wiring harness. Connect the dizzy wires as shown.
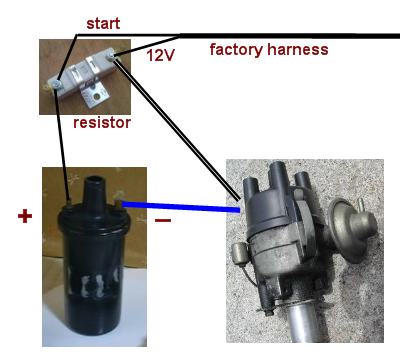
If you have fitted the 12V EI coil (high-energy coil), add a jumper wire as shown in red:
The A-series wiring colours mentioned are from a 1980 Sunny:
- The original white wire which connects from the negative side of the coil to the points is not used and can be removed
- The black wire from the tab on the vacuum diaphragm can also be left off. An optional condensor connects here to reduce radio interference.
- The same applies to the black wire from the positive side of the coil to the body via a capacitor (condensor).
Coil
You can use the stock 1200 coil as long as you leave the ballast resistor in place. Stock coil is 1.3 ohms + 1.5 ohm resistor = 3.2 ohm, so it will draw 3.75 amps at 12 volts (I=V/R). This low amperage is to prevent the contact points from burning out.
Points coil: 3.75 amps
Nissan N12 Pulsar IE coil: 12 amps
For best performance, use the Pulsar coil or a performance coil. It draws 12.9 amps @ 0.93 ohms. Any 1980s Datsun-Nissan EI coil should work just fine. With this type of coil, bypass the stock resistor. Remove it or simply jump a wire (short) across both terminals.
The coil from a Series 2 Bluebird (Datsun 910) or R31 Pintara with electronic dizzy may be used with Datsun/Nissan electronic ignition. Bosch GT40R or GT40RT can be used as a direct replacement for the stock 1200 coil, but is less powerful than the stocker 1.3 ohm coil.
Pulsar Coil aftermarket
Standard Motor Products UC12
Primary 200 Scale .7 - 1.4
Secondary 200 Scale 9.0k - 15.5k

N12 part number 22433-11M00 assembly
22462-11M00 Hitachi coil
22462-N7811 Hanshin coil
Bosch HEC715 (made in China) is the aftermarket coil for EI systems, and draws more current (0.41 ohms). Consider using an ignition relay as this will draw 29 amps (I=V/R).
MSD Blaster
For multi-channel coil drivers (not stock IE)
Low resistance, quick rise time for high-revving systems
Maximum Output: 43,000 volts
85:1 windings
MSD Blaster 2/MSD Blaster 3
Primary Resistance: 0.7 ohms
Secondary Resistance: 4.70K ohms
100:1 windings
Maximum Output: 45,000 volts
Performance
When using the EI coil, regap the spark plugs to 0.44 inches for maximum spark performance.
Has anyone dynoed the different configurations?
Question: Is it reasonable to expect a (slight) increase in power?
Answer: No. Electronic Ignition will make your engine run at peak spark month after month with none of the losses that points have as they wear. Thus you should get performance equivalent to a newly installed and correctly adjusted set of points. Add to that differing vacuum and mechanical advance curves and the difference is probably a wash. However if your tune was marginal before it may pick up a few HP -- but so would new points and properly adjusted fuel mixture w/o Electronic Ignition.
For best performance, get your dizzy recurved. This applies to stock dizzies or EI dizzies. You can do this yourself if you are patient and methodical. Start with Timing.
Fitting Background
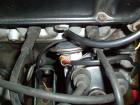
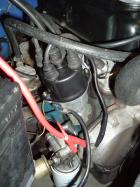
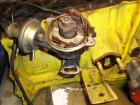
Late block: if you try to line up the hold-down bracket, the vacuum advance hits the block:

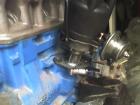
Early block: since the bolt hole is on the other size compared to Late block, you can line up the flange. However it comes nowhere close to lining up with the hold-down bolt hole in the block.
Easy solution: don't try to line up the bracket with the bolt hole.
Early vs Late A-series
Do you want to fit the distributor into an early A10 or A12 engine? Or a later A12/A14/A15?
Clamp modifications need to be slightly different: Late engine block have a fastening bolt hole about 5mm further out from the dizzy bore hole. Plus the location and shape of the pad is different.
If the E-series distributor is bolted straight in, with a Late Block the vacuum advance canister will hit side of the block. But the pre-1974 block doesn't have this problem. It has the hold-down bolt on the opposite side of the dizzy bore hole. This will place the canister facing near to the opposite position, away from the block.
See A-series Distributor Comparison for more details.
Late Block: limits of rotation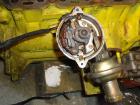
There is plenty of room in a 1200 for any position in-between these two.
Early Block: limits of rotation
This is about 20 degrees of swing, which should be enough to time the distributor correctly. It will actually rotate further anti-clockwise but will cover the bolt hole if you do.
beattie
 beattie's E15E distributor
- with Top-weights (visible centrifugal advance)
- similar to circa 1983 Mazda 626 GC (AU)
- Cap is taller than the usual E15
Cap and rotor: The "standard" E15 rotor is the conventional style, same style as the A-series that is. This E15E Distributor has a round item that is fastened to the top plate where the centrifugal weights are and covers them completely. So the cap needs to be taller then the "standard" E15 item!
I don't understand this bit but I'm leaving it in until I clarify it.
Part numbers are
- CAP-BOSCH GM554
- ROTOR-BOSCH GM555

Need to confirm alternate sources for distributor. Mitsubishi 4G15?
Models
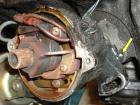
To identify the E-series distributor you have or find, clean the grease off the side of the body and read the numbers:

Top line: Distributor Model Number. This will tell you the kind of EI it is so you can identify the cap & rotor parts.
Bottom line: Nissan Part Number. You can look up the exact application at E-Series Distributor.
In the case of this photo, it is a D4R type and the part number is:
- 22100-P4000 B11 ER 0284-0486 OPTION(E13S+E15S).MT
- 22100-P4000 M10 ER 0285-0486 OPTION.E15S HITACHI D4R83-39
- 22100-P4000 N12 ER 0684-0486 OPTION.E15S.MT HITACHI D4R83-39
ER is Nissan worldwide RHD market.
D4R83
See D4R for Hitachi D4R series
D4A
Hitachi D4A series
Mitsubishi T4T
For more details see T4T
Cap & Rotor
Which cap & rotor you need varies by the distributor type, which is stamped on the distributor housing. See the links above for the various types.