| Revision as of 01:49, 9 May 2015 ddgonzal (Talk | contribs) (->Ignition Switch) <- Previous diff |
Revision as of 02:29, 9 May 2015 ddgonzal (Talk | contribs) (->Ignition Switch) Next diff -> |
||
| Line 95: | Line 95: | ||
| * [[Keys]] | * [[Keys]] | ||
| * [[Locks]] | * [[Locks]] | ||
| + | * [[Ignition Switch]] | ||
| <blockquote><table border=1 cellspacing=0><tr><td> | <blockquote><table border=1 cellspacing=0><tr><td> | ||
| Line 116: | Line 117: | ||
| 5-position switch vs 4-position switch: | 5-position switch vs 4-position switch: | ||
| <br>[http://datsun1200.com/modules/myalbum/photo.php?lid=22011 http://datsun1200.com/modules/myalbum/photos/22011.jpg] | <br>[http://datsun1200.com/modules/myalbum/photo.php?lid=22011 http://datsun1200.com/modules/myalbum/photos/22011.jpg] | ||
| - | <br>Note addition of ACC position. | + | <br>Note addition of ACC position, which power [[Radio]] & Rear [[Defroster]] |
| Portugal market: | Portugal market: | ||
Revision as of 02:29, 9 May 2015
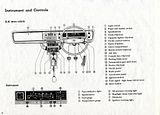
1972 USA Owner's Manual (starting page 8):


1974 Export Pickup Owner's Manual (starting page 6):
Contents |
Selt Belt Warning Light/Buzzer
1972 USA Owner's Manual (page 9):

See main article: Seat belts
Clock
See main article: Clock
Speedometer
1972 USA Owner's Manual (page 9):

See main article: Speedometer
Tachometer
Tachometer was optional.
1972 USA Owner's Manual (page 9):

See main article: Tachometer
Water Temperature Gauge
Also see: Thermostat or Temperature Gauge
Fuel Gauge
1972 USA Owner's Manual
The position of the pointer will vary slightly during acceleration, braking and when the car is going up or down a hill.
Specifications
From the 1973 Datsun 1200 Factory Service Manual.
Ohms Mark
35   Half
Stock Fuel level gauge, ss measured by club members:
- Empty mark: 73-88 ohms input
- Full mark: 12 ohms
ang94541 uses an aftermarket Autometer 3515, which does doesn't match the Nissan sender except at the empty mark. It is designed for the unusual Ford senders.
- 3515 Empty mark: 73 ohms
- 3515 Full mark: 10 ohms
Reference: Forum: Fuel sending unit specs
Also see: Fuel tank (includes Fuel Sender specs)
Indicator/Warning Lights
Also see: Wiring
Ignition Warning Light
1972 USA Owner's Manual
Oil Pressure Warning Light
1972 USA Owner's Manual
Headlight Beam Indicator Light
1972 USA Owner's Manual
Brake System Warning Light
1972 USA Owner's Manual
Turn Signal Indicator Lights
1972 USA Owner's Manual
Switches
Also see: Wiring
Ignition Switch
Also see:
* Keys
* Locks
* Ignition Switch
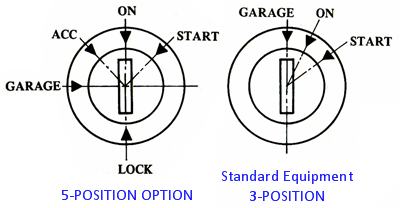
No mention is made of what the OFF position is for. Presumably its use is the same as the "GARAGE" position.
1972 USA Owner's Manual (page 11):
 ignition switch ... is integrated with the steering lock device
...
The "ACC" (accessories) position of the switch permits you to use all of the electrical accessories.
1974 Export Pickup Owner's Manual (pages 9,10): (Optional)
ignition switch ... is integrated with the steering lock device
...
The key can be inserted or withdrawn only when the switch is in the "GARAGE" or "LOCK" position. In the "GARAGE" position, however, the steering is not locked.
(3-position)
The "ON" position allows you to turn on the ignition system as well as all the other electrical circuits.
Notice that the standard 3-position type does not have an "ACC" position.
5-position switch vs 4-position switch:
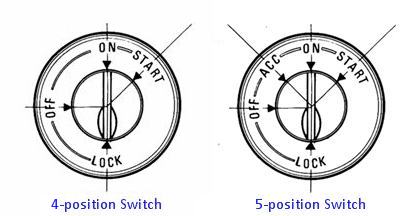
Note addition of ACC position, which power Radio & Rear Defroster
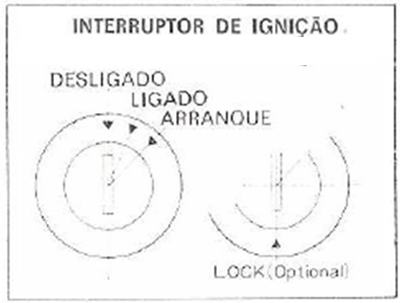
Interruptor de ignićāo [Ignition switch]
Desligado [OFF]
Ligado    [ON]
Arranque  [START]
Light Switches
Also see: Lighting Switch
Light Switch

The key takeaway here is that:
1972 USA Owner's Manual
At the second position, the parking lights are still on and the headlight beams are lit, then if you push the turn signal lever switch forward, the headlight high beams will be turned on ... Pull the lever toward you, and it will be changed over to low beam.
- Knob in the 1st Position, NO HEADLIGHTS for US models
- Knob in the 1st Position, LOW BEAMS work for other countries, including Japan-market
B120 1974 Export owner's manual 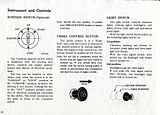
The light switch clearance lights, parking lights, headlights, taillights, license plate light and instrument panel lights.
With the light switch knob pulled on, the following lights will be on.1st position:
Clearance, parking, tail, license, instrument panel lights and then headlight low beams.
With the turn signal switch lever pulled up, the headlight low beams can be turned on.2nd position:
Turning the knob clockwise will darken the instrument panel lights.
Headlights and other lights
If you push the turn signal switch lever forward, the headlight high beams will be turned on.
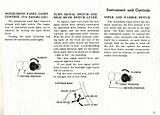
INSTRUMENT PANEL LIGHT CONTROL (For Australia only)
The instrument panel light control is integral with light switch. The brightness of instrument panel lights can be adjusted by turn the light switch knob.(Australia only)
Turn Signal Switch and High Beam Switch Lever
1972 USA Owner's Manual
Hazard Warning Switch
1972 USA Owner's Manual
...first of two positions, parking lights, taillights, license plate lights and instrument panel lights are turned on.
Light switch operation differs between Australia models and other markets. Turn Signal operation (T/S) is the same?
Wiper and Washer Switch
Horn
Just press the button to sound the Horn.
1972 USA Owner's Manual
Parking Brake Lever
1972 USA Owner's Manual
If the ignition switch is on when the parking brake lever is applied, the brake warning light will glow.
Heat Glass Switch
Optional equipment.
1972 USA Owner's Manual

![[Datsun 1200 encyclopedia]](/wiki/upload/wiki.png)
