| Revision as of 23:58, 22 July 2016 ddgonzal (Talk | contribs) <- Previous diff |
Revision as of 00:07, 23 July 2016 ddgonzal (Talk | contribs) Next diff -> |
||
| Line 110: | Line 110: | ||
| Turning the knob clockwise will darken the instrument panel lights.<br>http://i297.photobucket.com/albums/mm219/ddgonzal/Datsun%201200/wiki/lights_aus.jpg (Australia only)</blockquote></td></tr></table></blockquote> | Turning the knob clockwise will darken the instrument panel lights.<br>http://i297.photobucket.com/albums/mm219/ddgonzal/Datsun%201200/wiki/lights_aus.jpg (Australia only)</blockquote></td></tr></table></blockquote> | ||
| - | === Turn Signal Switch and High Beam Switch Lever=== | + | === Turn Signal Switch and High Beam Switch Lever=== |
| - | <blockquote><table border=1 cellspacing=0><tr><td>1972 USA [[Owners manual|Owner's Manual]]<br> | + | {{OwnersManual|12||Pull the lever toward you, and it will be changed over to low beam}} |
| - | [http://s297.photobucket.com/albums/mm219/ddgonzal/Datsun%201200/owners_manual/1972/12.jpg http://s297.photobucket.com/albums/mm219/ddgonzal/Datsun%201200/owners_manual/1972/th_12.jpg]</td></tr></table></blockquote> | + | |
| === Hazard Warning Switch=== | === Hazard Warning Switch=== | ||
| - | <blockquote><table border=1 cellspacing=0><tr><td> | + | {{OwnersManual|13||By pushing the tumbler switch, all the directional lights flash at the same time to warn other cars that some trouble happened in your car.}} |
| - | [http://s297.photobucket.com/albums/mm219/ddgonzal/Datsun%201200/owners_manual/1972/13.jpg http://s297.photobucket.com/albums/mm219/ddgonzal/Datsun%201200/owners_manual/1972/th_13.jpg] 1972 USA Owner's Manual<blockquote><hr>By pushing the tumbler switch, all the directional lights flash at the same time to warn other cars that some trouble happened in your car.</blockquote> | + | |
| - | </td></tr></table></blockquote> | + | |
| See main article: [[Turn_Signals#Hazards|Hazards]] | See main article: [[Turn_Signals#Hazards|Hazards]] | ||
| == Wiper and Washer Switch == | == Wiper and Washer Switch == | ||
| - | <blockquote><table border=1 cellspacing=0><tr><td> | + | {{OwnersManual|12||To operate the washer, turn clockwise and hold the knob for a moment, or until there is enough fluid on the glass to wash off the dirt. Do not operate the washer for more than thirty seconds continuously.}} |
| - | [http://s297.photobucket.com/albums/mm219/ddgonzal/Datsun%201200/owners_manual/1972/12.jpg http://s297.photobucket.com/albums/mm219/ddgonzal/Datsun%201200/owners_manual/1972/th_12.jpg] 1972 USA Owner's Manual<blockquote><hr>To operate the washer, turn clockwise and hold the knob for a moment, or until there is enough fluid on the glass to wash off the dirt. Do not operate the washer for more than thirty seconds continuously.<hr> | + | |
| - | </blockquote> | + | |
| - | </td></tr></table></blockquote> | + | |
| Also see: | Also see: | ||
| Line 134: | Line 128: | ||
| Also see: [[Horn]] | Also see: [[Horn]] | ||
| - | <blockquote><table border=1 cellspacing=0><tr><td> | + | {{OwnersManual|13||Sound the horn by depressing a horn button on either side of the steering wheel}} |
| - | [http://s297.photobucket.com/albums/mm219/ddgonzal/Datsun%201200/owners_manual/1972/13.jpg http://s297.photobucket.com/albums/mm219/ddgonzal/Datsun%201200/owners_manual/1972/th_13.jpg] 1972 USA Owner's Manual<blockquote>Sound the horn by depressing a horn button on either side of the steering wheel</blockquote></td></tr></table></blockquote> | + | |
| = Parking Brake Lever = | = Parking Brake Lever = | ||
| Also See: [[Hand Brake]] | Also See: [[Hand Brake]] | ||
| - | <blockquote><table border=1 cellspacing=0><tr><td> | + | {{OwnersManual|13||If the ignition switch is on when the parking brake lever is applied, the [[#Brake_System_Warning_Light|brake warning light]] will glow.}} |
| - | [http://s297.photobucket.com/albums/mm219/ddgonzal/Datsun%201200/owners_manual/1972/13.jpg http://s297.photobucket.com/albums/mm219/ddgonzal/Datsun%201200/owners_manual/1972/th_13.jpg] 1972 USA Owner's Manual<blockquote><hr>If the ignition switch is on when the parking brake lever is applied, the [[#Brake_System_Warning_Light|brake warning light]] will glow.<hr> | + | |
| - | </blockquote> | + | |
| - | </td></tr></table></blockquote> | + | |
| = Heat Glass Switch = | = Heat Glass Switch = | ||
| Line 150: | Line 140: | ||
| See main article: [[Glass#Heated_Glass]] | See main article: [[Glass#Heated_Glass]] | ||
| - | <blockquote><table border=1 cellspacing=0><tr><td> | + | {{OwnersManual|13||The rear heat glass incorporates a printed heating element to prevent frosting or icing}} |
| - | [http://s297.photobucket.com/albums/mm219/ddgonzal/Datsun%201200/owners_manual/1972/13.jpg http://s297.photobucket.com/albums/mm219/ddgonzal/Datsun%201200/owners_manual/1972/th_13.jpg] 1972 USA Owner's Manual<blockquote>The rear heat glass incorporates a printed heating element to prevent frosting or icing</blockquote></td></tr></table></blockquote> | + | |
| [[Category:Body]] | [[Category:Body]] | ||
Revision as of 00:07, 23 July 2016
Instruments and Controls is a section in the Datsun 1200 Owners manual.
Contents |
Overview
* Seat Belt Warning System North America models
* Speedometer
* Tachometer (OPTIONAL sedan/coupe)
1972 USA Owners manual (Page 09 ... ):
 Seat Belt Lamp, Tachometer and Speedometer
Water Temperature Gauge
1972 USA Owners manual (Page 10 ... ):
 If the pointer stays on the "H" side for more than two minutes, stop the vehicle and let the engine cool down, keeping it at 1,000 to 1,500 rpm.
"H" is past the large middle range (way over to right-side -- the H area).
Also see:
* Thermostat
* Temperature Gauge
Fuel Gauge
The fuel gauge is part of the Cluster Gauge
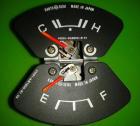
Also see: Fuel Sender
1972 USA Owners manual (Page 10 ... ):
 The position of the pointer will vary slightly during acceleration, braking and when the car is going up or down a hill.
Indicator/Warning Lights
Also see: Wiring
Ignition Warning Light
1972 USA Owners manual (Page 10 ... ):
 Glows red whenever the alternator is not supplying current
Oil Pressure Warning Light
1972 USA Owners manual (Page 10 ... ):
 Stop the engine immediately
Headlight Beam Indicator Light
1972 USA Owners manual (Page 10 ... ):
 The beam indicator glows whenever the high beams are being used
Brake System Warning Light
1972 USA Owners manual (Page 11 ... ):
 Brake System Warning Light
Turn Signal Indicator Lights
1972 USA Owners manual (Page 11 ... ):
 Winkers
Switches
Also see: Wiring
Ignition Switch
Also see:
* Keys
* Locks
* Ignition Switch
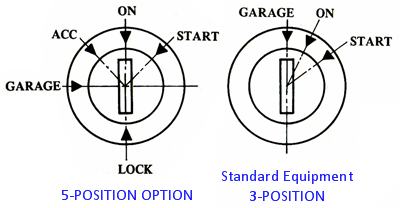
No mention is made of what the OFF position is for. Presumably its use is the same as the "GARAGE" position.
1972 USA Owner's Manual (page 11):
 ignition switch ... is integrated with the steering lock device
...
The "ACC" (accessories) position of the switch permits you to use all of the electrical accessories.
1974 Export Pickup Owner's Manual (pages 9,10): (Optional)
ignition switch ... is integrated with the steering lock device
...
The key can be inserted or withdrawn only when the switch is in the "GARAGE" or "LOCK" position. In the "GARAGE" position, however, the steering is not locked.
(3-position)
The "ON" position allows you to turn on the ignition system as well as all the other electrical circuits.
Notice that the standard 3-position type does not have an "ACC" position.
5-position switch vs 4-position switch:
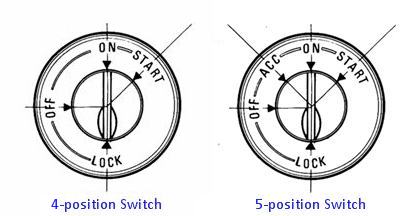
Note addition of ACC position, which power Radio & Rear Defroster
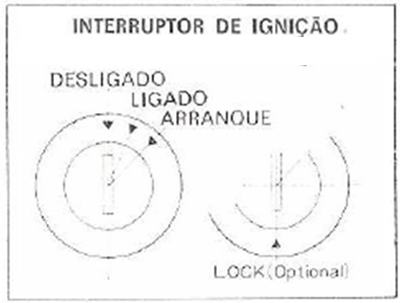
Interruptor de ignićāo [Ignition switch]
Desligado [OFF]
Ligado    [ON]
Arranque  [START]
Light Switches
Also see: Lighting Switch
Light Switch

The key takeaway here is that:
1972 USA Owner's Manual
At the second position, the parking lights are still on and the headlight beams are lit, then if you push the turn signal lever switch forward, the headlight high beams will be turned on ... Pull the lever toward you, and it will be changed over to low beam.
- Knob in the 1st Position, NO HEADLIGHTS for US models
- Knob in the 1st Position, LOW BEAMS work for other countries, including Japan-market
B120 1974 Export owner's manual 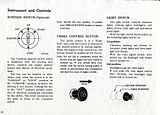
The light switch clearance lights, parking lights, headlights, taillights, license plate light and instrument panel lights.
With the light switch knob pulled on, the following lights will be on.1st position:
Clearance, parking, tail, license, instrument panel lights and then headlight low beams.
With the turn signal switch lever pulled up, the headlight low beams can be turned on.2nd position:
Turning the knob clockwise will darken the instrument panel lights.
Headlights and other lights
If you push the turn signal switch lever forward, the headlight high beams will be turned on.
INSTRUMENT PANEL LIGHT CONTROL (For Australia only)
The instrument panel light control is integral with light switch. The brightness of instrument panel lights can be adjusted by turn the light switch knob.(Australia only)
Turn Signal Switch and High Beam Switch Lever
1972 USA Owners manual (Page 12 ... ):
 Pull the lever toward you, and it will be changed over to low beam
Hazard Warning Switch
1972 USA Owners manual (Page 13 ... ):
 By pushing the tumbler switch, all the directional lights flash at the same time to warn other cars that some trouble happened in your car.
See main article: Hazards
Wiper and Washer Switch
1972 USA Owners manual (Page 12 ... ):
 To operate the washer, turn clockwise and hold the knob for a moment, or until there is enough fluid on the glass to wash off the dirt. Do not operate the washer for more than thirty seconds continuously.
Also see:
* Wipers
* Washer
Horn
Also see: Horn
1972 USA Owners manual (Page 13 ... ):
 Sound the horn by depressing a horn button on either side of the steering wheel
Parking Brake Lever
Also See: Hand Brake
1972 USA Owners manual (Page 13 ... ):
 If the ignition switch is on when the parking brake lever is applied, the brake warning light will glow.
Heat Glass Switch
Heated rear (defrostable) window was Optional equipment.
See main article: Glass#Heated_Glass
1972 USA Owners manual (Page 13 ... ):
 The rear heat glass incorporates a printed heating element to prevent frosting or icing

![[Datsun 1200 encyclopedia]](/wiki/upload/wiki.png)


